Actions are pre-defined system responses following a trigger condition from a form, an event listener, a manual trigger, or a preceding action. Actions serve as the building blocks of a process. Each action constitutes a logical step within the process. Processes generally consist of several actions logically ordered to complete a procedure. Most actions have specific attributes applied that define how the action should function. For more information, see Configuring action attributes.
Actions can be manual or automatic.
Actions are initially categorized into groups based on their typical usage as part of a process. However, you can create new groups, and then rename and move specific actions to different groups so you can organize them in ways that work best for you. For more information, see Actions toolbox.
As you drag and drop actions onto the canvas to build your processes, keep in mind that you can use actions in many ways to achieve your objective. You may want to streamline one process to finish as quickly as possible. You might have another process in which you want to insert several checks to make sure the job is done correctly. There are a number of routine processes you can fully automate as well.
Primary actions serve as the starting point of a process or sub-process. A primary action links an event listener with a process or sub-process. Every process has a root-level primary action or starting point (represented as a lightning bolt in the workflow explorer and the process canvas). For more information, see Using the workflows panel.
Primary actions have few attributes, but are connected to forms or event listeners which are responsible for starting processes. See Creating asset forms and Event listeners.
You can have additional primary actions within your processes. These primary actions represent the start of another process and can be considered a sub-process of the current process. You can double-click these additional primary actions, which will launch the process associated with that primary action (workflow). In this manner, processes can exist independently or be part of other processes.
Actions are the building blocks you will use to design processes, initiate the necessary interactions between systems and participants, identify and resolve dependencies, and move processes toward completion. The right combination of actions will result in increased efficiencies in your business processes, help to insure effective communication between workflow participants, and enable detailed auditing and reporting for each workflow instance.
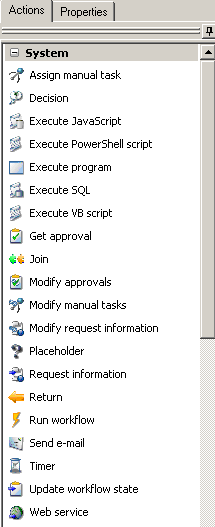
Asset Lifecycle Manager's default configuration includes several logical groupings of workflow actions. The Actions toolbox is on the right side of an open workflow's canvas.

Once an action has been included on a workflow canvas, you can copy the action and its attributes between open canvasses in the Design console. This makes it easy to reuse actions and retain their properties when defining new workflows.
For more information, see Workflows main window.
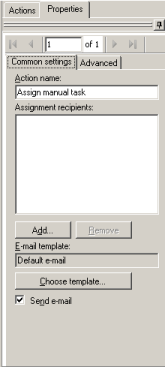
To configure an action's attributes, select the action in the canvas. Once the action has focus, a green frame highlights the action's icon, and its attributes are displayed in the Properties tab.
The Properties tab includes two sub-tabs for configuring attributes: Common Settings and Advanced.
The Common settings tab includes the most common attributes for the action, along with corresponding buttons, text boxes, and/or combo boxes. With some actions, however, required options are also located on the Advanced tab.

For additional configuration options, use the Advanced tab. To edit a specific attribute, click on the row you want to change the value for. You can then type a value into the row, or click a button to browse and select the intended value or setting for the attribute. If you are typing a device name (instead of browsing and selecting), we recommend that you include the fully qualified domain name.

When you use the Check workflow for errors toolbar button
 to validate a workflow, the bottom
validation results pane identifies any actions with missing or
incorrect attributes. To make a change or correction, double-click
the error description. This opens the Properties tab for the
first attribute that needs fixing.
Each action has a unique set of attributes. For information on specific attributes, see the Help topic for that action. Actions are grouped in the following categories:
If you have installed separate process integration modules, they have their own sets of specific actions and corresponding attributes.
Often you will need to add or assign participants in your workflow processes. For example, while creating a workflow you may need to specify approvers, assign manual tasks, add notification recipients, etc. Select the action requiring human intervention (decision, approval, etc.), and then assign the necessary attributes. The action is selected when a green frame outlines the action's icon.
If the workflow includes approvers or task recipients from different domains, a trust relationship must exist between the domains. This enables users from both domains to log into the Web console and complete their assigned tasks.
When you include an action that involves more than one approver, you can decide whether to require all approvers to OK the request, or whether only one approval is required. Use the Properties tab's Advanced sub-tab to do this.
If you specify Each contact must approve, you can also indicate a percentage. If you specify Only one contact must approve, the process will continue as soon as a single approval has been received.
If you include a group, Asset Lifecycle Manager treats the entire group as an individual approver. Once an approval or denial is recorded by any member of the group, the approval is treated as a group decision and other group members can no longer approve or deny.
When the action is called during the course of a process, the participant receives an e-mail prompting them to perform the associated task, and the workflow waits until the participant responds before proceeding.
If you select Field as the contact type and add All who have approved as the participant, all approvers of the preceding action are assigned as approvers of the current action.
NOTE: Before you can assign participants in workflows, you need to have used the Configure Options utility to configure connections to domain users and groups. See See "Configuring users/groups".
NOTE: For the User contact type, when users are passed in to Asset Lifecycle Manager, they are resolved using one of two unique identifiers; the User ID or user name. The first name, last name, and any other parameters aren't used.