When creating a Thinstall project using SetupCapture, we recommend using a "clean" install of Windows. If you don't already have a clean PC sitting around for this purpose, we recommend using a product like VMWare to maintain a clean image of Windows.
With VMWare, you can install Windows into a virtual machine one time and take a "snapshot" of the entire machine in its clean state (no application installed). Then after you have used Thinstall's Setup Capture application to capture an application's install, you can use VMWare to discard your changes and revert the virtual machine to a clean state where it is ready to capture a new application.
The guide below shows how to install and configure VMWare Server with a base clean OS. As of this writing, VMWare Server is available for free from VMWare. MSDN subscribers can also obtain a free license to a similar product from Microsoft called VirtualPC. We recommend VMWare over VirtualPC if you have a choice in selection.
Step 1: Go to the VMWare web site.
At www.VMWare.com you can register for a license, download the installation package, and access documentation for VMWare.
You can find a lot of helpful information about how to work with VMWare here.
Step 2: Register for a VMWare Server license.
The first thing you will need to do is to register for a VMWare Server license. Yes, VMWare Server is free, but you still need a license for it.
Go to http://register.VMWare.com/content/registration.html to register.
Make sure to retain the serial number provided at the bottom of the web page, after submitting your registration, since this is the only time it is provided.
Step 3: Download the VMWare Server installer.
VMWare Server is available for free download at www.VMWare.com/download/server.
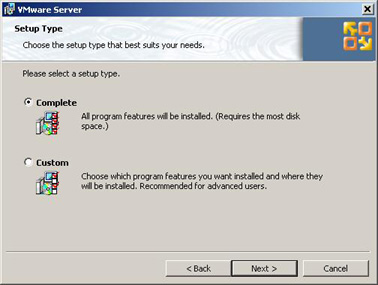
Step 4: Install VMWare Server.
Double-click on the installer. The installation steps are straight forward. Just follow the on-screen instructions selecting all defaults.
If the installer warns you about "Microsoft Internet Information Services (IIS) not installed ...", click OK to continue.

If the installer warns you about CD/DVD autorun being enabled, check the disable box.
When the installer reaches the Customer Information panel, enter the serial number, obtained earlier, in the Serial Number field.
(You may skip this step and enter the serial number later on when you want to use VMWare Server.)
You may have to restart to complete the installation.
Step 5: Launch the VMWare Server Console.
Launch the VMWare console program with the "VMWare Server Console" icon that was placed on the desktop.
Alternately use the menu: Start > All Programs > VMWare > VMWare Server > VMWare Server Console.
In the "Connect to Host" dialog, select the "Local" radio button and click Ok.
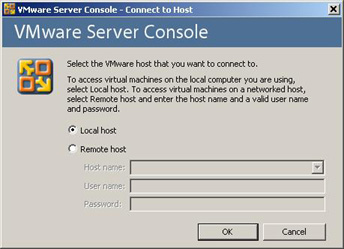
You now should have the VMWare Server Console running, with no virtual machines open.
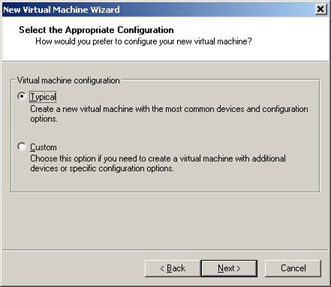
Step 6: Create a new virtual machine.
Click "New Virtual Machine" to bring up the "New Virtual Machine Wizard".
Alternately use the menu: File > New > Virtual Machine... menu item.
Click Next.
Select a "Typical" virtual machine configuration.
Click Next.
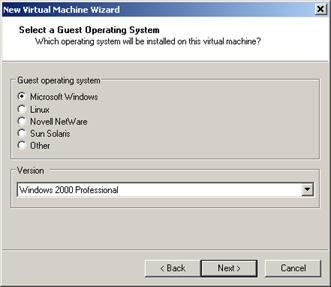
Select the operating system that you will be installing on the virtual machine.
This should be the earliest operating system that you want to run your thinstalled application on.
In this example Windows 2000 professional will be used. This will allow a thinstalled application to run on W2K,WXP,W2K3, and Vista.
Select "Microsoft Windows" and "Windows 2000 Professional"
Click Next.
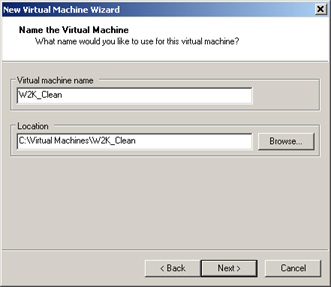
Enter a display name and disk location for the virtual machine directory, such as "Win2K_Clean".
Click Next.
Select "Use bridged networking", this will allow the virtual machine to communicate with other PCs on your LAN.
Click Next.

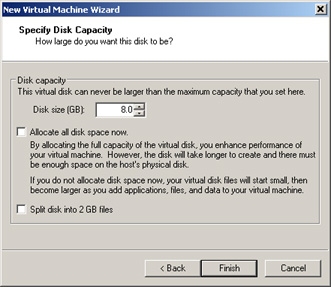
The default of 8.0GB is adeqaute for most uses.
If you plan to capture large application installs, you may want to increase this size to 20GB.
Uncheck to "Allocate all disk space now".
Click Finish.
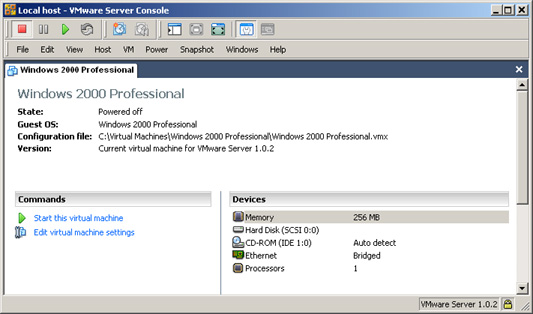
A directory containing several files is created at the location you specified earlier. (Defaults to C:\Virtual Machines).
If you examine the contents of this directory you will find two files of interest. The machine configuration file, 'Windows 2000 Professional.vmx', may be doubled clicked to launch and open VMWare Server Console. Another file of interest is the virtual disk file, 'Windows 2000 Professional.vmdk', which holds the contents of the hard drive. This file will grow as need to hold the contents of the hard drive, up to the limit specified above.
You should now have a fresh new virtual machine.
Step 7: Configure the virtual machine to boot from the CD drive.
A virtual machine is created with a completely empty hard drive and is not able to boot up.
You will need to configure the virtual machine to boot from your installation CD, either physical or ISO file.
Select the VM > Settings... menu to edit the virtual machine settings.
Select the CD-ROM device.
Click once to place a check mark in the 'connect at power on' check box.
If you have a physical installation CD: select the 'use physical drive' radio button, select the 'Host' radio button, and select 'Auto detect' menu item.
Insert the CD into your physical machine's CD drive.
If you will be using an ISO file: select the 'use ISO image' radio button, browse to the location of the file.
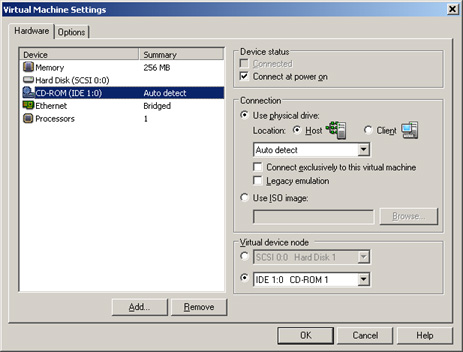
Click the Ok to close the Machine Setting dialog.
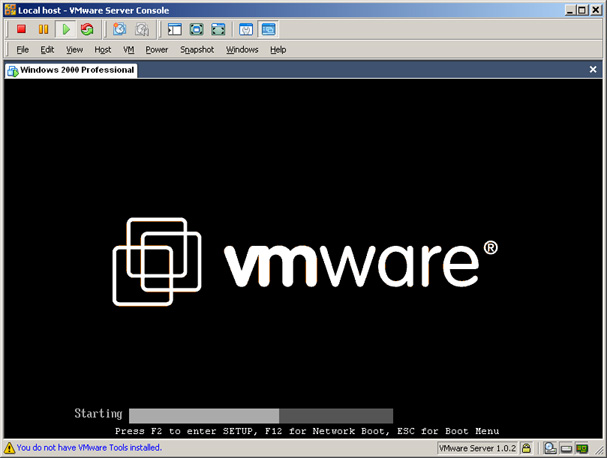
Step 8: Start up the virtual machine and begin installing the operating system.
Select the Power > Power On menu to start the virtual machine running.
At this point you will see the virtual machine's desk top turn black, then the BIOS post screen, and later the installer startup screen will appear.
To interact with the virtual machine you need to click in the virtual machine's desk top. This will cause the virtual machine to 'capture' the keyboard and mouse as input devices. All further keystrokes and mouse clicks will be delivered to the virtual machine, not to your physical machine. To release the keyboard and mouse at any time press the Control and Atl keys simultaneously.
If you see a 'No operating system found' message or 'No bootable CD' dialog, then you need to Power Off the virtual machine (Power > Power off) and change the CD configuration or try a different installation CD.
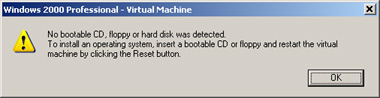
Make sure the 'connect at power on' check box is selected or try the 'legacy emulation' check box (see step 7) .
If all goes well you should see the Windows installer appear and start asking you to make decisions.
Follow the on screen instructions to install the operating system you have selected. Typically this involves creating a new disk partition, formatting this partition, providing replies to the installation program, and waiting around for the installation to complete. When in doubt use the default settings suggested by the installer.
Usually the installation will finish by restarting the machine. Once the machine has restarted, resist the temptation to use the machine or change any settings. You want to preserve at least one copy of the machine just after installing.
Step 9: Install VMWare Tools
VMWare Tools is a set of drivers and services that allow the virtual and physical machines to interact smoothly together.
Select the VM > Install VMWare tools menu to start the installation of VMWare tools.
This will temporarily connect a CD drive to the virtual machine with an installation CD. For Windows 2000, the installer automatically launches on the virtual machine. If it does not appear, navigate to the new CD drive, locate and launch the VMWare Tools installer (something like D:\setup.exe). Accept all defaults from the installer and restart the virtual machine.
Once installed VMWare tools allows you to size the monitor to your liking, drag/drop and copy/paste between the virtual machine and physical machine.
Step 10: Note: This step is optional, it will cause your virtual machine to revert back to the "clean" state each time it is powered off.
Make the hard drive 'Independent-Nonpersistent'
Use the virtual machine's Start > Log Off menu to shutdown the virtual machine.
Once the virtual machine has shutdown, Select the VM > Settings... menu item and select the Hard Disk device.
Click the Advanced button.
Click once to place a check mark in the 'Independent' check box.
Select the 'Nonpersistent' radio button.
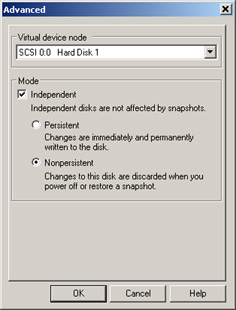
Click Ok to close the Advanced dialog.
Click Ok to close the Virtual Machine Settings dialog.
Changing the hard drive to 'Independent-Nonpersistent' causes all changes to the virtual machine's hard drive go to a separate temporary virtual disk file. When the machine is powered off the file is discarded. The benefit of this is the ability to always return to a clean machine state by simply power cycling the machine. Additionally you power off the virtual machine, rather than wait for shutting down, without triggering a disk scan (or corruption) on the next boot.
Step 11: Preserve your clean virtual machine.
Exit VMWare Server Console and create a backup copy of the virtual machine directory. This will preserve the virtual machine at its clean state. It is very easy to contaminate or otherwise break a virtual machine, sometimes without even knowing it. If you have a back up copy you won't have to wait through the windows installation once again.
Step 12: Adjust the virtual machine to suit your environment.
You may need to change some setting to fit your work place environment, such as network connection settings. Remember to keep the virtual machine in 'Independent-Nonpersistent' mode until you know the changes you are make work. Then Power down the machine, remove the 'Independent-Nonpersistent' mode, Power up, make the changes, Shut down the machine, and return to 'Independent-Nonpersistent'. This technique will minimize the impact of using the machine while not in 'Independent-Nonpersistent' mode. Remember to use Start > Log Off, (not Power off) while not in 'Independent-Nonpersistent' mode, since this may trigger a disk scan upon the next boot.