
Software license monitoring gives you the tools to manage software assets so you can track software usage, monitor license compliance, and control costs in your organization.
IT administrators and software asset managers find it challenging to track product licenses installed on numerous devices across a network. They run the risk not only of over-deploying product licenses, but also of purchasing too many licenses for products. You can avoid these problems by using the software license monitoring console to monitor and report on product licenses and usage across your organization.
The software license monitoring console displays data from multiple perspectives (by products, computers, or licenses) and presents reports in multiple formats (such as HTML, PDF, and CSV). As you filter the data to find the products or licenses you want in a report, click the View as report button to create a report of the data currently being displayed.
More extensive reports are available in the LANDesk Management Suite Reports tool.
Software license monitoring features include:
Read this chapter to learn about:
Software license monitoring is designed to give you accurate data about your organization's use of software licenses, in a format that's readily accessible. New features and enhancements include the following:
If you have used previous versions of software license monitoring, note the following changes in this version:
Software license monitoring is an important component of your overall IT asset management strategy. As a part of LANDesk Management Suite, this tool takes data from the inventory management of devices in your organization and gives you a way to determine where software is installed. As you define the software licenses you want to monitor, this tool helps you allocate licenses efficiently by providing a reporting structure that shows when you are in compliance with the licenses, and indicates where you can improve efficiency in license allocation.
To create a comprehensive software license management solution that includes discovery, advanced license definition, user entitlement, reconciliation, and license recovery, we recommend that you use LANDesk Asset Lifecycle Manager with LANDesk Management Suite. With Asset Lifecycle Manager you can define licenses in more detail, track license assignment, use automated process flows to managed licenses efficiently. Using Asset Lifecycle Manager, you can roll up license data from multiple cores and define automated flows that cover the full process of software licensing from user requests to reporting, compliance auditing, and recovery of unused software licenses.
Any user with a role definition that includes software license monitoring can view and edit data in the software license monitoring console. Administrative users are assigned this role by default. Other users can be assigned View and Edit permissions for the Software license monitoring role.
There are a few basic tasks that you do to enable software license monitoring. These tasks are summarized below; specific instructions are found later in this chapter.
The Management Suite software monitoring agent gathers inventory data from managed devices about what software applications are installed, by which computers groups, and how often they are run. As you review this data you may find that some applications are not found or not recognized correctly. You can use the software license monitoring console to check for specific software, and if needed you can add or correct product definitions.
When the inventory data has been saved to the inventory database, it is displayed in the software license monitoring console under the Discovered product super group. Your task is to select products from that list that you want to monitor. Those products can then be linked to your license data and can be tracked in the reports that show you how well your licenses match actual product usage.
You will need to add data about the software licenses you want to monitor. You can add this data manually, or import data from another source. Once you have added information about your licenses, such as how many licenses you have purchased, purchase date and expirations dates, type of license, and how the licenses are consumed, you will see compliance statistics and reports that compare the license data with actual software usage.
As you review software and license compliance data, you can generate a report of the currently displayed data. Reports can be formatted in six ways: HTML, PDF, CSV, XML, RTF, and Excel spreadsheet (.xls) file.
When you have license and software data established in the database, you can also use the Management Suite reports feature to generate predefined reports with license and usage data. For more information, see Reports.
The software license monitoring console is designed to let you view what software applications are discovered on your managed devices. The console offers three different perspectives—product, license, and computer—so you can focus on what's important to you.
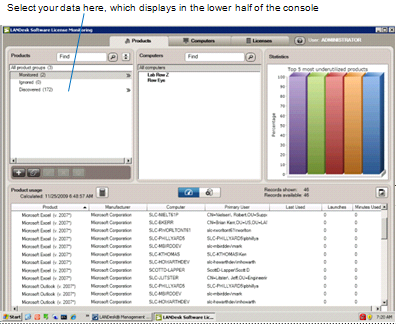
After you select the perspective you want, use the top left and center panes to select data, which is displayed in the lower half of the console. As you select items, you filter the data to view specific products, computers, or licenses. When you have a group of data that you want to share, you can generate reports from the console.
After you have run inventory scans on managed devices, you will see a list of installed software under the Discovered product super group. From this group, you can choose which software products you want to monitor. You can choose to ignore some software, such as approved freeware that users may install. You don't need to monitor all software as you begin, so you can leave products in the Discovered group until you decide whether to monitor or ignore them.
As you navigate the window from the left pane, refine your search by using the top middle pane. For example, if you are viewing computer groups in the left pane, you can then select a product in the middle pane to see which computers have that product installed. As you select different combinations, the data in the lower pane changes to match your selections.

The different views available in the console are described in the sections below.
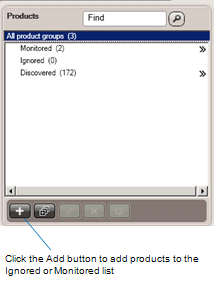
Click the Products tab to view a list of product super groups in the left pane. This perspective is typically used by IT administrators. Three product super groups are displayed as defaults:
These default group names are displayed in a normal font. As you move products to the Monitored or Ignored super group, product groups based on manufacturer are automatically created (these are also displayed in a normal font). If you create other custom product groups, your group names are displayed in a bold font.
A custom product group includes any combination of products that suits your needs. Depending on whether you have chosen to monitor those products or ignore them, you'll see the product group displayed under the Monitored super group or the Ignored super group, or both.
To find a group or a product, click the chevrons (>>) to the right of a product group (or double-click the product group name). To return back to a product group, click the product group in the hierarchical list.
In the Products pane, a toolbar provides quick access to basic tasks:
As you select different groups, manufacturers, or products, you'll notice that the contents of the lower pane change. There are two view options for the lower pane:
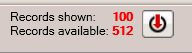
In the Product usage view, the first 100 records are displayed. To view more records, click the Get all records button. If you have a very large number of records, there may be a limit to how many you can view. No more than 10,000 records that can be displayed in the product usage view. If there are more than 10,000 records available, the Get all records button is not displayed because displaying so many records would cause the console to respond too slowly. In this case, if you want to display more than the first 100 records, you'll need to filter the data so a smaller number of records (less than 10,000) are displayed.
NOTE: If your core server is running Windows 2003 Server, a limit on how much memory can be addressed by the operating system can prevent SLM from calculating usage correctly on more than 15,000 managed computers. If you need to calculate usage on more devices and if you have more than 3.6 GB of physical memory installed on your server, you'll need to change the settings in Windows 2003 Server so the OS can address more than its default limit of 3.6 GB of memory (see the article on large memory support available from Microsoft Support at http://support.microsoft.com/kb/283037).
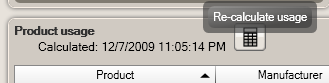
The data displayed in the Product usage view represents the composite of all inventory scans saved to the database. A time stamp indicates at what time the last product usage calculation was started. The product usage calculation is performed automatically, when your regular inventory maintenance is run on the database.
If you believe there is additional data from inventory scans that is not reflected in the product usage view, and you don't want to wait for the next automatic calculation, you can click the Re-calculate usage button to start a new calculation.
If you have a large number of records, this calculation can take several minutes. Be aware that while the calculation is being performed, the reported number of available records reflects only the current number that have been processed. If the number of records changes or seems too low, the calculation has most likely not been completed. If you click the Re-calculate usage button again, the calculation will start over (so the number reported will change again).
Normally, product usage is calculated from the first time a product is found in an inventory scan. Over time, you may have situations where you want to reset the calculation to get a more accurate picture of current product usage. For example, if a product has been installed for several months and used a few times on some computers, you can reset product usage calculation for that product on all managed devices. After you do this, the new usage data (number of launches and minutes used) will reflect only usage from the time you reset it.
A task is scheduled to reset product usage, and the Custom job processing dialog box is displayed to show you the progress of the task. When it is completed, click Close.
NOTE: If the task was not completed of any of the computers, that computer will continue to show the old usage calculations. This could happen with a mobile device that is not connected to the network at the time the task is run. Check the Scheduled tasks tool to make sure all devices have completed the task, and if needed, re-run the task on only those computers that failed when the task was run.
Click the Computers tab to view a list of computer groups. This perspective is typically used by managers to view computers and software usage in their organizations. This perspective is also where you create computer groups that can be associated with licenses, if you want to track license usage for a division in your organization.
Computer groups listed here are based on the device groups or queries in your Management Suite network view. Items in My devices and Public devices, for example, can be selected as computer groups. Other groups you have created can also be selected, so you can view groups based on device type, functional groups within your organization, or other criteria you have used to create groups.
If you have defined queries in your Management Suite network view, you can use those queries to create dynamic lists in the software license monitoring console.
When you select a group in the Computers perspective, the lower pane displays all records for software installed in the computers that belong to the group.
As a default, the first 100 records are displayed in the lower pane. To view all records, click the Get all records button. If you have a very large number of records, you may be limited in how many records you can view. If this is the case, filter the data so a smaller number of records are available. (For additional notes, see Product usage view limitations.)
In the Computers pane, a toolbar provides quick access to basic tasks:
Normally, product usage is calculated from the first time an inventory scan is run on a managed device. Over time, you may have situations where you want to reset the calculation of all software running on a managed computer. For example, if a computer is reassigned to another user or other changes are made, you can start over with software usage calculation. After you do this, the new usage data will reflect only usage from the time you reset it.
A task is scheduled to reset product usage, and the Custom job processing dialog box is displayed to show you the progress of the task. When it is completed, click Close.
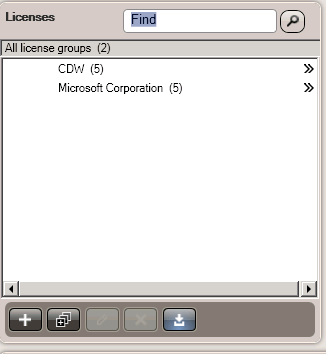
Click the Licenses tab to view license data, grouped by software manufacturer, vendor, or the license groups that you create. This perspective is typically used by those who track license compliance for your organization.
This perspective is empty until you add or import license data. When you add license data, the manufacturer and vendor names are automatically used to create groups in the licenses pane. These groups are displayed in a normal font. You can also create groups to view any combination of licenses, such as all site licenses or all freeware. The groups you create are displayed in a bold font.
When you click a license group name, the licenses in that group are displayed in the bottom pane of the console. If a computer group is associated with the licenses, the licenses for only computers in that group are displayed in the bottom pane.
For example, if you monitor a software license for software that is used by your Advertising division, you can associate that license definition with an Advertising computer group. When you display that license, only the license details for the Advertising division are displayed in the lower pane.
In the Licenses pane, a toolbar provides quick access to basic tasks:
The top right pane in the software license monitoring console displays charts that show you at a glance key information you can act on as you review software license usage. When you look at the Products and Computers perspectives, you'll see a chart that shows the five most underutilized products. When you look at the Licenses perspective, you'll see a chart that shows an overview of license compliance in terms of non-compliance and opportunities for saving money when licenses are underused. The graphs reference whatever data is displayed in the lower pane of the console.
This graph shows up to five monitored products that are installed but not actively used. The calculation for this graph is tied to the Last used and Launches columns in the Product usage view. If there are products installed that have never been used, those products (and version numbers) are shown with the percentage of users that have never used the products. Hover your mouse pointer over the bars in the graph to view the product data.
You can use the data to review with employees in your organization whether they need to have licensed software installed on their computers, and possibly reduce costs by redistributing or not renewing those licenses.

This graph shows three helpful situations in monitoring license compliance:
NOTE: For the Warning and Opportunity calculations, you can change the thresholds at which products are counted for these compliance issues. For example, you may want to know when you are within 20 percent of using all purchased licenses for a product. To modify these percentages, edit the settings in the SLM.View.exe.config file, found on the core server in the \Program Files\LANDesk\ManagementSuite folder.
The LANDesk Management Suite software monitor scan runs when you schedule regular inventory scans. It monitors executable files that are running and compares application information on each device with a standardized database of software applications, matching the names and file sizes of executable files against the database.
Two other inventory scans help complete the picture with other data about software. These scans look at the Windows registry, uninstall keys, .msi files, shortcuts, and GUIDs to identify software products. All the scan data is then compared to give as complete a picture as possible of what software is installed on each managed device.
The software license monitoring console displays this summary of data in the Products perspective. Even if you don't have license data available, you can view this product data to find out on how many managed devices a particular software product has been discovered.
Most applications installed on your managed devices will be identified as matches with the software data included in this product, but in some cases there may be software that doesn't match the standardized data.
You can create custom products, which add product definitions for any unidentified software executable files. When you do this, the executable files in the product definition are automatically added to the list of executables that the inventory scanner looks for. You can specify which files indicate that software is discovered, and also define usage executables that are the applications used when the software is run on a computer.
Software license compliance is an important part of your overall IT asset management. You want to be able to show accurate compliance when your organization is audited, and if your organization has policies related to software usage, software license compliance can help ensure that employees are following your policies.
Your organization's compliance with the terms of your software licenses is dependent on:
The first item is taken care of by the LANDesk Management Suite inventory scans that run on managed devices in your network. These scans include a software monitor scan that saves software information to the Management Suite database.
The second item needs to be added to the database from the license records that your organization has compiled. You can import data from different sources by exporting the data from an Excel spreadsheet to an XML file.
The third item is what the software license monitoring feature does when all data is available in the database. Compliance is calculated each day when regular inventory maintenance runs on the database (as specified in the Inventory tab of Configure LANDesk Software Services). The success of your software license monitoring depends on how accurately you have entered software license data, and how completely your inventory scans cover the devices in your organization.
Someone in your organization maintains records of which licenses have been purchased, and this data needs to be available and accurate for compliance calculation.
If you are just starting with software license monitoring, you may want to begin with a small number of licenses, most likely the ones that need to be monitored for audits. You can enter or import that license data using the software license monitoring console. The data is then used to generate statistics (in the top right pane of the console) and reports.
If your license data is in a format not easily imported, you can enter the data manually in the Licenses perspective. The data you enter is stored in the database and is used to calculate compliance.
You can import existing license data from a previous version of LANDesk Management Suite or from another data source. The data must be saved as an XML file with a specific format. (If you are importing from a previous version, note that the format of license database tables in version 9.x is different than the format in 8.x versions, so you will need to modify the data format before importing.)
A sample Excel spreadsheet (LicenseImport.xls) is included in the ldmain share of the core server, for your reference. Any XML file that you use to import license data must be formatted with the same column headings, and the same order of columns, as in the sample spreadsheet. If the headings in your XML file do not match exactly, the data can't be imported.
NOTE: A Product Name column is not included in the format for importing license data, so after importing your licenses you need to manually associate each license with a Primary product and, if needed, a Secondary product.
If the data does not appear in the console, or you receive an error message, any of the following items may have caused an error:
When you associate a license with a product, you can only select from products that are currently monitored. If you don't find the manufacturer or product name that you want, check in the Products perspective to make sure the product is being monitored.
In the License details pane, a time stamp shows the last time that license compliance was calculated. This is done on a daily basis at the time inventory maintenance is run on your database. If you have added license data and want to re-calculate compliance without waiting for the scheduled maintenance, you can click the Re-calculate compliance button in the License details pane.

If you have a large number of records, this calculation can take several minutes.