This section provides information on downloading, viewing, and
organizing security content; downloading and working with patches;
and creating and using custom definitions.
NOTE:Scanning and
remediating devices
For information on performing security and compliance scans on
managed devices for all types of security risks (such as OS and
application vulnerabilities, software updates, spyware, system
configuration exposures, etc.), remediating affected devices, as
well as generating security alerts, logging, and reports, see
Scanning and remediating
devices.
Your network and devices are continuously vulnerable to security
risks and exposures from many harmful sources: worms, viruses,
spyware, as well as ordinary maintenance issues like software
updates and bug fixes. Patches are released regularly to repair
inevitable operating system and application vulnerabilities. The
Patch and Compliance tool makes the process of gathering the latest
security type's definitions and patches quick and easy by letting
you download content via a LANDesk-hosted database. LANDesk Security Suite
services consolidates known definitions from trusted,
industry/vendor sources and sends reliable information directly to
you.
NOTE:Patch and
Compliance also supports custom vulnerability definitions
In addition to known vulnerabilities, you can also create your own
custom vulnerability definitions and associated detection rules.
For more information, see Creating custom definitions and
detection rules.
By establishing and maintaining up-to-date security content, you
can better understand the nature and extent of the security risks
for each platform and application you support, determine which
vulnerabilities and other types of risks are relevant to your
environment, and customize security scanning and remediation tasks.
The first step in this security management strategy is to download
a current listing of the latest known security content.
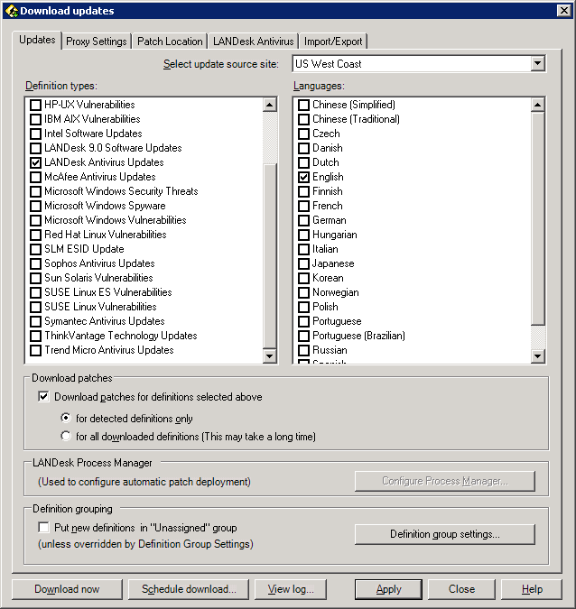
Using Download Updates
Use the Download Updates dialog box (Tools > Security >
Patch and Compliance > Download Updates) to configure and
perform security content updates at once, or create a scheduled
update task to occur at a set time or as a recurring task (see
Scheduling automatic security content updates).
NOTE: Only one
LANDesk user on a specific core server (including additional
consoles) can update security content at a time. If a user attempts
to update content while the process is already running, a message
prompt appears indicating there is a conflict.
To download security content (and patches)
Click Tools > Security > Patch and
Compliance.
Click the Download updates toolbar
button.
Select the update source site from the list of
available content servers.
Select the definition types whose security content
you want to update. You can select one or more types in the list
depending on your LANDesk Security Suite content subscription. The
more types you select, the longer the update will take.
Select the languages whose content you want to update
for the types you've specified.
Some vulnerability and other definition types, and any associated
patches, are language neutral or independent, meaning they are
compatible with any language version of the OS or application
addressed by that definition. In other words, you don't need a
unique language-specific patch to remediate those vulnerabilities
because the patch covers all supported languages. For example,
Linux and UNIX platforms use only language neutral definitions and
patches. However, Microsoft Windows and Apple Macintosh platform
vulnerability definitions and patches are nearly always language
specific.
When downloading content for any platform (with the appropriate
subscription), all of the selected platform's language neutral
vulnerability definitions are automatically updated by default. If
you've selected a Windows or Mac content type, you must also select
the specific languages whose definitions you want to update. If
you've selected the Sun Solaris or a Linux platform, you do not
have to select a specific language because their content is
language neutral and will be updated automatically.
If you want new content (content that does not
already reside in any groups) to automatically be placed in the
Unassigned group instead of the default location, which is the Scan
group, select the Put new definitions in the Unassigned
group check box.
If you want to automatically download associated
patch executable files, click the Download patches check
box, and then click one of the download options. (NOTE:
Patches are downloaded to the location specified on the Patch
Location page of the Download updates dialog box.)
For detected definitions only: Downloads only
the patches associated with vulnerabilities, security threats, or
LANDesk updates detected by the last security scan (i.e., the
definitions that are currently residing in the Detected
group).
For all downloaded definitions: Downloads ALL
of the patches associated with vulnerability, security threats, and
LANDesk updates currently residing in the Scan group.
If you have a proxy server on your network that is
used for external Internet transmissions (that is required to
update security content and download patches), click Proxy
Settings and specify the server's address, port number, and
authentication credentials if a login is required to access the
proxy server.
Click Apply at any time to save your
settings.
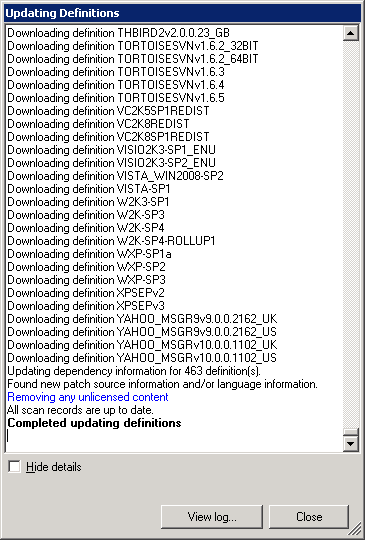
Click Update Now to run the security content
update. The Updating Definitions
dialog box (see below) displays the current operation and status.
(To create a scheduled task, click Schedule Update.)
When the update has completed, click Close.
Note that if you click Cancel before the update is finished,
only the security content that has been processed to that point is
downloaded to the core database. You would need to run the update
again in order to obtain all of the remaining security
content.
NOTE: Do not close
the console while an update security process is running or the
process will be terminated. However, this rule does not apply to a
Download Security Content scheduled task, which will finish
processing even if the console is closed while it is running.
To configure the patch download location
On the Download updates
dialog box, click the Patch Location tab.
Enter a UNC path where you want the patch files
copied. The default location is the core server's \LDLogon\Patch
directory.
If the UNC path entered above is to a location other
than the core server, enter a valid username and password to
authenticate to that location.
Enter a Web URL where devices can access the
downloaded patches for deployment. This Web URL should match the
UNC path above.
You can click Test Settings to check to see if
a connection can be made to the Web address specified above.
If you want to restore the UNC path and Web URL to
their default locations, click Restore to Default. Again,
the default storage location is the core server's \LDLogon\Patch
directory.
Scheduling automatic security
content updates
You can also configure security content updates as a scheduled
task to occur at a set time or as a recurring task. To do this,
simply click the Schedule download toolbar button. The
Scheduled update information
dialog box shows task-specific settings for the task. Click
OK to create a Download Security Content task in the
Scheduled Tasks window, where you can specify the scheduling
options.
NOTE:Task-specific settings and global settings
Note that only the definition types, languages, and definition and
patch download settings are saved and associated with a specific
task when you create it. Those three settings are considered task
specific. However, all of the settings on the other pages of the
Download updates
dialog box are global, meaning they apply to all subsequent
security content download tasks. Global settings include: patch
download location, proxy server, spyware autofix, security alerts,
and antivirus. Any time you change a global settings it is
effective for all security content download tasks from that point
on.
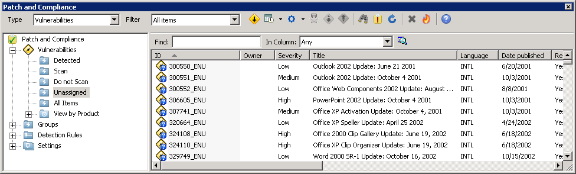
Viewing security content
After security content has been updated with the LANDesk
Security service, you can view the definitions and detection rules
(for vulnerabilities and custom definitions) only in their
respective groups in the Patch and Compliance tool window.
Use the Type drop-down list to view content for a
specific definition type or for all definition types. You can also
use the Filter control to further customize the content you
want to display.
Once security content has been downloaded, you can move items
into different status groups, or copy them into your own custom
groups. For information on how to use the different groups, see
Understanding and using the Patch and Compliance
tool.
You can also view property details for each of the updated
definitions and detection rules by right-clicking an item and
selecting Properties. This information can help you
determine which definitions are relevant to your network's
supported platforms and applications, how detection rules check for
the presence of definitions, what patches are available, and how
you want to configure and perform remediation for affected
devices.
NOTE:Custom
definitions can be modified
If you select a downloaded industry definition, its properties
dialog box is primarily for information viewing purposes only.
However, if you select a custom definition, or are creating a new
custom definition, the pages and fields in the properties dialog
box are editable, allowing you to define the definition and its
detection rules.
Searching for
vulnerabilities by CVE names
LANDesk supports the CVE (Common Vulnerabilities and Exposures)
naming standard. With Patch and Compliance you can search for
vulnerabilities by their CVE names, and view CVE information for
downloaded vulnerability definitions.
For more information about the CVE naming convention, LANDesk
compatibility with the CVE standard, and how to use CVE
identification to find individual security vulnerability
definitions, see Using CVE names.
Using filters to customize item
lists
The Filter drop-down list lets you create and apply
custom display filters to control the items that display in the
right-hand frame of the tool window. Filters can help you
streamline a large amount of security content. You can filter
content by operating system and severity.
The Filter control can be used in conjunction with the
Type control to display exactly the security content you're
interested in viewing.
To create a new display filter
In Patch and Compliance, click the Filter
drop-down list, and then click Manage filters.
Click New.
Enter a name for the new filter.
If you want to filter content by operating system,
click the check box, and then select the operating systems you want
to display.
If you want to filter by the severity of the
definition, click the check box, and then select the severities you
want to display. Click OK
To apply a filter to a content group's display
Click the content group in the left-hand pane of the
window.
Click the Filter drop-down list, and then
select a filter from the list.
Purging unused definitions
You can purge unused definitions from the Patch and Compliance
tool window and the core database if you determine that it isn't
relevant to your environment or if a successful remediation makes
the information obsolete.
When you purge definitions, associated detection rule
information is also removed from the Detection Rules groups in the
tree view. However, the actual associated patch files aren't
removed by this process. Patch files must be removed manually from
the local repository, which is typically on the core server.
To purge unused definitions
Click Tools > Security > Patch and
Compliance.
Click the Purge unused definitions toolbar
button.
Select the platforms whose definitions you want to
remove. You can select one or more platforms in the list. If a
definition is associated with more than one platform, you must
select all of its associated platforms in order for the definition
to be removed.
Select the languages whose definition you want to
remove (associated with the platform selected above). If you select
a Windows or Macintosh platform above, you should specify the
languages whose definition you want to remove. If you select a UNIX
or Linux platform above, you must specify the Language neutral
option in order to remove their language independent
definitions.
Click Remove.
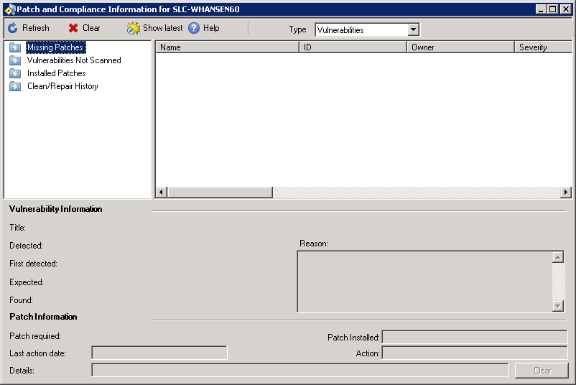
Viewing security information for a
scanned device
You can also view information specific to scanned devices
directly from the network view by right-clicking one or more
selected devices, and then clicking Security and Patch
Information.
This dialog box lets you view detection, installation, and
repair history, and perform patch management tasks.
Working with patches
The following section describes various tasks that can be
performed specifically with patch executable files.
Downloading patches
In order to deploy security patches to affected devices, the
patch executable file MUST first be downloaded to a local patch
repository on your network. The default location for patch file
downloads is this directory on the core server:
/LDLogon/Patches
You can change this location on the Patch Location page of the
Download updates dialog box.
You can download one patch at a time, or a set of patches
together.
NOTE:Patch
download location and proxy server settings
Patch downloads always use the download location settings currently
found on the Patch Location page of the Download updates dialog
box. Also note that if your network uses a proxy server for
Internet access, you must first configure the proxy server's
settings on the Proxy Settings page before you can download patch
files.
Patch and Compliance first attempts to download a patch file
from the URL (shown on the Patch Properties dialog box). If a
connection can't be made, or if the patch is unavailable for some
reason, then the patch is downloaded from the LANDesk Security
content service, which is a LANDesk-hosted database containing
patches from trusted industry sources.
Download methods
Use one the following methods to download patches:
From the Download Updates dialog box
From a detection rule
From a security definition
You can download patches from the Download Updates dialog box
concurrently with their associated security definitions. This
procedure is described above, see Using Download Updates.
You can also download patches directly from a detection rule or
a security definition.
To download patches from a detection rule
From any Detection Rules group, right-click a
detection rule, and then click Download Patch. (You can also
download patches for custom definitions from the detection rule
dialog box when creating or editing a custom definition.)
Or, to download a set of patches, select any number
of rules in any Detection Rules group, right-click the
selection, and then click Download Patch.
The download operation and status displays in the
Downloading Patches dialog. You can click Cancel at
any time to stop the entire download process.
When the download is finished, click the Close
button.
NOTE: With a
detection rule, you can also download patches from its properties
dialog box (Properties > Patch Information >
Download)
To download associated patches from a security definition
Right-click the security definition(s), click
Download associated patches.
Select whether to download all associated patches or
only current patches.
You can uninstall (i.e., rollback) patches that have been
deployed to managed devices. For example, you may want to uninstall
a patch that has caused an unexpected conflict with an existing
configuration. By uninstalling the patch, you can restore the
device to its original state.
To uninstall or rollback a patch
From any detection rule listing, right-click one or
more rules, and then click Uninstall Patch.
Enter a name for the uninstall task.
Specify whether the uninstall is a scheduled task or
a policy-based scan, or both.
If you selected scheduled task, specify which devices
from which you want to uninstall the patch.
If the patch can't be uninstalled without accessing
its original executable file (i.e., to use command-line
parameters), and you want to deploy the executable using Targeted
Multicast, select the Use multicast check box. To configure
Multicast options, click the Multicast Options button. For
more information, see About the Multicast options dialog box.
If you selected policy, and you want to create a new
query based on this uninstall task that can be used later, click
the Add a query check box.
Select a scan and repair settings from the available
list (or create a custom settings for this scan), to determine how
the scanner operates on end user devices.
Click OK. For a scheduled task, you can now
add target devices and configure the scheduling options in the
Scheduled tasks tool. For a policy, the new policy appears in the
Application Policy Management window with the task name specified
above. From there you can add static targets (users or devices) and
dynamic targets (query results), and configure the policy's type
and frequency.
If a patch installation failed, you must first clear the install
status information before attempting to install the patch again.
You can clear the install (repair) status for the selected device
by clicking Clear on the Security and Patch
Information
dialog box. You can also clear the patch install status by
vulnerability.
Removing patches
from the core database
To remove patch files permanently, you must delete them from the
patch repository, which is typically on the core server.
Using custom
definitions
Creating custom definitions
and detection rules
In addition to the known vulnerabilities that you update via the
Patch and Compliance tool, you can also create your own custom (or
user-defined) definitions, complete with custom detection rules,
associated patch files, and special additional commands to ensure
successful remediation.
Vulnerability definitions consist of a unique ID, title, publish
date, language, and other identifying information, as well as the
detection rules that tell the security scanner what to look for on
target devices. Detection rules define the specific platform,
application, file, or registry conditions that the security scanner
checks for in order to detect a vulnerability (or practically ANY
system condition or status) on scanned devices.
Custom vulnerability definitions is a powerful, flexible feature
that lets you implement an additional, proprietary level of patch
security on your LANDesk system. In addition to enhancing patch
security, custom vulnerabilities can be used to assess system
configurations, check for specific file and registry settings, and
deploy application updates, among other innovative uses that take
advantage of the scanning capabilities of the vulnerability
scanner.
NOTE:Creating
custom blocked application definitions
You can also create your own custom definitions for the blocked
application type. From the Type drop-down list, select
Blocked Applications, enter an executable filename and a
descriptive title for the definition, and then click OK.
Custom definitions don't necessarily have to perform remediation
actions (deploying and installing patch files). If the custom
definition is defined with a Detect Only detection rule or rules
that can only be detected by Patch and Compliance, the security
scanner looks at target devices and simply reports back the devices
where the rule's prescribed condition (i.e., vulnerability is
found). For example, you can write a custom Detect Only rule for
the security scanner to check managed devices for the
following:
Application existence
File existence
File version
File location
File date
Registry setting
And more...
You can create as many custom vulnerability definitions as you
need to establish and maintain the optimal level of patch security
for your environment.
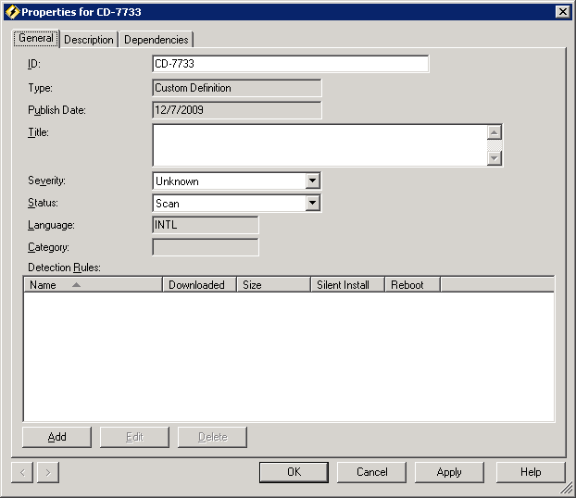
Creating custom
definitions
To create custom definitions
Click Tools > Security > Patch and
Compliance.
From the Type drop-down list, select All
Types or Custom Definitions. (The Create custom
definition toolbar button is available only with one of these
two types selected; or with the Blocked Applications type
selected, if you want to create a custom blocked application
definition.)
Click the Create custom definition toolbar
button. An editable version of the properties dialog box opens,
allowing you to configure vulnerability settings.
Enter a unique ID for the vulnerability. (The
system-generated ID code can be edited.)
The type is a Custom Definition and can't be
modified.
The publish date is today's date and can't be
modified.
Enter a descriptive title for the vulnerability. This
title displays in vulnerability lists.
Specify the severity level. Available options
include: Unknown, Service Pack, Critical, High, Medium, Low, and
Not Applicable.
Specify the status for the vulnerability. Available
options include: Don't Scan, Scan, and Unassigned. When you specify
a status, the vulnerability is placed in the corresponding group in
the tree view (see Tree view).
The language settings for user-defined
vulnerabilities is automatically set to INTL (International or
Language neutral, which means the vulnerability can be applied to
any language version of operating systems and/or
applications).
The Detection Rules list displays all the rules used
by this vulnerability. If you are creating a new custom
vulnerability, you should configure at least one detection rule
that is used by the security scanner to scan devices for the
vulnerability. To add detection rules, click Add. (See the
procedure below for step-by-step instructions.)
If you want to provide additional information about
this vulnerability, click Description and type your comments
in the text box and/or enter a valid Web address where more
information is posted.
As with known vendor vulnerabilities, custom vulnerabilities
should include one or more detection rules that tell the security
scanner what conditions to look for when scanning managed devices.
Follow the steps below to create a detection rule for a custom
vulnerability.
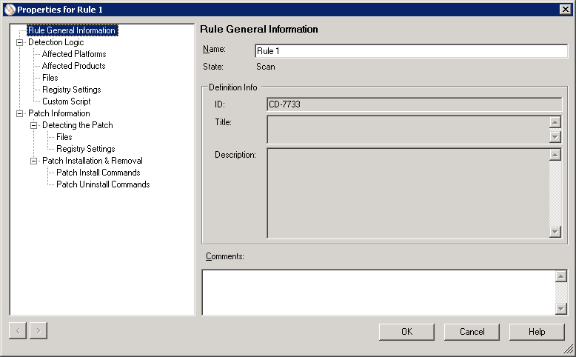
Creating custom detection rules
To create custom
detection rules
Right-click a custom definition, and then click
Properties. (Or double-click the vulnerability
definition.)
Click the Add button located under the
Detection Rules list. An editable version of the Rules Properties
dialog box opens at the dialog box's General Information page,
allowing you to configure a detection rule.
At the General Information page, enter a unique name
for the rule. The rule's status cannot be modified here. To change
the status of a detection rule, right-click the rule in any list
view, and then click Enable or Disable, depending on
the current state. The rule's definition information cannot be
modified here either. However, you can enter any information you
want in the Comments box.
Use the various pages of the Rules Properties dialog
box to define the detection rule, as described in the rest of this
procedure.
Open the Detection Logic pages.
At the Affected Platforms page, select the platforms
you want the security scanner to run on to check for this detection
rule's definition. The list of available platforms is determined by
the vulnerabilities you've updated via the Patch and Compliance
tool. Click Load default platform list to add the available
platforms to the list. You must select at least one platform.
At the Affected Products page, associate the rule
with one or more specific software applications. First, click
Edit to open the Selected Affected Products dialog box where
you can add and remove products in the Affected Products list (this
list can be shortened if you like, by clicking the check box at the
bottom of the dialog box). The list of available products is
determined by the content you've updated. You do not need to have a
product associated with a detection rule. Associated products act
as a filter during the security scan process. If the specified
associated product is found on the device, the scan quits. However,
if the product is found, or if no products are specified, the scan
continues to the files check.
At the Files page, configure specific file conditions
that you want the rule to scan for. Click Add to make the
fields on this page editable. The first step in configuring a file
condition is to specify the verification method. The fields on this
page depend on the verification method you select. To save a file
condition, click Update. You can add as many file conditions
as you like. For a detailed description of this option, see
About the Detection logic: Files
used for detection page.
At the Registry Settings page, configure specific
registry conditions that you want the rule to scan for. Click
Add to make the fields editable. To save a registry
condition, click Update. You can add as many registry
conditions as you like. For a detailed description of this option,
see About the Detection logic: Registry
settings used for detection page.
At the Custom Script page, you can create a custom
VB script to assist with detection for this detection rule. The
security scanner's runtime properties that can be accessed with a
custom script to report its results are: Detected, Reason,
Expected, and Found.
NOTE: You can click the Use editor button to open
your default script editing tool, associated with this file type.
When you close the tool you're prompted to save your changes in the
Custom Script page. If you want to use a different tool you have to
change the file type association.
At the Patch Information page, specify whether the
vulnerability associated with this detection rule can be repaired
or can only be detected on your managed devices. If you select the
repair option, the Patch Download Information and Repair
Information fields become editable.
If you can repair by deploying a patch, enter the
URL to that patch file and specify whether it can be downloaded
automatically. (You can attempt to download the associated patch
file at this time by clicking Download, or you can download
it at another time.)
Also, if you can repair by deploying a patch, enter
a unique filename for the patch file and specify whether the patch
requires a reboot in order to complete remediation and if the patch
requires user input during remediation. (For a detection rule that
includes remediation, we strongly recommend you create a hash for
the patch file by clicking Generate MD5 Hash. The actual
patch file must be downloaded before you can create a hash. For
more information on the hash, see About the Detection rule: General information
page.)
For a rule that allows remediation of the associated
vulnerability, you can configure additional commands that are run
during the remediation process on affected devices. To configure
additional remediation commands, click the Patch Install Commands
page, and then click Add to select a command type and to
make the command's argument fields editable. Additional patch
install commands are NOT required. If you don't configure special
commands, the patch file executes as it normally would by itself.
For a detailed description of this option, see About the Patch install commands page.
Now that you've created a custom vulnerability definition, you
can do the same things with it as you would with a known
vulnerability from an industry source. You can set the
vulnerability's status to Scan or place it in the Scan group to be
included in the next security scan, place it in the Don't Scan or
Unassigned group, view affected computers, enable Auto Fix, create
a repair job, or clear scan/repair status. To choose an option,
right-click a custom vulnerability definition to access its
shortcut menu.
Two operations that are unique to user-defined definitions are
importing and exporting, and deleting.
Importing
and exporting custom definitions
The Patch and Compliance tool provides a way for you to import
and export custom definitions and their detection rules. You can't
import and export known industry vulnerability definitions.
Custom definitions are exported and imported as an XML-formatted
file.
Import and export is useful if you want to share custom
definitions with other core servers. Exporting makes it possible
for you to save a backup copy for a definition that you want to
remove temporarily from the core database.
You can also use the export/import feature to export a
definition, manually edit the exported file as a template and save
multiple variations of the definition, and then import the new
definitions. If the definition is complex, this procedure can be
faster and easier than creating multiple definitions in the
console.
To export custom definitions
From a Custom Definitions list, select one or more
custom definitions.
Click the Export toolbar button. (Or,
right-click the selected definitions, and then click
Export.)
Enter the path to the folder where you want to export
the definitions as an individual XML file.
If you've exported the definitions before to the
specified location and you want to replace it, click the
Overwrite existing definitions.
Click Export, and check the Export Status
window to see whether the definitions are successfully
exported. NOTE: An exported definition continues to exist in the core
database, and therefore still appears in the Custom Definitions
group that corresponds to its status: Unassigned, Scan, or Don't
Scan.
Click Close.
To import custom definitions
In Patch and Compliance, click the Import Custom
Definitions toolbar button.
Locate and select one or more definitions (in the XML
file you want to import), and then click Open. If the
definition already exists in the core database, you're prompted
whether you want to overwrite it. Check the status window to see
whether the definition is successfully imported.
Click Close. Imported definitions (new and
updated) are placed in the Custom Definitions Unassigned
group.
Deleting
custom definitions
If you no longer need a custom definition, you can delete it.
Deleting a custom definition removes its information and its
associated detection rules from the core database, and from the
Patch and Compliance tool window. (Exporting does not remove the
definition information.)
As with purging known vulnerability information, deleting custom
definitions does not remove any downloaded associated patch files.
Patch files must be removed manually from the patch repository.
To delete custom definitions, select one or more custom
definitions, and then click the Delete selected custom
definitions button in the toolbar.
NOTE:Restoring
exported custom definitions
If you delete a custom definition that had previously been exported
as an XML file, you can restore that definition by importing it
back into the database via the Patch and Compliance tool.