Patch and Compliance is a complete, integrated security
management solution that helps you protect your LANDesk managed devices from a
variety of prevalent security risks and exposures.
Patch and Compliance provides all the tools you need in order to
download the most common types of security content updates (such as
vulnerabilities, spyware, configuration security threats, virus
definition (pattern) files, and unauthorized applications) from
LANDesk security
services. You can download associated patch files, and configure
and run security assessment and remediation scans on your managed
devices. You can also create your own custom definitions to scan
for and remediate specific, potentially harmful conditions on
devices. If any security risks are detected, Patch and Compliance
provides a variety of methods to remediate affected devices.
Additionally, at any time you can view detailed security
information for scanned devices, and generate specialized patch and
compliance reports.
All of these enterprise security management tasks can be
performed from the convenience of a single console.
Additionally, Patch and Compliance lets you scan managed
devices, and core servers and console machines, for versions of
installed LANDesk
software and deploy the appropriate LANDesk software updates.
NOTE:About
LANDesk Security
Suite
The Patch and Compliance tool is the main security management
component of LANDesk Security Suite.
Security Suite is
based on much of the primary LANDesk Management Suite
functionality, supplemented with specialized security management
tools such as the Patch and Compliance, Antivirus, Endpoint
Security (HIPS, Firewall, Device Control), and more. The Patch and
Compliance tool offers the same features in Management Suite and Security Suite and is
described in detail in this section. For more information on which
basic LANDesk
functionality is supported in Security Suite, see the
LANDesk Security
SuiteUsers Guide.
Looking ahead: What to do after
configuring devices for security scanning and remediation
Once you understand Patch and Compliance concepts, how to
navigate the user interface, and the general task workflow; and
after you've configured devices to work with Patch and Compliance,
you can perform the following patch and compliance management
tasks:
Download security content updates and patches
View security content definition and detection rule
properties
Patch and Compliance provides all of the tools you need to
establish system-wide security across your network. With Patch and
Compliance, you can automate the repetitive processes of
maintaining security content, and organizing and viewing that
content.
Use security scan tasks and policies to assess managed devices
for known platform-specific vulnerabilities. You can download and
manage patch executable files. Finally, you can remediate detected
vulnerabilities by deploying and installing the necessary patch
files, and verify successful remediation.
Additionally, you can create your own custom vulnerability
definitions in order to scan managed devices for specific OS and
application conditions that might threaten the operation and
security of your system. Custom definitions can be configured for
detection only or to do both detection and remediation. For more
information, see Creating custom definitions and detection
rules.
New features
Patch and Compliance offers several new capabilities, such
as:
Use the change settings task to change/update only
the device agent configuration settings you want to, including :
802.1X support settings, compliance security settings, configure
Windows firewall settings, custom variable override settings, HIPS
settings, LANDesk Antivirus settings, and security scan and repair
settings. With the change settings task you can change desired
settings without a full device agent configuration deployment.
Configure global alert settings.
Scan for the presence of spyware on your managed
devices. If spyware is detected, you can schedule a repair job that
removes the spyware from affected devices.
Deny launch of unauthorized or prohibited
applications on end user devices with blocked application
definitions.
Enable real-time spyware monitoring (detection and
removal), and real-time application blocking.
Scan managed devices for security threats (Windows
system configuration errors and exposures) on the local hard drive.
Once a security threat is identified, you can perform the necessary
fix manually at the affected device.
Use specific security threat definitions that detect
the Windows firewall, turn it on or off, and configure the firewall
settings.
Use custom variables that are included with other
security threat definitions in order to customize and change
specific local system configurations, and to enforce
enterprise-wide system configuration policies.
Receive alerts when specified vulnerabilities are
detected on managed devices by a security scan. You can configure
alerting by definition severity.
Implement frequent security scans for critical,
time-sensitive security risks such as virus scanning.
Use vulnerability dependency relationships to
identify which patches need to be installed before other
vulnerabilities can adversely affect managed devices or before they
can be remediated. Supercedence information describes patches that
have been replaced by more recent versions and that don't need to
be applied.
Verify the latest LANDesk software is installed on
your managed devices, as well as core servers and console machines,
by scanning for LANDesk software updates. If an outdated version is
detected on a device, you can schedule a repair job the deploys and
installs the latest LANDesk software update.
Features
With Patch and Compliance, you can:
Provide patch security for international versions of
the operating systems on your network, including current support
for the following languages: Czech, Danish, Dutch, English,
Finnish, French, German, Italian, Japanese, Norwegian, Polish,
Portuguese, Simplified Chinese, Spanish, Swedish, and Traditional
Chinese.
Organize and group security definitions to perform
customized security assessment scans and remediation (see Tree
view).
Assess vulnerabilities and other security risks on a
variety of supported device platforms, including Windows, Sun
Solaris, and Linux (see Scanning devices for security
risks).
Download, deploy, and install patches that have been
researched and verified (see Downloading patches).
Track the status of patch deployments and
installation on scanned devices.
Use LANDesk's Targeted Multicast, peer download, and
checkpoint restart features for fast and efficient patch
deployment.
Generate and view detected an extensive variety of
patch and compliance management-specific reports (see Using patch and compliance reports).
Security content types and
subscriptions
When you install LANDesk Management Suite, the Patch and
Compliance tool is now included by default (previously, it was a
separate add-on). However, without a Security Suite content
subscription, you can only scan for LANDesk software updates and
custom definitions. A Security Suite content subscription enables
you to take full advantage of the Patch and Compliance tool by
providing access to additional security content (definition
types).
LANDesk Security Suite content types include:
Antivirus updates (for third-party scanners, includes
antivirus scanner detection content only; for LANDesk Antivirus,
includes both scanner detection content AND virus definition
files)
Security threats (system configuration exposures;
includes firewall detection and configuration)
Software updates
Spyware
Vulnerabilities (known platform- and
application-specific vulnerabilities)
For information about Security Suite content
subscriptions, contact your LANDesk reseller, or visit the LANDesk
Web site.
The LANDesk User Community has user forums and best known
methods for many LANDesk products and technologies.
To access this valuable resource, go to: http://community.landesk.com
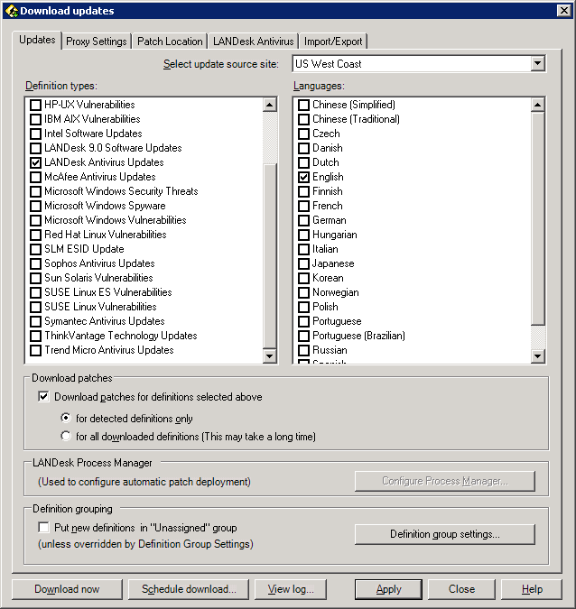
Using Download Updates
Note that the Updates page of the Download updates
dialog box includes several security content types in the
definition types list.
Scanning and remediation functions are not the same for these
various content types. For more information on how Patch and
Compliance scans for and remediates detected security risks on
managed devices, see the appropriate sections in Scanning and remediating
devices.
Supported device
platforms
Patch and Compliance supports most of the standard
LANDesk-managed device platforms, including the following operating
systems:
Windows NT 4.0 (SP6a and higher)
Windows 2000 Professional (SP4)
Windows 2003 Servers
Windows XP Professional (SP1/SP2)
Windows Vista
Mac OS X (10.2.x, 10.3.x, and 10.4.x)
Red Hat Linux 9 (scanning from the console; manual
remediation)
SUSE Linux (scanning from the console; manual
remediation)
Sun Solaris (scanning from the console; manual
remediation)
NOTE:Scanning
core servers and consoles for LANDesk software updates is
supported
You can also scan LANDesk core servers and consoles for LANDesk
software updates, but those machines must first have the standard
LANDesk agent deployed, which includes the security scanner agent
required for security scanning tasks.
Role-based administration with Patch
and Compliance
Patch and Compliance uses role-based administration to allow
users access to features. Role-based administration is the access
and security framework that lets LANDesk Administrators restrict
user access to tools and devices. Each user is assigned specific
roles and scope that determine which features they can use and
which devices they can manage.
Administrators assign these roles to other users with the Users
tool in the console. Patch and Compliance is a specific right that
appears under the Security rights group in the Roles dialog box. In
order to see and use the Patch and Compliance tool, a user must be
assigned the necessary Patch and Compliance right.
IMPORTANT:LANDesk
Script Writers group permission required
In order to create scheduled tasks and policies in the Patch and
Compliance tool and the Security Configurations tool (for security
and compliance scan tasks, repair tasks, and change settings
tasks), a user must have the LANDesk Script Writers group
permission. In other words, they must belong to a group that has
the LANDesk Script Writers permission assigned. For more
information about role-based administration, see Role-based administration.
With the Patch and Compliance right, you can provide users the
ability to:
See and access the Patch and Compliance tool in the
Tools menu and Toolbox
Configure managed devices for security assessment,
compliance, and remediation scanning
Configure devices for real-time spyware and blocked
application scanning
Configure devices for high frequency scanning for
critical security risks
Download security updates and associated patches for
the security types for which you have a Security Suite content
subscription
Create scheduled tasks that automatically download
definitions and/or patch updates
Create custom vulnerability definitions and custom
detection rules
Import, export, and delete custom definitions
View downloaded security content by type (including:
all types, blocked applications, custom definitions, LANDesk
updates, security threats, spyware, vulnerabilities, driver
updates, and software updates)
Customize selected security threats with custom
variables
Edit custom variable values (for security content
types with custom variables, such as security threats)
Add and remove security definitions from the
Compliance group
Change the status of definitions contained in the
Compliance group
Configure and run security and compliance scans on
managed devices as a scheduled task or as a policy
Divide a scheduled task scan into a staging phase
and a deployment phase
Create and configure scan and repair settings that
determine the scan options, such as: content type to be scanned
for, scanner information and progress display, device reboot
behavior, and the amount of end user interaction. Then, apply scan
and repair settings to security scan tasks, repair tasks, uninstall
tasks, and reboot tasks
View detailed scan results by: detected group,
specific definition, individual device, or a group of selected
devices
Perform remediation as a scheduled task or as a
policy
Use Auto Fix to automatically remediate the
following security types if they are detected: vulnerabilities,
spyware, LANDesk software updates, and custom definitions (must
also be a LANDesk Administrator)
Track and verify the status of patch deployment and
installation (repair history on scanned devices)
Purge unused security type definitions (must be a
LANDesk Administrator)
Uninstall patches from scanned devices
Remove patches from the core database
Configure vulnerability alerts
Generate a variety of security specific reports
(also requires Reporting roles)
Patch and compliance task
workflow
The following steps provide a quick summary outline of the
typical processes involved in implementing patch and compliance
management on your LANDesk network. Each of these procedures are
described in detail in subsequent sections.
Basic steps in implementing and using patch and compliance
management:
Configure managed devices for security scans and
remediation with the security scanner agent (via agent
configuration or install/update tasks).
Download security content (vulnerability and other
security risk definitions) from a security content server (updated
from industry/vendor data sources). Also, create custom definitions
if desired.
Organize and view security content.
Create security and compliance assessment scan
tasks.
Configure scan and repair settings to determine
scanner operation and end-user options. These settings define your
security compliance policies.
Use your customized scan tasks and settings to scan
target devices for vulnerabilities, spyware, security threats,
blocked applications, etc.
View scan results for scanned devices.
Download patches that will remediate detected
vulnerabilities.
Repair detected vulnerabilities by deploying and
installing patches to affected devices
Repair other detected security risks and
exposures.
View patch installation status and repair history
information. You can also generate security-specific reports.
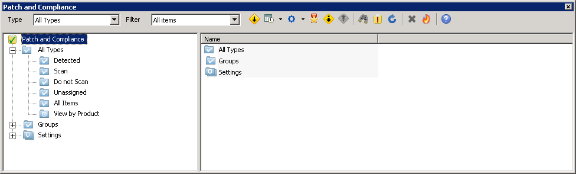
Understanding and using the Patch and
Compliance tool
The Patch and Compliance tool window, like all other LANDesk
tools, is opened from either the Tools menu or the
Toolbox and can be docked, floated, and tabbed with other
open tool windows (see Dockable tool
windows).
NOTE:Patch and
Compliance right
In order to see and access the Patch and Compliance tool, users
must have either the LANDesk Administrator right (implying full
rights), or the specific Patch and Compliance right. For more
information about user roles and rights, see Role-based administration.
To open the Patch and Compliance tool, click Tools >
Security > Patch and Compliance.
The Patch and Compliance window contains a toolbar and two
panes. The left-hand pane shows a hierarchical tree view of
security type definition and detection rule groups. You can expand
or collapse the objects as needed.
The right-hand pane displays a column list of the selected
group's definition details or detection rule details, depending
upon which group you've selected in the left-hand pane, plus a
Find feature for searching in long item lists.
NOTE:Characters
not allowed when searching a list
In the Find box, the following extended characters are not
supported: <, >, ', ", !
The Patch and Compliance tool window contains a toolbar with the
following buttons:
Toolbar buttons
Download updates: Opens a dialog box where you
can specify the platforms and languages for the security content
types you want to update, as well as which security content server
to access. You can also configure whether to place definitions in
the Unassigned group, whether to download associated patches
concurrently, the location where patches are downloaded, and proxy
server settings.
Create a task: Includes a drop-down list where
you can select which type of task you want to create:
Security scan: Lets you create a security scan
task, specify whether the scan is a scheduled task or a policy, and
select a scan and repair settings that determines whether the
security scanner displays, reboot and interaction behavior, and the
content types scanned for.
Compliance scan: Lets you create a security
scan task that specifically checks target devices for compliance
with your current security policy as defined in LANDesk Network
Access Control settings and by the contents of the Compliance
group. You can also specify whether the compliance security scan
runs as a scheduled task (including which devices to scan and
whether to scan immediately) or as a policy.
Change settings: Lets you create a task that
changes the default settings on a managed device by writing the
specified settings ID to the local registry. With a change settings
task you can change one or more of these settings: 802.1X support
settings, compliance security settings, configure Windows firewall
settings, custom variable override settings, HIPS settings, LANDesk
Antivirus settings, and security scan and repair settings. You can
use this task as a quick and convenient way to change only the
settings you want to without having to redeploy a full device agent
configuration.
Reboot: Lets you create a device reboot task,
specify whether the reboot is a scheduled task or a policy, and
select a scan and repair settings that determines display and
interaction behavior. Note that only the options on the reboot page
of the dialog box apply to this task.
Repair: Lets you create a security repair task
that remediates detected security exposures on scanned devices. You
can configure the repair as a scheduled task or as a policy or
both, divide the repair task into separate staging and repairing
phases, select a scan and repair settings, and download patches.
Note that one or more repairable security definitions must first be
selected in order to create a repair task.
Gather historical information: Lets you create
a task that gathers the current scanned and detected counts (for a
specified number of days) that can be used for reporting. You can
also create and configure a scheduled task that performs the same
action.
Configure settings: Includes a drop-down list
where you can select which type of settings you want to configure,
change, or update:
Scan and repair settings: Lets you create,
edit, copy, and delete scan and repair settings. Scan and repair
settings determine whether the security scanner displays on devices
while running, reboot options, user interaction, and the content
types scanned.
Compliance settings: Lets you create, edit,
copy, and delete compliance settings. Compliance settings determine
when and how a compliance security scan takes places, whether
remediation occurs automatically, and what to do when LANDesk
Antivirus detects a virus infection on target devices.
Custom variable override settings: Lets you
create, edit, apply, and delete scan and repair settings. Custom
variables overrides allow you to configure exceptions to custom
variable values. In other words, with custom variable override
settings you can ignore or bypass a specific custom variable
condition so that a scanned device is not determined to be
vulnerable.
Definition group settings: Lets you create,
edit, copy, and delete Definition group settings to automate
security content downloads.
Alert settings: Lets you configure global
security alerts.
Rollup core settings: Lets you create and
manage rollup core settings. Rollup core settings determine
automatic forwarding of the latest security scan results to a
rollup core server on your network. Security scan data forwarding
allows you to view real-time vulnerability status for all of your
managed devices in a large, distributed enterprise network without
having to manually retrieve that data directly from the primary
core server.
Create custom definition: Opens a blank
Definition properties dialog box with editable fields where you can
specify whether the custom definition is detection only or also
allows remediation, enter specific vulnerability information,
create detection rules, and identify the appropriate patch file for
remediation.
Import custom definitions: Allows you to
import an XML file containing custom definitions.
Export selected custom definitions: Allows you
to export a custom definition as an XML file.
Scan information: Lets you view detailed patch
and compliance activity and status information, by categories such
as recently scanned and definition severity, for all of your
managed devices.
Computers out of compliance: Lists devices
that have been scanned to check for compliance with the predefined
compliance security policy (based on the content of the Compliance
group), and are determined to be unhealthy or out of
compliance.
Refresh: Updates the contents of the selected
group.
Delete selected custom definitions: Removes
the selected custom definitions from the core database.
Purge patch and compliance definitions: Lets
you specify the platforms and languages whose definitions you want
to remove from the core database. Note that only a LANDesk
Administrator user can perform this operation.
Help: Opens the online help to the Patch and
Compliance section.
Type drop-down list
Use the Type drop-down list to determine which downloaded
definitions display in the tree view. Definition types are
designated by the publisher of the content. Filtering the display
can be helpful if you want to see only one specific type of
security content, or if you want to narrow down an extremely long
comprehensive list.
The Type drop-down list includes the following
options:
All types (comprehensive list of all downloaded
security definitions)
Antivirus (lists downloaded scanner detection
definitions only; does not list specific LANDesk Antivirus virus
definition files)
Vulnerabilities (lists all downloaded vulnerability
definitions for any of the available platforms)
The left pane of the Patch and Compliance window shows the
following items:
Tree view
The root object of the tree view contains all of the security
types such as vulnerabilities, spyware, security threats, blocked
applications, and custom definitions groups (and associated
detection rule groups, if applicable). The root object can be
expanded and collapsed as needed.
All Types (or the currently selected type name)
Contains the following subgroups:
Detected: Lists all of the definitions detected by
security scans, for all of the devices included in the scans. The
contents of this group are cumulative based on all the security
scans run on your network. Definitions are removed from this group
only by: being successfully remediated, being removed from the Scan
group and running the scan again, or by actually removing the
affected device from the database.
The Detected list is a composite of all detected security
definitions found by the most recent scan. The Scanned and Detected
columns are useful in showing how many devices were scanned, and on
how many of those devices the definition was detected. To see
specifically which devices have a detected definition, right-click
the item and click Affected computers.
Note that you can also view device-specific information by
right-clicking a device in the network view, and then clicking
Security and Patch Information.
You can only move definitions from the Detected group into
either the Unassigned or Don't Scan groups.
Scan: (For the Blocked Applications type, this group is
called Block.) Lists all of the security definitions that
are searched for when the security scanner runs on managed devices.
In other words, if a definition is included in this group, it will
be part of the next scan operation; otherwise, it won't be part of
the scan.
By default, collected definitions are added to the Scan group
during a content update. (IMPORTANT: Except for blocked
applications, which are added to the Unassigned group by
default.)
Scan can be considered one of three possible states for a
security definition, along with Don't Scan and Unassigned. As such,
a definition can reside in only one of these three groups at a
time. A definition is either a Scan, Don't Scan, or Unassigned and
is identified by a unique icon for each state (question mark (?)
icon for Unassigned, red X icon for Don't Scan, and the regular
vulnerability icon for Scan). Moving a definition from one group to
another automatically changes its state.
By moving definitions into the Scan group (click-and-drag one or
more definitions from another group, except the Detected group),
you can control the specific nature and size of the next security
scan on target devices.
NOTE:Caution
about moving definitions from the Scan group
When you move definitions from the Scan to the Don't Scan group,
the current information in the core database about which scanned
devices detected those definitions is removed from the core
database and is no longer available in either an item's Properties
dialog box or in a device's Security and Patch Information dialog
box. To restore that security assessment information, you would
have to move the definitions back into the Scan group and run the
same security scan again.
Don't scan: (For Blocked Applications, this group is
called Don't Block.) Lists all of the definitions that
aren't searched for the next time the security scanner runs on
devices. As mentioned above, if a definition is in this group, it
can't be in the Scan or Unassigned group. You can move definitions
into this group in order to temporarily remove them from a security
scan.
Unassigned: Lists all of the definitions that do not
belong to either the Scan or Don't Scan groups. The Unassigned
group is essentially a holding area for collected definitions until
you decide whether you want to scan for them or not.
To move definitions, click-and-drag one or more from the
Unassigned group into either the Scan or Don't Scan groups.
New definitions can also be automatically added to the
Unassigned group during a content update by selecting the Put
new definitions in the Unassigned group option on the
Download updates
dialog box.
All Items: Lists all of the selected type's definitions
in a flat list, even if you've moved a definition into either the
Unassigned, Scan, or Don't Scan group.
View by Product: Lists all of the definitions organized
into specific product subgroups. These subgroups help you identify
definitions by their relevant product category.
You can use these product subgroups to copy definitions into the
Scan group for product-specific scanning, or copy them into a
custom group (see below in order to perform remediation for groups
of products at once).
Definitions can be copied from a product group into the Scan,
Don't Scan, or Unassigned group, or any of the user-defined custom
groups. They can reside in platform, product, and multiple custom
groups simultaneously.
Groups
Contains the following subgroups:
Custom Groups:
Lists all of the subgroups you've created and the definitions they
contain. My Groups provide a way for you to organize security
definitions however you want. Use a group's contents to copy
several definitions into the Scan group for customized scanning, or
to create a repair job for several definitions at once.
You can also use a custom group to define the contents of a
security scan. Copy the definitions you want to scan for into a
custom group and select that group in the Scan for option of the
Scan and repair settings dialog box.
To create a custom group, right-click Custom Groups (or a
subgroup) and then click New Group.
To add definitions to a custom group, click-and-drag one or more of
them from any of the other definition groups. Or, you can
right-click a custom group, and then click Add
Definition.
Predefined: Lists any predefined vulnerability
definition groups as determined by the LANDesk security content
subscription. For example, this group might contain industry
published definitions such as the SANS Top 20, which are the top 20
vulnerability definitions identified and published by Microsoft.
(These definitions are typically a subset of the Microsoft Windows
Vulnerabilities that are downloaded with the Download
updates
dialog box.)
Alert: Lists all of the definitions that will
generate an alert message the next time the security scanner run
and devices.
Compliance: Lists all of the definitions that
are used to determine whether a managed (or mobile/guest device) is
Healthy or Unhealthy. This group is used by LANDesk Network Access
Control (NAC) to deny or allow access to the main network. The
definitions and associated patch files contained in the Compliance
group are copied to a special remediation server that scans
devices, determines compliance or non-compliance, and can remediate
non-compliant devices so that they can be granted full access to
the corporate network.
Detection Rules
The Detection Rules group displays only for certain security
content types.
NOTE:Detection
rules
These rules define the specific conditions (of the operating
system, application, file, or registry) that a definition checks
for in order to detect the associated security risk. Definitions
(i.e., content types) that use detection rules include:
vulnerabilities, security threats, and custom definitions. Spyware
and blocked applications do not use detection rules.
The Detection Rules group contains the following subgroups:
Scan: Lists all of the detection rules that are enabled
for security scanning on devices.
By default, detection rules associated with a definition of any
security content type are added to the Detection Rules Scan group
during a content update. Likewise, custom detection rules
associated with a custom definitions are added to the Scan group
when you create the custom definition.
Note that in addition to having a definition's detection rules
enabled, its corresponding patch executable file must also be
downloaded to a local patch repository on your network (typically
the core server) before remediation can take place. The Downloaded
attribute (one of the detail columns in the tool window's
right-hand pane) indicates whether the patch associated with that
rule has been downloaded.
Don't Scan: Lists all of the detection rules
that are disabled for security scanning on devices. Some
definitions have more than one detection rule. By disabling a
detection rule, you can ensure that it won't be used to scan for
the conditions indicating that definition is present on devices.
This can allow you to simplify a security scan without redefining
the definition.
View by Product: Lists all of the detection
rules for collected definitions, organized into specific product
subgroups. These subgroups help you identify detection rules by
their relevant product category.
You can use these product subgroups to perform group
operations.
Settings
The Settings group lets you view the various settings you've
created for security scanning tasks. You can right-click any of the
Settings groups to create a new settings and view the settings
information in a report format.
Contains the following subgroups:
Scan and Repair: Lists all of the scan and
repair settings you've created that are used to determine the
operation of the security scanner. Each scan and repair settings
has a unique ID number. The right-hand pane shows useful
information for the listed scan and repair settings.
Compliance: Lists all of the compliance
settings you've created that are used to determine the operation of
the security scanner when performing a specific compliance scan.
Each settings has a unique ID number. The right-hand pane shows
useful information for the listed scan and repair settings.
Custom variables to override: Lists all of the
custom variable override settings you've created that are used to
determine which modified custom variable values to ignore when the
security scanner runs. Each settings has a unique ID number. The
right-hand pane shows useful information for the listed
settings.
Definition details
The right pane of the Patch and Compliance window displays
detailed information listed in sortable columns for definition and
detection rule items, as described below:
ID: Identifies the definition with a unique,
vendor-defined alphanumeric code.
Severity: Indicates the severity level of the
definition. Possible severity levels include: Service Pack,
Critical, High, Medium, Low, Not Applicable, and Unknown.
Title: Describes the nature or target of the
definition in a brief text string.
Language: Indicates the language of the OS or
application affected by the definition.
Date Published: Indicates the date the
definition was published by the vendor.
Repairable: Indicates whether the definition
can be repaired through patch file deployment and installation.
Possible values are: Yes, No, Some (for a definition that includes
multiple detection rules and not all detected definitions can be
fixed), and No rules (for a custom definition that doesn't include
any detection rules).
Silent Install: Indicates whether the
definition's associated patch (or patches) installs silently,
meaning without user interaction. Some definitions may have more
than one patch. If any of a definition's patches don't install
silently, the Silent Install attribute says No. To see how
individual patches install, right-click the definition and click
Properties | Patches.
Detected: Displays the number of scanned
devices that detected the definition.
Scanned: Displays the number of devices
scanned for the definition.
Auto Fix: Indicates whether Auto Fix is
enabled or disabled for the definition.
CVE ID: (Applies only to vulnerabilities)
Identifies a vulnerability by its unique CVE (Common
Vulnerabilities and Exposures) name. For more information, see
Using CVE names.
Using a definition shortcut menu
You can right-click an item to view more details with the
Properties option.
A definition's shortcut menu also lets you do the following
tasks (depending on the security type):
Affected computers
Computers that did not scan
Download associated patches
Autofix when scanning
Add to Compliance group
Add to Alert group
Clear scan/repair status
Repair
Copy
Properties
Info
Export
Copy to other core(s)
Auto sync
Detection Rule details
Name: Displays the name of the detection rule
(can be the file name of the patch executable).
ID: Displays the ID of the definition
associated with the rule.
Repairable: Indicates whether the associated
definition can be repaired through patch file deployment and
installation.
Silent Install: Indicates whether the rule's
associated patch installs silently on devices without user
interaction.
Reboot: Indicates whether the associated patch
file requires a system reboot in order to complete a successful
remediation.
Auto Fix: Indicates whether Auto Fix is
enabled or disabled for the associated definition.
Downloaded: Indicates whether the rule's
associated patch executable file has been downloaded to the local
repository.
Right-click a detection rule to view more details with the
Properties option. The shortcut menu also lets you
enable/disable the rule, download the associated patch, open the
patch repository folder, and uninstall the patch.
Configuring devices for
security scanning and remediation
Before managed devices can be scanned for vulnerabilities,
spyware, security threats, and other security types, and receive
patch deployments or software updates, they must have the security
scanner agent installed (this agent is installed by default with
the standard LANDesk agent).
This section includes information about configuring Windows
devices for security scanning via an agent configuration, and
information about configuring Linux, UNIX and Mac devices.
NOTE:Scanning
core servers and consoles for LANDesk software updates is
supported
You can also scan LANDesk core servers and consoles for LANDesk
software updates, but they must first have the standard LANDesk
agent deployed, which includes the security scanner agent required
for security scanning tasks.
Configuring Windows devices for security scanning
The security scanner agent is included by default with the
standard LANDesk agent and is installed on devices with even the
most basic agent configuration. In other words, any Windows device
configured with the Agent configuration tool will be ready for
patch and compliance scanning and remediation.
Using the Agent
Configuration tool
Use the Agent Configuration tool (Tools > Configuration
> Agent Configuration > New Windows configuration) to
create agent configurations with specified Patch and Compliance
scanning settings , and other security settings, that can be
deployed to target devices.
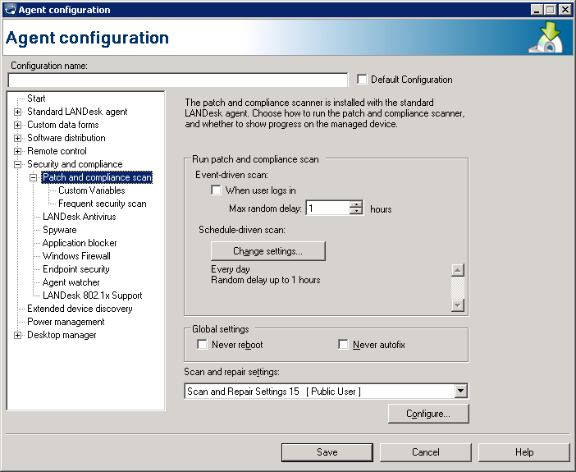
To configure devices for security scanning and remediation via
an agent configuration
In the console, click Tools > Configuration
> Agent Configuration.
Click the New Windows toolbar button.
After specifying your desired settings for the agent
configuration, click the Security and Compliance group, and
then click Patch and Compliance Scan.
Select how you want the security scanner to run on
your managed devices. For more information about an option, click
Help.
Select a scan and repair settings from the available
list to apply it to the agent configuration you're creating. You
can create a new settings or edit an existing settings by clicking
Configure. Scan and repair settings determine whether the
security scanner displays on devices while running, reboot options,
user interaction, and the security content types scanned.
Finish specifying any other desired settings for the
agent configuration and then click Save.
When creating or editing an agent configuration, you can specify
some of the security scanner options, such as when and how often
the scanner runs automatically on managed devices, whether the
scanner displays progress and prompts on the end user device, as
well as global settings for remediation operations such as device
reboot and autofix. For more information on customizing the
behavior of the security scanner agent as part of creating and
deploying agent configurations to managed Windows devices, see
Deploying Security
services.
NOTE: WinSock2 is
required on Windows 9x devices in order for the security scanner
agent to run.
After agent configuration occurs, a program icon for the
security scanner is added to the LANDesk Management program
group in the Start menu on the managed device. This program
can be used to run the scanner directly from the device as opposed
to any runkey launch, recurring local scheduler launch, or
scheduled task via the console.
Additional security settings in agent configurations
When defining a device agent configuration (for Windows
devices), you can also enable and configure complementary security
features, such as:
Frequent security scanning for critical security
risks
Spyware monitoring
Application Blocker
Windows Firewall
Endpoint Security which includes the security
components: HIPS, LANDesk Firewall, and Device Control
Agent Watcher to monitor files and services
802.1X NAC support that extends network access
control (NAC) with authentication and compliance
See the sections below for more information.
About the Frequent Security scan page
Use this page to enable and configure high frequency scanning
for critical, time-sensitive security risks such as recently
discovered and malignant viruses, and firewall configuration
risks.
This page contains the following options:
Use the frequent security scanner: Enables a
frequent security scan on devices with this agent
configuration.
Scan only when a user is logged in: Restricts
the frequent security scan so that it runs only if a user is logged
into the target device.
Every: Specifies the time interval for a the
frequent security scan.
Scan and repair settings (that scans for a
group): Specifies the scan and repair settings that control the
security scanner for frequent security scans. Scan and repair
settings determine whether the security scanner displays on devices
while running, reboot options, and user interaction. The setting
you select must be configured to scan a group, not a type. You can
also click Configure to create a new scan and repair setting
that is associated with a group.
About the Spyware and Application Blocker pages
Use these pages to enable and configure spyware detection and
real-time application blocking and removal on managed devices
configured with this agent configuration.
Real-time spyware detection checks only for spyware definitions
that reside in the Scan group, and that have autofix turned
on. You can either manually enable the autofix option for
downloaded spyware definitions, or configure spyware definition
updates so that the autofix option is automatically enabled when
they are downloaded.
Real-time spyware detection monitors devices for new launched
processes that attempt to modify the local registry. If spyware is
detected, the security scanner on the device prompts the end user
to remove the spyware.
This page contains the following options:
Enable real-time spyware blocking: Turns on
real-time spyware monitoring and blocking on devices with this
agent configuration.
NOTE: In order for real-time spyware scanning and detection
to work, you must manually enable the autofix feature for any
downloaded spyware definitions you want included in a security
scan. Downloaded spyware definitions don't have autofix turned on
by default.
Notify user when spyware has been blocked:
Displays a message that informs the end user a spyware program has
been detected and remediated.
If an application is
not recognized as spyware, require user's approval before it can be
installed: Even if the detected process is not recognized as
spyware according to the device's current list of spyware
definitions, the end user will be prompted before the software is
installed on their machine.
With real-time application blocking, remediation is NOT a
separate task. Application blocking takes place as part of the
security scan itself, by editing the registry on the local hard
drive to disable user access to those unauthorized applications.
Security services uses the Software license monitoring tool's
softmon.exe feature to deny access to specified application
executables even if the executable file name has been modified
because softmon.exe reads the file header information.
This page contains the following options:
Enable blocking of unauthorized applications:
Turns on real-time application blocking on devices with this agent
configuration.
Notify user when an application has been
blocked: Displays a message that informs the end user they have
attempted to launch an unauthorized application and access has been
denied.
Configuring Linux and UNIX
devices for security scanning
Patch and Compliance also supports vulnerability scanning
on:
Red Hat Linux
SUSE Linux
Sun Sparc (Solaris 8)
For each platform, security content can be downloaded with Patch
and Compliance just as with Windows vulnerabilities.
Linux and UNIX devices can't be configured with the security
scanner agent via the console's agent configuration tool. Linux and
UNIX device configuration is a manual process. For more information
about setting up Linux and UNIX devices, see Configuring Linux and UNIX device agents. You can also
see the README file contained in the respective platform's tar file
located in the platforms folder under ManagementSuite\LDLogon on
the core server.
Once configured, Linux and UNIX platforms can be scanned for
vulnerabilities via scheduled tasks from the console. If
vulnerabilities are detected, remediation must be performed
manually at the affected device.
Configuring Mac OS X devices for security scanning
On Macintosh OS X devices, Patch and Compliance supports
security content downloads, as well as security scanning and
remediation.
Additionally, you can create and configure agent configuration
for your Macintosh devices with the Agent configuration tool. As
with Windows agent configuration, the security scanner agent is
part of the default standard LANDesk agent for Macintosh devices.
To create and deploy a Macintosh agent configuration with security
scanner support, see Managing Macintosh devices.
Once configured, Macintosh devices can be scanned for
vulnerabilities via scheduled tasks from the console. If
vulnerabilities are detected, remediation must be performed at the
affected device.
To launch the security scanner manually on Mac devices
Open the Mac OS X System Preferences and
select the LANDesk Client page.
On the Overview tab, click Check Now in
the Security section.
Legal disclaimer
for the blocked applications type
NOTE:Disclaimer
As a convenience to its end users, LANDesk provides access to a
database containing certain information regarding executable files
that an end user may utilize in connection with the application
blocker functionality of the LANDesk Security Suite. THIS
INFORMATION IS PROVIDED AS-IS WITHOUT ANY EXPRESS, IMPLIED, OR
OTHER WARRANTY OF ANY KIND, INCLUDING BUT NOT LIMITED TO THE
IMPLIED WARRANTIES OF MERCHANTABILITY AND/OR FITNESS FOR A
PARTICULAR PURPOSE. As such, LANDesk does not guarantee the
accuracy, completeness or currency of this information and the end
user is responsible to review and confirm this information before
use. Any use of this information is at the end users own
risk.