 Important: Important: |
|---|
| This is retired content. This content is outdated and is no longer being maintained. It is provided as a courtesy for individuals who are still using these technologies. This content may contain URLs that were valid when originally published, but now link to sites or pages that no longer exist. |
Microsoft Corporation
June 1999
Summary:Provides an overview of how to use Platform Builder to build a custom Microsoft Windows CE operating system (OS) for a hardware development platform. Includes instructions for installing Platform Builder, information about building a Windows CE PC-based hardware development platform (CEPC), and a tutorial that demonstrates how to adapt the Windows CE OS for a CEPC. Also includes information about Microsoft Technical Support resources for Platform Builder. (15 printed pages)
Contents
Hardware and Software Requirements
The following are the hardware and software requirements for
Platform Builder:
Platform Builder is distributed on multiple compact discs
(CDs). The Platform Builder Setup application, Setup.exe, performs the
following tasks:
To install Platform Builder
To verify that Platform Builder is installed correctly, open a
command prompt window and type "set _winceroot." The _winceroot
environment variable specifies the fully qualified path of the
directory in which Platform Builder is installed. The following
table explains the messages returned by the
Setcommand. The CEPC is one of two hardware development platforms supported
by Platform Builder. This guide provides information for setting up
and using only a CEPC. This information is also available on the
Microsoft Windows CE Web site at
http://msdn.microsoft.com/embedded/ce.net/default.aspx. This section recommends specific hardware components and
configurations for the CEPC. Other basic input/output systems
(BIOS), motherboards, and configurations can be used to build a
CEPC; however, because Windows CE is not a Plug and Play system, it
requires plug-in cards that live at fixed slots and use fixed
resources such as interrupt request lines (IRQs) and I/O base
addresses. Therefore, if you use different hardware, you must set
up the BIOS and hardware configuration to match the Windows CE
operating system. For this reason, we strongly suggest that you use
the recommended CEPC hardware components and configurations
described in this section. The hardware required to build a CEPC is the CPU, display card,
and other peripherals. The following is a list of recommended CEPC
components. These components are off-the-shelf products. The
typical cost of building a CEPC based on this configuration ranges
from $300 to $400, depending on the number of peripheral cards. The following table lists the essential hardware for the
CEPC. The following list provides additional information about
essential hardware for the CEPC:
The following table lists optional hardware for the CEPC that
can be used depending on the type of development and testing that
is done. The following list provides additional information about
optional hardware for the CEPC:
The hardware just listed does not include an audio controller,
because we have not yet tested the audio portion of this
specification on the CEPC. Once the appropriate audio hardware has
been tested and verified, the CEPC specification will be updated on
the Windows CE Web site. The audio card that has been tested and
verified on Windows CE operating system version 2.10 and later is
the Sound Blaster AWE64 Plug and Play card. This section provides detailed step-by-step instructions on how
to assemble and/or set up the CEPC. Please consult the motherboard documentation for information on
installing the motherboard, the jumper settings for the CPU, system
memory, and other system configurations. The following table lists
the recommended motherboard and peripheral card configuration for
the CEPC. This section provides the exact BIOS settings that need to be
set on the CEPC for the motherboard and card configuration listed
in the preceding table. For the
Standard CMOS Setupchoose the default CMOS settings in the
BIOS. The following table lists the recommended settings for the
Features Setupin the BIOS. The following table lists the recommended settings for the
Chipset Features Setupin the BIOS. For the
Power Management Setupchoose the default
Power Managementsettings in the BIOS. The following table
lists the recommended settings for the
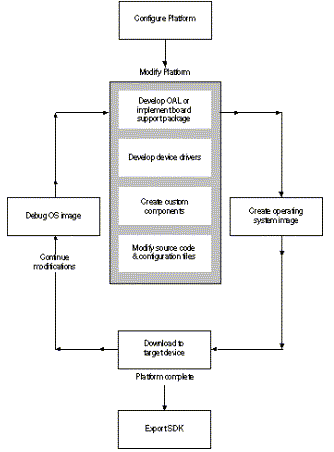
PNP and PCI Setupin the BIOS. The following illustration shows the process of building a
custom Windows CE OS for a hardware development platform.
This section provides a tutorial that demonstrates how to use
Platform Builder to build a custom Windows CE OS for a CEPC. In
this tutorial, the Windows CE OS image is built using the Maxall
configuration. Maxall builds a fully configured version of Windows
CE. Once the Windows CE OS image is built, this tutorial also
demonstrates how to boot the CEPC (assembled in the previous
section) using this Maxall image. In this tutorial, you complete the following tasks:
To create a new platform and build the Windows CE OS image
Once a valid Windows CE OS image is built, an Ethernet
connection and the appropriate Ethernet tools are used to transfer
the OS image from the development workstation to the CEPC platform.
The Ethernet connection method requires that the following files on
the development workstation are run in a Command Prompt Build
window for the OS configuration.
The recommended hardware configuration for the CEPC does not
include a hard drive. Instead, the specification assumes that the
CEPC is booted using a boot floppy program. Typically, the CEPC is
connected to the development workstation via an Ethernet connection
and the Windows CE OS image is downloaded from the development
workstation to the CEPC using the Ethernet connection. After the
image is transferred into CEPC's system memory, a bootloader
program on the boot floppy disk boots the Windows CE OS image. For more information about the CEPC hardware configuration, see
the section
"Building a CEPC"earlier in this
article.
To create a boot disk for the CEPC
After you create the boot floppy disk, it should contain the
following important files:
This file is an Ethernet bootloader component.
This file loads the bootloader image Eboot.bin.
These files are required MS-DOS files.
This file contains instructions to boot the CEPC, which are also
provided later in this article.
The Eboot.bin and Loadcepc.exe files are updated in this release
of Windows CE version 2.12. The new Loadcepc.exe and Eboot.bin
files provide the ability to use static IP addresses to boot the
CEPC when a Dynamic Host Configuration Protocol (DHCP) server is
not available to automatically serve up Internet Protocol (IP)
addresses. In addition, these tools can also be used to download a
Windows CE OS image from version 2.11 release. Depending on which debug/download network card you are using,
ISA or PCI, verify that Autoexec.bat on the boot disk is setup
correctly for the network card. The following examples are for an ISA-based Ethernet network
card. If you are using the Linksys LNE2000 ISA card, verify that
Autoexec.bat contains one of the following lines. The file should contain the following line if you are using a
DHCP Server: The file should contain the following line if you are using a
static IP address: The first line is used when a DHCP server is available to serve
up IP addresses automatically in the network environment. If you do
not have a DHCP server, use the second line, which specifies a
static IP address to the Loadcepc tool. In both examples the IRQ
parameter is set to 5 and the I/O base address is set to 340,
therefore you must manually set these parameters on the ISA network
card by using the network utilities provided by the card
manufacturer. The following examples are for a PCI-based Ethernet network
card. If you are using the Kingston KNE30T PCI card, verify that
Autoexec.bat contains one of the following lines. The file should contain the following line if you are using a
DHCP server: The file should contain the following line if you are using a
static IP address: The first line is used when a DHCP server is available to serve
up IP addresses automatically in the network environment. If you do
not have a DHCP server, use the second line that specifies a static
IP address to the Loadcepc tool. In both examples, the IRQ
parameter is set to 9 and the I/O base address is set to 0. The
Eboot.bin image provided on the boot floppy will automatically ping
the network card using IRQ:9, read the card's I/O base address, and
then use the correct address for network operation. Therefore, it
is not necessary to manually set the configuration parameters on
the network card as in the case when an ISA-based Ethernet network
card is used. The parameter 1 in /e:1 in the previous command line signifies
the type of network card used for the CEPC. Because only the NE2000
compatible card is supported, this parameter must always be set to
1.
To create a Command Prompt Build window on the development
workstation
To Transfer the Windows CE OS image to the CEPC using an
Ethernet connection
If you do not see your device name listed in the dialog box or
if you are running into other problems, connect a null serial cable
between the CEPC and the development workstation. Then, run a
terminal program on the development workstation (with the
appropriate terminal settings) before booting the CEPC. When the
CEPC boots, you will see debug serial output on the terminal
window. The following is an example of the debug serial output that
is displayed:
Included in the debug serial output is the device name for the
CEPC. In the preceding example the device name is CEPCLS54334. The
device name includes the Ethernet address of the CEPC and a
two-letter suffix indicating the type of Ethernet network card
being used. In the example the suffix is LS, which refers to the
ISA LinkSys card. The only other suffix that is currently supported
for the Ethernet network card is KS, which refers to the PCI
Kingston card. However, you can use an NE2000-compatible card from
any manufacturer.
Use this device name as arguments for Cesh.exe and Ceterm.exe in
steps 9 and 10 of this procedure.
This must be selected because images are not persistent after
the hardware development platform is rebooted.
Allow all Ethernet applications to remain running on the
development workstation. The CEPC platform will broadcast a BOOTME
message to Eshell.exe, and the Eshell application will download the
named image file and begin execution.
When the download is complete, the prompt
Windows CE>is displayed in the build window. The Windows
CE OS image should have booted on the CEPC machine.
To build a sample application on the development workstation
To start kernel debugger
The
Gocommand executes code from the current statement until a
breakpoint or the end of the program is reached, or until the
application pauses for user input.
The online documentation and context-sensitive help included
with Platform Builder provide comprehensive background information
and instructions for using Platform Builder.
To access the online documentation for Platform Builder
You can find updates to the documentation and technical
information in the Readme file on one of the Platform Builder
CDs. In addition, Microsoft offers technical support and services
ranging from self-help tools to direct assistance from a Microsoft
technical engineer.
To view technical support in online Help
A Help page titled "Getting Help from Microsoft Technical
Support" is displayed. This page contains links to a variety of
technical support topics.
To view technical support information on the Web
The information contained in this document represents the
current view of Microsoft Corporation on the issues discussed as of
the date of publication. Because Microsoft must respond to changing
market conditions, it should not be interpreted to be a commitment
on the part of Microsoft, and Microsoft cannot guarantee the
accuracy of any information presented after the date of
publication. This document is for informational purposes only.
This White Paper is for informational purposes only. MICROSOFT
MAKES NO WARRANTIES, EXPRESS OR IMPLIED, IN THIS DOCUMENT.
© 1999 Microsoft Corporation. All rights reserved.
Microsoft, Win32, Windows, and Windows NT are either registered
trademarks or trademarks of Microsoft Corporation in the United
States and/or other countries.
Other product and company names mentioned herein may be the
trademarks of their respective owners.
Installing Platform Builder
Building a CEPC
Building and Running an OS Image
For More Information
Hardware and Software Requirements
Installing Platform Builder
Note To reduce the installation
size of Platform Builder, you can deselect the CPUs you do not need
in the
CPU Selectiondialog box and deselect options in the
Custom Optionsdialog box. To access the
Custom Optionsdialog box, choose the
Optionsbutton in the
CPU Selectiondialog box.
Message
Definition
_winceroot=<
fully qualified path>
Platform Builder is installed correctly.
Environment variable _winceroot not defined
You either did not restart the development
workstation following setup, or Setup.exe did not complete
successfully. Uninstall and reinstall Platform Builder.
Building a CEPC
Hardware Requirements for a CEPC
Product
Description
Motherboard
Asus P5A or P5A-B Super Socket7
CPU
AMD K6-200 or any
Case
Enlight ATX 250W
Heat Sink/Fan
Any
Memory
Minimum 32 Mb PC-100 SDRAM or any
Floppy
1.44 MB Teac Floppy or any
Video card
S3 3D Virge 4MB
Debug/Download Ethernet
ISA or PCI-based NE2000-compatible network
card
Product
Description
Product Ethernet
PCI-based NE2000 compatible network card
PC card controller
Intel 82365 chipset Personal Computer Memory Card
International Association (PCMCIA) controller
Universal serial bus (USB) controller
OHCI controller built in to the motherboard
Fast IR controller
National Semiconductor PC87108 or PC87338 chipset
based FIR controller
Assembling the CEPC
Motherboard and card configuration
Slot number
Card/adapter
I/O base
Comments
Interrupt (IRQ)
PCI Slot 1
S3 Virge Video
Required
(Not Used)
PCI Slot 2
NE2000 Debug/Download Ethernet
Optional
9
PCI Slot 3
NE2000 Product Ethernet
Optional
15
PCI Slot 4
PCI Slot 5 /ISA Slot 1
PC Card Adapter
0x300
Optional
11
ISA Slot 2
LinkSys NE2000 Debug/Download Ethernet
0x340
Required
5
Built-in COM1
COM1
0x3f8
4
Built-in COM2
COM2
0x2f8
3
Built-in LPT1
LPT1
0x378
7 (not yet used)
Built-in USB
14
Built-in Audio
10
Built-in Kbd/Mouse
1
BIOS settings
Option
Setting
Boot Virus Detection
Disabled
PCI/VGA Palette Snoop
Disabled
CPU Internal Cache
Enabled
Video ROM BIOS Shadow
Enabled
External Cache
Enabled
C8000 –CBFFF Shadow
Disabled
Quick Power On Self Test
Enabled
CC000 –CFFFF Shadow
Disabled
HDD Sequence SCS/IDE First
IDE
D0000 -D3FFF Shadow
Disabled
Boot Sequence
A/C
D4000 -D7FFF Shadow
Disabled
Boot Up Floppy Seek
Enabled
D8000 –DBFFF Shadow
Disabled
Floppy Disk Access Control
Read Only
DC000 –DFFFF Shadow
Disabled
IDE HDD Block Mode Sectors
Disabled
Boot Up NumLock Status
On
HDD S.M.A.R.T capability
Disabled
Typematic Rate Setting
Disabled
PS/2 Mouse Function Control
Enabled
Typematic Rate (Chars/Sec)
6
OS/2 Onboard Memory
Disabled
Typematic Delay (Msec)
250
Security Option
Setup
Option
Setting
SDRAM
By SPD
Onboard Serial Port 1
3F8/IRQ4
SDRAM CAS Latency
2T
Onboard Serial Port 2
2F8/IRQ3
SDRAM RAS Precharge Time
2T
Onboard Parallel Port
378/IRQ7
SDRAM RAS to CAS Delay
2T
Parallel Port Mode
EPP
Enhanced Page Mode Count
Disabled
ECP DMA Select
Disabled
Internal Page Detection
Disabled
Onboard IR
Disabled
SDRAM Pipe Function Disabled
IR Mode
IrDA SIR
SDRAM x111-211 Mode
Enabled
FIR DMA Select
1
I/O Recovery Time
Disabled
Onboard PCI IDE Enable
Disabled
Graphics Aperture Size
64 MB
IDE Ultra DMA Mode
Disabled
Frame Buffer Posted Write
Enabled
IDEO Master PIO/DMA Mode
Auto
Force PCI_66 GAT Mode
Disabled
IDO Slave PIO/DMA Mode
Auto
AGP Bus Turbo Mode
Enabled
IDE1 Master PIO/DMA Mode
Auto
Passive Release
Disabled
IDEO Slave PIO/DMA Mode
Auto
Delayed Transaction
Disabled
Memory Hole at 15M-16M
Disabled
DRAM are 64 (Not 72) bits wide
Data Integrity Mode
Disabled
Onboard FDC Controller
Enabled
Onboard FDC Swap A & B
No Swap
Option
Setting
PNP OS Installed
No
DMA 1 Used By ISA
No/ICU
Slot 1 IRQ
NA
DMA 3 Used By ISA
No/ICU
Slot 2 IRQ
9
DMA 5 Used By ISA
No/ICU
Slot 3/Audio IRQ
NA
Slot 4/5 IRQ
NA
ISA MEM Block BASE
No/ICU
PCI Latency Timer
0 PCI Clock
SYMBIOS SCSI BIOS
Disabled
IRQ 3 Used By ISA
No/ICU
USB Function
Enabled
IRQ 4 Used By ISA
No/ICU
USB IRQ
14
IRQ 5 Used By ISA
Yes
VGA BIOS Sequence
PCI/AGP
IRQ 7 Used By ISA
No/ICU
IRQ 9 Used By ISA
No/ICU
IRQ 10 Used By ISA
No/ICU
IRQ 11 Used By ISA
Yes
IRQ 12 Used By ISA
No/ICU
IRQ 14 Used By ISA
No/ICU
IRQ 15 Used By ISA
No/ICU
Building and Running an OS Image
Note This tutorial assumes you
selected the x86 CPU during the installation of Platform Builder
and installed Platform Builder in the default directory provided by
Setup.exe.
Editing Autoexec.bat
loadcepc /b:38400 /v/e:1:340:5 eboot.bin
loadcepc /b:38400 /v /e:1:340:5:<IP
Address> eboot.bin
loadcepc /b:38400 /v/e:1: 0:9 eboot.bin
loadcepc /b:38400 /v /e:1: 0:9:<IP Address>
eboot.bin
Note When Autoexec.bat is
created on the boot floppy disk, it is configured by default to be
used with the Linksys ISA network card. This configuration assumes
that a DHCP server is available.
\Profiles\All Users\Start Menu\Programs\Microsoft
Windows CE Platform Builder 2.12\x86 Tools
directory where
rootdirectoryis the directory in which the Windows NT
profiles are stored, for example C.
>Microsoft Windows CE Ethernet Bootloader 2.2
for CE/PC... > ... >Using device name: CEPCLS54334
cd
\<%Wince_Root%>\public\common\oak\bin\i386 regini
ppsh.ini
Note If you do not run Cesh.exe
and Ceterm.exe before beginning the image download, the image will
not boot on the hardware development platform.
For More Information