|
|
< Day Day Up > |
|
You’re now ready to begin the upgrade process. Remember, a top-down upgrade is strongly recommended, as SMS 2003 sites can report only to other SMS 2003 sites and not to SMS 2.0 sites. In this section we’ll begin with upgrading the primary site server and then explore upgrading secondary sites. Remember that you must run the DRW before upgrading to identify any problems that you might encounter—for example, an enabled logon point or software metering server. Once you have cleaned up your SMS 2.0 site, existing objects (collections, packages, advertisements, queries) will be migrated to the new SMS 2003 site.
The site upgrade process for a primary site is fairly straightforward, providing you have prepared the SMS 2.0 site server appropriately. Most notably, check that the server meets the hardware requirements, that it’s running a supported operating system platform (with all appropriate service packs applied, of course), and that the appropriate version of SQL Server has been installed (with the appropriate service pack applied, of course).
You’ll need to log onto the site server using an account that has administrative permissions for the SMS database as well as for the server itself. The account needs to be a member of the local Administrators group. You’ll also need access to the SMS 2003 source files.
Log on to the site server and locate the SMS 2003 source files that you’ll be using to upgrade the server, either from the application CD or a network share. Then follow these steps to upgrade the primary site:
Navigate to the SMSsetup\Bin\I386 folder and then double-click Setup.exe to launch the Microsoft Systems Management Server Setup Wizard Welcome page, shown in Figure 20.9.
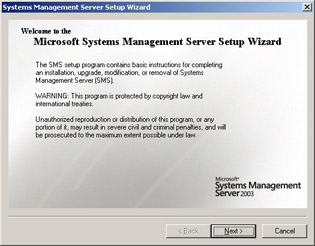
Figure
20.9: The Microsoft Systems Management Server Setup Wizard
Welcome page.
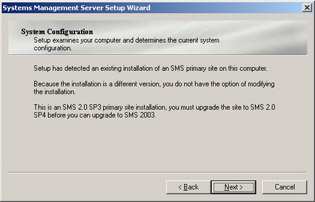
Click Next to display the System Configuration page, shown in Figure 20.10, and verify that Setup has found the SMS 2.0 site. Read the page text before you proceed with the upgrade. Note that in this example you’re reminded that the SMS 2.0 site must be running SMS 2.0 SP4 before you can upgrade. This is the kind of issue that the DRW can alert you to before you start your upgrade.
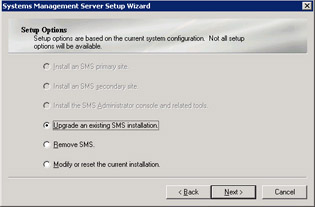
Click Next to display the Setup Options page, shown in Figure 20.11. The option Upgrade An Existing SMS Installation is selected by default.
From this point, the remaining installation runs pretty much the same as described in Chapter 2. Click Next to display the Systems Management Server License Agreement page, shown in Figure 20.12. After reading the license agreement, select I Agree (assuming that you do).
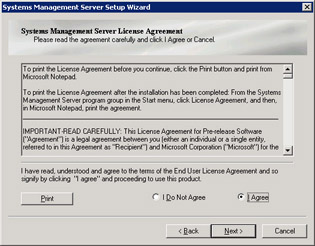
Figure
20.12: The Systems Management Server License Agreement
page.
If your installation of SQL Server is on a server other than the SMS site server, clicking Next will display the SMS Provider Information page, shown in Figure 20.13. Select either the SMS Site Server option or the SQL Server Computer option. The accompanying notes on this page will help you decide where to place the SMS Provider. In general, for large sites with a large number of SMS administrators and because the SMS Provider’s primary task is to access object data in the SMS database, you should place the SMS Provider where the database resides—on the SQL Server computer.
Click Next to display the Completing The Systems Management Server Setup Wizard page and then click Finish to begin the primary site upgrade process.
At this point, if this site has any child sites the setup process will remind you to upgrade these sites using a top-down approach, as discussed earlier. Keeping this in mind, if this site reports to an SMS 2.0 site, click Cancel to stop the migration process. Remember that SMS 2003 sites can’t report to SMS 2.0 sites. Click Finish to continue.
| Caution |
Clicking Cancel stops the migration, but it doesn’t leave the existing SMS 2.0 site intact. In this case, use your backup of the SMS 2.0 site to recover it. |
When the upgrade is complete, a message to that effect is displayed on your screen. Click OK.
When you upgrade the parent site of an SMS 2.0 secondary site to SMS 2003, the secondary site isn’t automatically upgraded. This allows you to maintain SMS 2.0 secondary sites if you need to—for example, to support older Windows clients.
If you need to upgrade the secondary site, you can do so using one of the following techniques:
Initiate the upgrade process wholly from the parent site. This procedure will take up some network bandwidth and is similar to creating a secondary site as outlined in Chapter 4, “Multiple-Site Structures”— that is, you right-click your primary site entry in the SMS Administrator Console, choose All Tasks from the context menu, and then choose Upgrade Secondary Sites to launch the Upgrade Secondary Site Wizard. This wizard is fairly self-explanatory; refer to Chapter 14 in the Microsoft Systems Management Server 2003 Concepts, Planning, and Deployment Guide, mentioned earlier in this chapter, for details.
Initiate the upgrade process from the parent site but place the source files locally at the secondary site to minimize network concerns.
Upgrade locally at the secondary site server, using the SMS 2003 source files and setup process. Again, this procedure is similar to that outlined in Chapter 4 for creating a new SMS 2003 secondary site. It’s almost identical to the primary site upgrade procedure discussed in the preceding section. In this case, however, there will be no database to convert, so the process should take less time.
|
|
< Day Day Up > |
|