|
|
< Day Day Up > |
|
After you have created your packages and programs, the next step is to create an advertisement. Remember, before you configure an advertisement, you must have identified and created the collections that you’ll advertise the programs to. Programs are always advertised to collections—even if it’s a collection of one.
To create an advertisement, follow these steps:
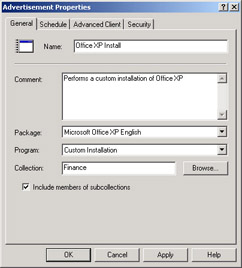
In the SMS Administrator Console, navigate to the Advertisements folder, right-click it, choose New from the context menu, and then choose Advertisement to display the Advertisement Properties dialog box, as shown in Figure 12.47.
In the General tab, begin by entering a descriptive name for the advertisement. Enter a descriptive comment to add more detail. Select the package and program to advertise from their respective list boxes. Enter the collection name, or browse for it by clicking Browse. If the collection has subcollections and you want to include them in the advertisement, select the Include Members Of Subcollections check box.
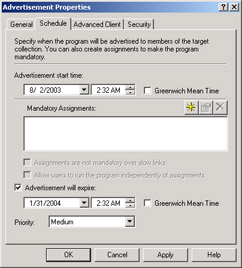
Select the Schedule tab, shown in Figure 12.48. Begin by selecting the start time and date for the advertisement. This setting represents the time at which the program is advertised and made available for the client to run. By default, the advertisement will be made available in all time zones at the same time, meaning that if the advertisement start time is 3:00 in New York, it’s made available in New York at 3:00, in Chicago at 2:00, in London at 8:00, and so on. If you want the advertisement to be made available at a specific hour in each time zone—for example, at 3:00 in New York, Chicago, and London, select the Greenwich Mean Time check box.
If the advertisement will be available for only a specific period of time, select the Advertisement Will Expire check box, select an expiration date, and select Greenwich Mean Time if desired. The priority you specify is a sending priority only and is used when the advertisement is sent to a child site.
You can also assign a run time to the advertisement. To configure this option, click New (the yellow star button) in the Mandatory Assignments section of the Schedule tab to display the Assignment Schedule dialog box, shown in Figure 12.49. Here you can assign a mandatory time and date for the advertised program to run. If the program is not run by this time and date, the Advertised Programs Client Agent on the client will execute it.
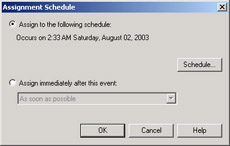
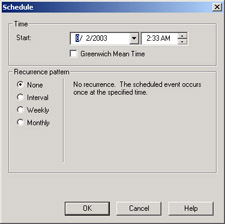
If you select Assign To The Following Schedule and click Schedule, the Schedule dialog box appears, as shown in Figure 12.50. In this dialog box, you can specify exactly when you want to run the advertised program. You can also set a recurrence interval for advertisements such as monthly virus file updates.
If you select the Assign Immediately After This Event option in the Assignment Schedule dialog box, you can choose to have the advertised program execute as soon as possible—meaning as soon as the program reaches the client and all program requirements (correct platform, user logged on, administrator access, and so on) are met; at logoff—the next time a user logs off the client; or at logon—the next time a user logs on to the client.
Click OK to return to the Schedule tab. If you configure a mandatory assignment, two additional options become available. Select the Assignments Are Not Mandatory Over Slow Links check box to prevent a potentially large program from running if the Advertised Programs Client Agent discovers that the network is overutilized. Select the Allow Users To Run The Program Independently Of Assignments check box if you want to give the user the option of canceling a mandatory advertisement when it’s scheduled to run or to reschedule when the advertisement runs.
Select the Advanced Client tab, shown in Figure 12.51. These options are available for use by Advanced Clients only and determine how a program should run when a distribution point is or is not available in the site the Advanced Client is roaming to.
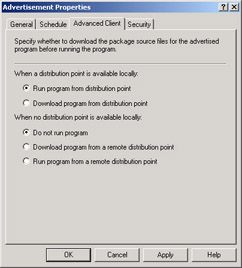
Figure
12.51: The Advanced Client tab.
In the When A Distribution Point Is Available Locally section the default option is Run Program from Distribution Point. This means that the program is executed from the distribution point. However, if the computer loses its connection to the distribution point while the program is running, the program will fail. Choose the Download Program From Distribution Point option to ensure that the entire package is downloaded to the client before the program is executed. If the distribution point supports Background Intelligent Transfer Service (BITS) and the computer becomes disconnected from the distribution point before the files have been downloaded, the download will pick up where it left off when the computer reestablishes a connection.
In the When No Distribution Point Is Available Locally section, the default option is Do Not Run Program. By default, packages aren’t run if the distribution point is not local. Since Advanced Clients can roam to the boundaries of other SMS sites in the hierarchy, there might not be a local distribution point available that has the package. If the package is located on a distribution in the Advanced Client’s assigned site, the distribution point is considered remote. Choose the Download Program From A Remote Distribution Point option if this package needs to be run on the client and the package is large or the network link to the remote site is slow. Choose the Run Program From A Remote Distribution Point option if the package needs to be run on the client and the package is small or the network connection to the remote site is fast and reliable.
Click OK to create the advertisement.
As we’ve seen, you can specify a recurring schedule for your advertisement. This setting can be useful for programs that need to be executed on a regular basis. Let’s return to our virus update file example. Suppose you’ve created a package that distributes a virus update file once a month. On the 14th of every month, you obtain a virus update file and replace the old file in the package source file directory with the new file. You also configure the package to refresh its distribution points once a month, say on the 15th.
When you create the advertisement, give it an assigned schedule. Set it to run on the 16th, maybe at 11:00 P.M. Now all you have to do is remember to update the source file directory once a month. The package and advertisement process will take care of the rest.
You might also consider creating a package that executes the virus-scanning program on the client. Again, you could assign a recurring advertisement to run the virus scan at regular intervals. Here’s another twist on this scenario: let’s say that you want the virus scan to run immediately after the virus update file is installed. You’ve seen that when you create a program, you have an advanced option to run another program first. You would then create a program that executes the virus scan but first copies the update file. Then create a recurring advertisement that runs that program once a month at the appropriate time.
You can use recurring advertisements to handle a variety of these kinds of events. Use them to periodically synchronize the system time on your SMS clients with the site server. Use them to perform disk maintenance tasks such as monthly defragmentation or optimization routines. With a little creativity and imagination, you can automate many such tasks and make your job as a system administrator more productive.
|
|
< Day Day Up > |
|