|
|
< Day Day Up > |
|
In addition to the methods described earlier in this chapter for creating and distributing a package and an advertisement, SMS 2003 includes an alternative tool called the Distribute Software To Collection Wizard. This wizard walks you through each step in the process of creating or identifying a package and program, defining a distribution point, creating or identifying a collection to a target, and creating an advertisement.
| Note |
The procedure described below varies slightly depending on where you start the wizard. |
To run the Distribute Software To Collection Wizard, follow these steps:
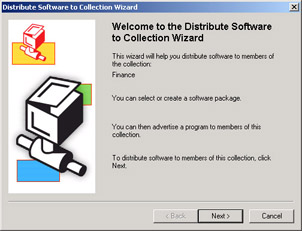
Right-click any collection, resource, package, program, or advertisement in the SMS Administrator Console, choose All Tasks from the context menu, and then choose Distribute Software to launch the Distribute Software To Collection Wizard, shown in Figure 12.39.
Figure
12.39: The Distribute Software To Collection Wizard welcome
page.
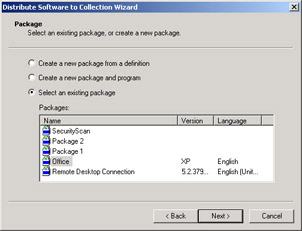
Click Next to display the Package page, shown in Figure 12.40. Here you can create a new package and program from scratch or from a definition file or you can select an existing package.
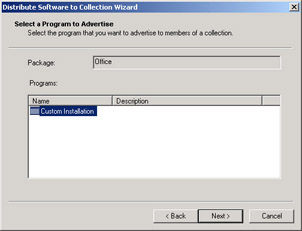
Click Next. The next few pages will vary depending on whether you're creating a new program from scratch or from a package definition or by selecting an existing program. If you selected an existing package, the Select A Program To Advertise page is displayed, as shown in Figure 12.41. Select the distribution point that should receive the package source files.
Figure
12.41: The Select A Program To Advertise page.
If you selected Create A New Package From A Definition, you're presented with pages asking you to select the package definition file and define the source file directory.
If you selected Create A New Package And Program, the wizard will prompt you for a package name and identification, the location of source files (if there are any), the program name and command line, as well as ask whether user input is required or administrative rights are needed.
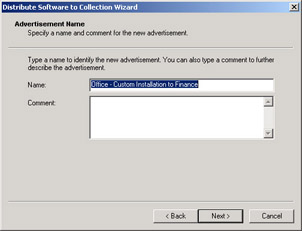
Click Next. The next few pages prompt for advertisement properties. On the Advertisement Name page, shown in Figure 12.42, enter a descriptive name and comment for the advertisement.
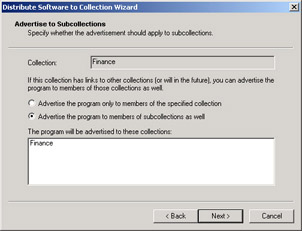
Click Next to display the Advertise To Subcollections page, shown in Figure 12.43. Here you can specify whether to advertise to the collection's subcollections if any exist.
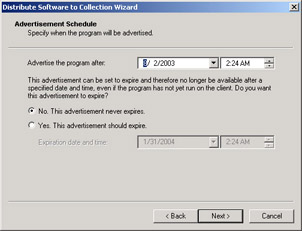
Click Next to display the Advertisement Schedule page, shown in Figure 12.44. This page lets you specify when the advertisement should be offered and whether it expires.
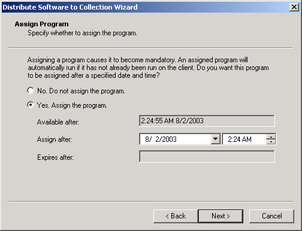
Click Next to display the Assign Program page, shown in Figure 12.45. Here you can specify an assigned time if necessary.
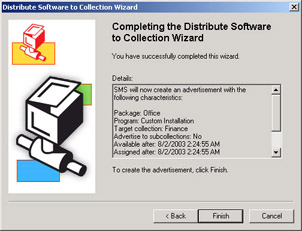
Click Next to display the Completing The Distribute Software To Collection Wizard page, shown in Figure 12.46. Review your selections and then click Finish to begin the package distribution and advertisement processes.
Figure
12.46: The Completing The Distribute Software To Collection
Wizard page.
As you've probably noticed, the Distribute Software To Collection Wizard doesn't present you with all possible options available for packages, programs, and advertisements. For example, you can't create a recurring advertisement using this wizard. However, the wizard does provide a fine method for generating general packages, programs, collections, and advertisements. There's also a neat technique for targeting one computer without having to create a collection of one: use the wizard to create the collection for you. Simply start the wizard by right-clicking the computer resource you want to target.
| Note |
In case you were wondering, you can't use Ctrl+click to select more than one client at a time in a collection. There is currently no way to target a group of two or three computers that are part of a larger membership without creating a separate collection for them. Perhaps we'll see this functionality in a future release of SMS. |
|
|
< Day Day Up > |
|
The server encountered an internal error or misconfiguration and was unable to complete your request.
Please contact the server administrator at webmaster@systemmanager.forsenergy.ru to inform them of the time this error occurred, and the actions you performed just before this error.
More information about this error may be available in the server error log.
Additionally, a 500 Internal Server Error error was encountered while trying to use an ErrorDocument to handle the request.