|
|
< Day Day Up > |
|
Now we can delve into the package distribution process in more detail, beginning with package creation itself. In this section we’ll explore the package creation process, including identifying distribution points and creating programs.
If your package involves the accessing of source files, such as performing a software installation, you must define a location for the source files. The location can be a shared folder on the site server or on a remote server, including a CD-ROM drive. The most important characteristic of the source file location is that it must be accessible to the SMS site server either using the SMS service account if running SMS in standard security mode or using the site server’s computer account if running SMS in advanced security mode. If your program involves using a script file or files, be sure to include them as part of your source files as well or the program will fail.
As in all things SMS, you’ll begin in the SMS Administrator Console. You can create a package either from scratch—one for which you provide all the configuration details—or from a package definition file that already contains all the package details. In this section we’ll look at the former technique.
To create a package from the ground up, follow these steps:
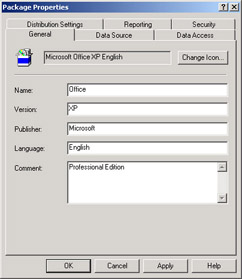
Navigate to the Packages folder, right-click it, choose New from the context menu, and then choose Package to display the Package Properties dialog box, shown in Figure 12.1.
In the General tab, enter the name of the package, its version, its publisher, its language, and a descriptive comment if desired. The only required value here is Name. Notice that the full package name is displayed in the text box to the left of the Change Icon button.
Click Change Icon to enter or browse for an icon file or Setup.exe file to display the correct icon for the package. The default icon is the SMS package icon.
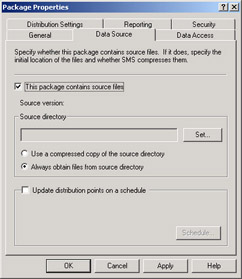
Select the Data Source tab, shown in Figure 12.2. This tab lets you define details concerning the source files for the package. If the package contains source files—even a single file—select the This Package Contains Source Files check box to enable the options in the Source Directory frame.
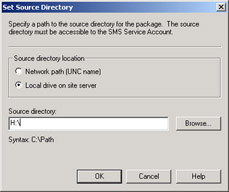
Click Set to display the Set Source Directory dialog box, shown in Figure 12.3. In this dialog box you define the location of the source files. The location can be either a local drive path or a UNC path to a remote share. Enter the location or click Browse to look for the directory. Then click OK to return to the Data Source tab.
If your source files aren’t likely to change or are on a removable medium such as a CD-ROM, or if the source path is likely to change, select the Use A Compressed Copy Of The Source Directory option. This option causes SMS to create and store a compressed version of the source files on the site server. When the package needs to be sent to a new distribution point or updated on existing distribution points, SMS will access the compressed files, uncompress them, and send them to the distribution points.
If your source files are likely to change periodically—for example, if they include a monthly virus update file—select Always Obtain Files From Source Directory. Selecting this option also allows you to select the Update Distribution Points On A Schedule check box. Setting an update schedule ensures that as the source files change, the distribution points will be updated regularly.
Select the Data Access tab, shown in Figure 12.4. The Data Access tab defines how SMS will store the package source files on the distribution points. The default setting is Access Distribution Folder Through Common SMS Package Share. With this setting, SMS will define a share point on the distribution points and place the source files in a folder in that share. The share will always be SMSPKGx$, where x represents the drive with the most free disk space. This share is a hidden share to keep prying eyes from browsing for it. When SMS runs out of disk space, it will find the next drive with the most free space and create an additional SMSPKGx$ directory and share there.
If you prefer to create your own folder organization and access shares, you may do so first and then reference the share by selecting the option Share Distribution Folder and entering the UNC path to the share. This value can be a share or a share and a path, but whatever value you enter must be unique among all packages. Also, the share and path must already exist on the distribution points that you target. If you enter only a share name (in the form \\server\appshare), any file or subfolders created within the share will be deleted and re-created whenever the package is updated or refreshed. If you enter a share that includes a path (\\server\appshare\word), only the down-level folder will be deleted and re-created.
Select Disconnect Users From Distribution Points to do just that. If you want to ensure that no users are connected to the package folder on the distribution points when files are being refreshed or updated, this option will cause SMS to inform users that they will be disconnected. Users will be disconnected after the time period you specify in the User Grace Period text box. The default value is 5 minutes, but you can specify from 0 to 59 minutes. The Number Of Retries Before Disconnecting Users option indicates how many times SMS will attempt to refresh the distribution points before disconnecting users. This value can range from 0 to 99.
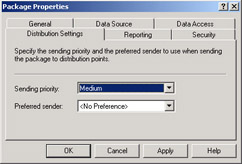
Select the Distribution Settings tab, shown in Figure 12.5. In this tab you identify the sending priority and preferred sender to use when sending this package to distribution points in a child site. If you have no child sites, these settings will have no effect. (Refer to Chapter 4, “Multiple-Site Structures,” for a discussion of parent-child relationships and the role of the sender in transferring information between sites in the hierarchy.)
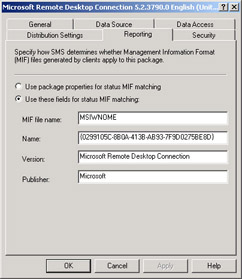
Select the Reporting tab, shown in Figure 12.6. This tab lets you identify how SMS reports installation status Management Information Format (MIF) files from the client when the package is run. Select Use Package Properties For Status MIF Matching to simply use the values you supplied in the General tab to identify status MIF files generated during installation. Or select Use These Fields For Status MIF Matching and fill in the fields if you want to specify different values.
Select the Security tab to set class and instance security rights for the package. This type of security is discussed in Chapter 17, “Security.”
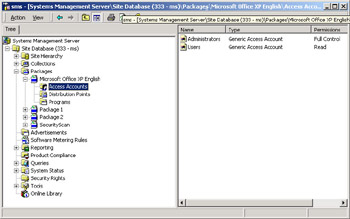
We haven’t quite finished creating this package. If you expand the new package entry you just created in the SMS Administrator Console, as in the example shown in Figure 12.7, you’ll see that three areas of configuration remain. The first area, defining access accounts, allows you to further secure who has access to the distribution source files. The other two areas are absolutely essential to the successful distribution of the package: defining distribution points, without which the client has no access to the source files, and defining programs, which specifies how to install or run the source files. Let’s configure the access account first.
By default, when SMS creates the SMSPKGx$ share, it grants Read access to the local Users group and Full Control to the Administrators group. The default Users and Administrators entries map to the local Users and Administrators groups for Windows distribution points. These accounts are known as generic package access accounts.
Since the default share is a hidden share, the only way a client should know that a package is available to it is through the package distribution process. In other words, the client agent will see an advertisement for that package that targets a collection the client is a member of. Bear in mind that users will be users, and it’s possible that they will find the hidden share, navigate to a package folder, and execute any programs they find there. This could also happen if you create your own shares.
There are a couple of ways to deal with this little breach of security. One would be for you to evaluate the share (or NTFS) security for the SMS shares or for the package folders within the share. This is a time-consuming and potentially destructive process if you happen to lock out SMS from accessing the share. The other solution is to define access accounts for the package through the SMS Administrator Console. When you define an access account, you also define the level of access or permission for the specified user or group. This is much like creating ACLs in Windows.
To define an access account, follow these steps:
Navigate to the Packages folder, find your package entry, and expand it.
Right-click Access Accounts, choose New from the context menu, and then choose the type of access account you want to create.
The two types of access accounts are listed here:
Windows User Access Account—Defines a Windows user or group account and the level of permission to allow
Generic Access Account—Defines additional or replacement user, guest, or administrator accounts and the level of permission to allow that maps to an operating system–specific account
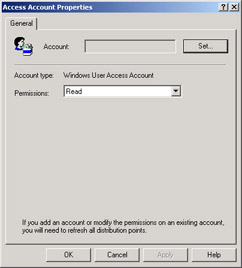
Select the appropriate option to display the Access Account Properties dialog box, shown in Figure 12.8.
Click Set to specify the account information as follows:
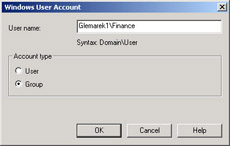
For a Windows user account, the Windows User Account dialog box will appear, as shown in Figure 12.9. Enter the user or group account in \\Domain\user format, and select User or Group.
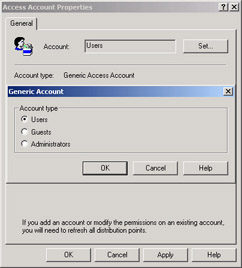
For a Generic account, the Generic Account dialog box will appear, as shown in Figure 12.10. Select the account type.
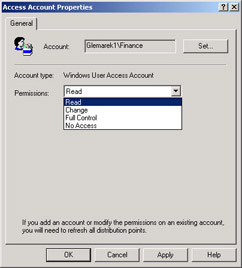
Click OK to return to the Access Account Properties dialog box. Select the appropriate level of permissions from the Permissions drop-down list, as shown in Figure 12.11. For most applications, Read permission will be sufficient. However, if the program requires any kind of writing back to the source directory, you’ll need to assign at least Change permission.
Figure
12.11: The Permissions list of the Access Account Properties
dialog box.
Click OK to create the account.
An essential configuration detail for any package is identifying the distribution points on which the package can be found. You should have already assigned the distribution point role to one or more site systems in your SMS site, as well as at any child sites. You now need to tell SMS which of those distribution points will host the package.
| Note |
If you’re distributing the package to a child site, even if the SMS administrator for that site will ultimately distribute the package to its clients, you still must identify at least one distribution point at that child site when you create the package. |
To define distribution points, follow these steps:
Navigate to the Packages folder, find your package entry, and expand it.
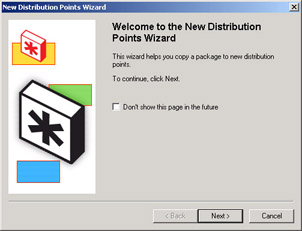
Right-click Distribution Points, choose New from the context menu, and then choose Distribution Points to activate the New Distribution Points Wizard, shown in Figure 12.12.
Figure
12.12: The New Distribution Points Wizard welcome
page.
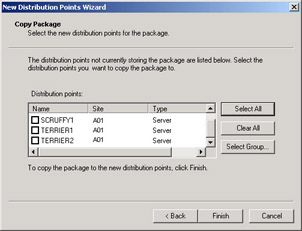
Click Next to display the Copy Package page, shown in Figure 12.13. This page shows a list of available distribution points. Scroll through the list and select the distribution points you want.
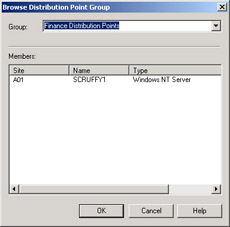
Click Select Group to open the Browse Distribution Point Group page, shown in Figure 12.14. Here you can view a list of distribution point groups and their member site systems. If you select one of the distribution point groups and click OK, all the site systems that are members of that group will be selected in the Copy Package page.
Figure
12.14: The Browse Distribution Point Group dialog
box.
Click Finish to add the distribution points you selected to the package details.
Once you have added a distribution point to the package, that distribution point will no longer appear in the list of available distribution points if you run the New Distribution Points Wizard again—the wizard displays only distribution points that are available. If you need to remove a distribution point from the package, select it, right-click it, and choose Delete from the context menu. When you delete a distribution point, you’ll also delete the package source directory on that distribution point.
It’s often desirable to group distribution points so that packages can be distributed to them as a block rather than having to name the distribution points individually. Distribution point groups are defined through the site settings of your site—in the same place that you assign the distribution point role.
To define a distribution point group, follow these steps:
In the SMS Administrator Console, navigate to the Site Systems folder under your site name, then Site Settings.
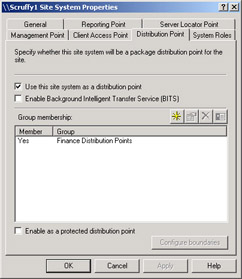
Right-click one of the distribution points you defined and choose Properties from the context menu to display the Site System Properties dialog box. Select the Distribution Point tab, shown in Figure 12.15.
Figure
12.15: The Distribution Point tab of the Site System
Properties dialog box.
To add a new distribution point group, in the Group Membership section click the New button (the yellow star) to display the Distribution Point Group Properties dialog box, shown in Figure 12.16. Enter the name of the group and indicate whether this site system is to be a member of the distribution point group. Then click OK to return to the Site System Properties dialog box.
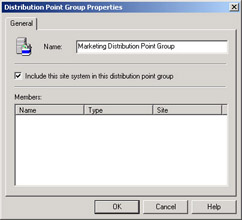
Figure
12.16: The Distribution Point Group Properties dialog
box.
Select the next site system you want to include in the distribution point group, right-click it, choose Properties from the context menu, and select the Distribution Point tab. Notice that any distribution point groups you have created will be listed in this tab for each site system, as shown in Figure 12.17.
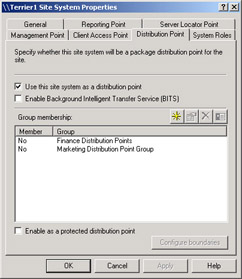
Figure
12.17: The updated Group Membership list in the Distribution
Point tab.
Select the distribution point group that this site system should be a member of and click the Properties button (the hand holding a piece of paper) to display the Distribution Point Group Properties dialog box, shown in Figure 12.18.
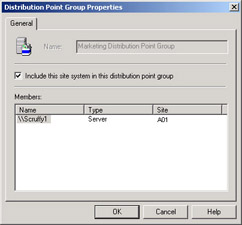
Figure
12.18: The updated Distribution Point Group Properties
dialog box.
Select the Include This Site System In This Distribution Point Group check box and then click OK to return to the Distribution Point tab. The site system now shows that it’s a member of the distribution point group. Click OK again.
Repeat step 5 for every site system that needs to be a member of a distribution point group.
If you need to remove a site system from a distribution point group, simply repeat step 5 of this procedure, but clear the Include This Site System In This Distribution Point Group check box. If you need to remove a distribution point group altogether, select any site system, open its Site Systems Properties dialog box, and select the Distribution Point tab. Select the distribution point group in the Group Membership list and click the Delete button (the black “X”).
Finally, it’s necessary to create at least one program for each package. This program specifies how the package is to be executed at the client. Many packages can have more than one program associated with them. For example, a package might have different installation methods such as Custom, Typical, Unattended, and Manual. This is where you really have to know your package. The command-line information you provide here will either make or break the package when it’s run on the client.
To create a program, follow these steps:
Navigate to the Packages folder, find your package entry, and expand it.
Right-click Programs, choose New from the context menu, and then choose Program to display the Program Properties dialog box, shown in Figure 12.19.
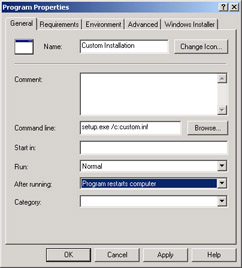
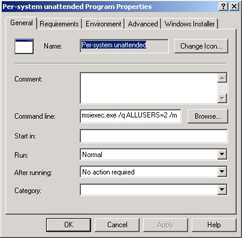
In the General tab, enter a descriptive name for the program—for example, Custom Installation or Unattended Installation. Enter additional descriptive information in the Comment text box.
In the Command Line text box, enter the command that should be executed at the client. For example, this could be a Setup.exe file, a batch file, or an .MSI file; however, you must include any and all command-line arguments required for successful execution. For example, if you run the Setup program, which uses a script file called Custom.inf, and the Setup program invokes this script file through a “/c” command-line switch, you must enter the full command as it references the script: setup.exe /c:custom.inf.
In the Start In text box, enter the name and path of the directory in which you want the program to start. This field is optional, and by default the distribution folder on the distribution point is used.
From the Run drop-down list, select an option—Normal, Minimized, Maximized, or Hidden—to specify how the program will be displayed to the user. Hidden does mean that nothing will be displayed; this option is best used with fully unattended, or silent, installations.
From the After Running drop-down list, select an option—No Action Required, SMS Restarts Computer, Program Restarts Computer, or SMS Logs User Off—to specify what action, if any, will be performed after the program completes.
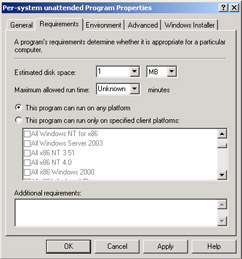
Select the Requirements tab, shown in Figure 12.20. This tab lets you specify descriptive elements regarding the program’s estimated size and installation run time. More importantly, it allows you to identify which operating system platforms the program can run on. This enables you to filter out those clients on whose platform the program can’t run.
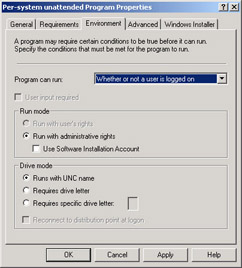
Select the Environment tab, shown in Figure 12.21.
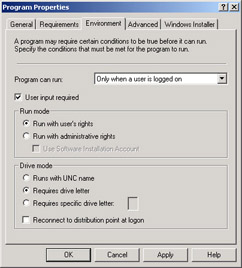
Figure
12.21: The Environment tab.
In this tab, user level and drive mode requirements are defined. First specify when the program can run. The drop-down list options are Only When A User Is Logged On (which can apply to all clients, but Windows 98 clients in particular); Whether Or Not A User Is Logged On; and Only When No User Is Logged On. These last two options are specific to computers running Windows NT 4.0 and later. If either of these options is selected, the User Input Required check box and the Run With User’s Rights under Run Mode option are automatically disabled.
If the program requires the user to click even a single OK button, you must select Only When A User Is Logged On from the Program Can Run drop-down list and then select the User Input Required option. Clear this option only if the program is fully scripted (that is, automated). If the program must be run in the local administrative security context, select the Run With Administrative Rights option in the Run Mode frame. If you have specified a particular account to use on Windows computers when running programs that require administrative privileges, select the Use Software Installation Account check box. If you require that the logged-on user also be able to interact with the program while it’s running with administrative rights, select the Allow Users To Interact With This Program check box.
In the Drive Mode frame, select the option that best fits the program. As you have no doubt experienced, although most programs understand UNC paths, some do not and require a drive letter mapping. If you need to have the client reconnect to the distribution point each time the user logs on, select the Reconnect To Distribution Point At Logon check box. This option could be useful if the application needs to write information back to the distribution folder on the distribution point, retrieve startup files, and so on.
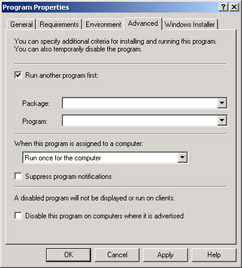
Select the Advanced tab, shown in Figure 12.22, which provides several additional options. If you need to run another program before this one—for example, to install a service pack or a patch, select the Run Another Program First check box and then select the appropriate package and program. This assumes, of course, that you have already created the other package and program. In this example you won’t need to advertise the other program separately.
If you’ve assigned a program to run on a computer, you can either execute it once for the computer or once for every user who logs on to the computer by choosing one of two run time options in the When This Program Is Assigned To A Computer section. Select Run Once For The Computer, the default, to execute the program once for use by all users on the computer. Select Run Once For Every User Who Logs On to execute the program once for each user when the user logs on. Use the Suppress Program Notifications check box to turn off notification and countdown icons and messages for this program.
To temporarily disable the program from being run—even if it has been assigned a specific time—select the Disable This Program On Clients Where It Is Advertised check box. This option can be handy if you need to update files, test an installation, and so on.
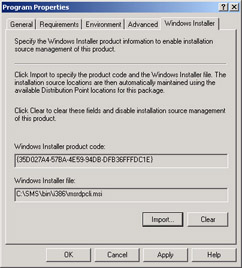
Select the Windows Installer tab shown in Figure 12.23 to specify Windows Installer product information to enable SMS to manage the location of source files for Windows Installer-based programs. This feature is available only for Advanced Clients and is valuable for determining the location of source files when Windows Installer needs to initiate a repair. Click Import to locate and select the Windows Installer package associated with the program and populate the Windows Installer Product Code and Windows Installer File fields.
Click OK to save the program.
If you decide to delete a program later, right-click the program in the SMS Administrator Console and choose Delete from the context menu to activate the Delete Program Wizard. This wizard walks you through the process and helps you decide whether to delete the program. Deleting a program does produce a ripple effect for other SMS components. Any advertisements of the program will also be deleted and will no longer be made available to the client. The wizard displays all the affected advertisements and prompts you once more to confirm the deletion.
In Chapter 11 we examined the advantages of using collections whose membership rules are query-based when advertising programs. When a new member joins the collection, it automatically receives any advertisements made to that collection. In general, you should leave programs advertised until they’re no longer needed or until they should be retired.
We’ve seen what’s involved in creating a package from the ground up. Now let’s see how much simpler the process becomes when you’re creating a package from a package definition file.
To create a package from a predefined definition file, follow these steps:
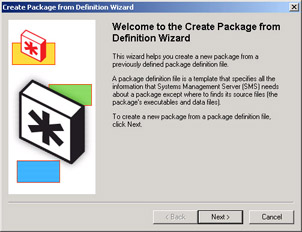
Navigate to the Packages folder, right-click it, choose New from the context menu, and then choose Package From Definition. This will initiate the Create Package From Definition Wizard, shown in Figure 12.24.
Figure
12.24: The Create Package From Definition Wizard welcome
page.
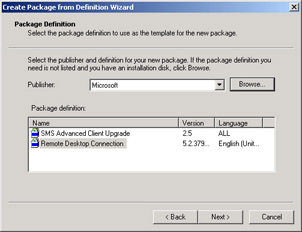
Click Next to display the Package Definition page, shown in Figure 12.25. Select one of the definitions provided by SMS 2003 from the Package Definition list and then click Browse to search for an SMS 2003 compatible .SMS or .PDF file or for a Windows Installer (.MSI) package file.
Figure
12.25: The Package Definition page.
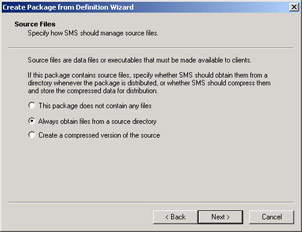
Click Next to display the Source Files page, shown in Figure 12.26. Here you specify how SMS should manage source files.
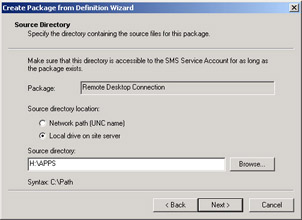
If you select This Package Does Not Contain Any Files and click Next, you’ll proceed directly to step 5. If you select one of the other options and click Next, the Source Directory page appears, as shown in Figure 12.27. In this page, identify either the network or local drive location of the source files and click Next.
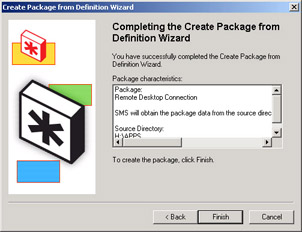
The Completing The Create Package From Definition Wizard page appears, as shown in Figure 12.28. Review your choices and then click Finish.
Figure
12.28: The Completing The Create Package From Definition
Wizard page.
Right-clicking the package you just created in the SMS Administrator Console will display the Package Properties dialog box. The result will be the creation of a package with the essential package details filled in and the appropriate programs created with their essential details filled in in the General, Data Source, and Reporting tabs of the Package Properties dialog box. The Data Access and Distribution Settings tabs are left with the default values. Figures 12-29 through 12-35 will give you an idea of the type of information generated by the package definition file used in the example. Of course, although SMS 2003 or any other application developer provides the package definition file itself, you’ll still need to obtain a copy of the source files for the application.
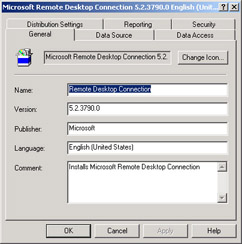
The General tab of the Package Properties dialog box, shown in Figure 12.29, contains the package detail information.
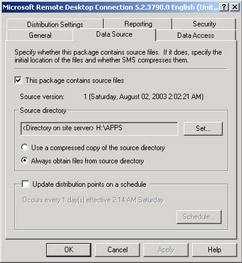
The settings in the Data Source tab, shown in Figure 12.30, are based on the parameters you defined using the Create Package From Definition Wizard.
Package definition files don’t always provide status MIF information for the Reporting tab. However, the package definition file we used here does fill in this information, including the MIF filename, as shown in Figure 12.31.
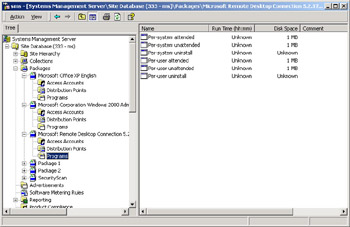
The package definition file is designed to generate all appropriate programs for the application package. The package definition file used in this example created six programs, as shown in Figure 12.32.
Right-clicking the Per-System Unattended entry displays the General tab of the Per-System Unattended Program Properties dialog box, shown in Figure 12.33, which provides the appropriate command-line executable and switches.
The Requirements tab, shown in Figure 12.34, displays the estimated disk space value and platform specification as provided by the package definition file.
Because this program requires administrative level access at the client, the program definition file specifies that option in the Environment tab, as shown in Figure 12.35.
In general, the package definition file will provide package details for the General and Data Source tabs of the Package Properties dialog box, which should make sense. Distribution settings, for example, define how a package is sent from one site to another, and only the SMS administrator for each site can modify those settings. On the other hand, the package definition file will usually provide most of the property settings in the Per-System Unattended Program Properties dialog box. The exceptions are the options in the Advanced and Windows Installer tabs. The package definition file typically doesn’t provide any property settings for the Advanced and Windows Installer tabs. Again, it’s up to you to decide whether to run another program first, temporarily disable the advertisement, or whether it’s necessary to provide Windows Installer path and file information.
The process behind the creation and distribution of a package, illustrated in Figure 12.36, is fairly straightforward. We begin, as always, with the SMS administrator defining the package, distribution points, and programs. The SMS Provider writes this information to the SMS database. This action triggers SQL Monitor to write a package notification wake-up file to Distribution Manager’s inbox (\SMS\Inboxes\Distmgr.box). The wake-up file takes the form of a site code and package ID as the filename with a .PKN extension. For example, a package notification file for site A01 might be named A0100003.pkn.
The Distribution Manager component wakes up and processes the package based on the package details you provided. Distribution Manager performs the following general tasks:
Compresses the source files, if necessary
Copies the package source directory to the specified distribution points
Creates various instruction files for clients that are copied to the CAPs and management points by Inbox Manager
Creates replication files for sending the package to child sites
If you specified that a compressed version of the files should be used, Distribution Manager will compress the files and store them either in the location specified when the Software Distribution component was configured (this process is discussed in the next section) or by default in the SMSPKG folder created on the drive on which SMS was installed on the site server, with the same filename and the extension .PKG.
Distribution Manager then copies the source file directory to the SMSPKGx$ folder created on each specified distribution point within the site. If the package files were compressed, Distribution Manager uncompresses them first.
Distribution Manager generates three files and writes them to the \SMS\Inboxes\Pkginfo.box folder on the site server. These files (with filenames as described earlier) are the following:
.PKG Package program detail information
.NAL Location of distribution points
The Inbox Manager component, as it’s wont to do, copies these files to the Pkginfo.box folder on each CAP. These files serve as instruction files for the client after it receives an advertisement. At this point, the process stops unless the package needs to be sent to a child site.
If the package does need to be sent to a child site, Distribution Manager writes a package replication file (.RPT) to Replication Manager’s inbox (\SMS\Inboxes\ Replmgr.box\Outbound). If a compressed copy of the package source directory doesn’t already exist, Distribution Manager also compresses the source directory into a temporary directory on the site server and then moves the file to the SMSPKG folder (on the SMS installation drive on the site server or the drive you specified when configuring the Software Distribution component).
Now Replication Manager takes over and begins the sending process. This process is discussed in detail in Chapter 4, so we’ll look at only the highlights here. Replication Manager creates a minijob for the Scheduler and places it in the Scheduler’s inbox (\SMS\Inboxes\Schedule.box). The Scheduler creates the package and instruction files needed for sending the data in question, as well as a send request file for the sender. The package and instruction files are placed in the \SMS\Inboxes\Schedule.box\Tosend directory. The send request file is written to the preferred sender’s outbox (\SMS\Inboxes\Schedule.box\Outboxes\sender, where sender is the sender folder, such as LAN, RASAsynch, or RASISDN). Recall that both the sending priority and the preferred sender are identified in the Package Properties dialog box.
When the send request file is written, the sender reads the file. It also examines whether the address properties have placed any restrictions on when requests of this priority can be sent and whether there are any bandwidth limits. It then changes the extension of the send request file to .SRS and writes status information to it.
The sender connects to the target site’s SMS_SITE share—the \SMS\Inboxes\ Despoolr.box\Receive directory—where the Despooler component on the target site will complete processing of the information at the target site. When the data has been completely transferred, the send request file is updated to a status of “completed” and the file is then deleted. Distribution Manager on the target site will carry out any necessary tasks. For example, if you identified distribution points at the target site, the Despooler will decompress the package and pass it to Distribution Manager, which will process the package for those distribution points.
|
|
< Day Day Up > |
|