|
|
< Day Day Up > |
|
The SMS administrator is frequently called on to diagnose problems on client computers. Remote Tools enables you to run diagnostics on Windows 98, Windows NT 4.0, Windows 2000, Windows XP, and Windows Server 2003 clients. You can then use this diagnostic information to help analyze and troubleshoot client hardware and other problems.
The diagnostic tools for Windows clients are based on the standard System Information utility (WinMsd). This utility provides a static view of the system configuration parameters, services, resources, environment settings, and other system information.
To run the System Information utility, follow these steps:
In the SMS Administrator Console, navigate to Collections and select the collection that contains the Windows client for which you want to initiate remote diagnostics.
Select the client, right-click it, choose All Tasks from the context menu as shown in Figure 10.13, and then choose Start Windows Diagnostics.

Figure
10.13: Choosing All Tasks from the context menu to access
the Start Windows Diagnostics utility.
The System Information window appears, as shown in Figure 10.14. This is the same System Information window you would see if you were logged on at the client and executed the utility there. You can view information about the hardware connected to the computer and identify device drivers and services that should be started when you start the computer. For more information about using this utility, see the Windows product documentation.
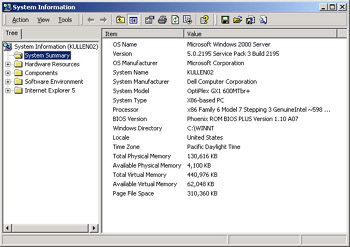
Figure
10.14: The System Information window.
Close the window when you’ve finished.
| Note |
You can also run the Windows Event Viewer and Performance Monitor utilities remotely for Windows clients by choosing All Tasks from the context menu. |
You run the diagnostic tools for Windows 98 clients from the Remote Tools window. From the toolbar or the Tools menu, you can run diagnostic routines on the client computer to view information about memory allocation, CMOS data, interrupt usage, and so on.
To start a Remote Tools session, follow these steps:
In the SMS Administrator Console, navigate to Collections and select the collection that contains the client for which you want to initiate remote tools.
Select the client, right-click it, choose All Tasks from the context menu, and then choose Start Remote Tools to display the Remote Tools window, shown in Figure 10.15.

Figure
10.15: The Remote Tools window, showing the result of
running the Windows Memory diagnostic for the client WJG.
On the toolbar in the Remote Tools window, the diagnostic tools for Windows clients begin with the sixth icon from the left. They are, in order: Windows Memory, Windows Modules, Windows Tasks, CMOS Information, ROM Information, and DOS Memory Map. Table 10.1 lists the diagnostic tools for Windows 98 clients.
|
Diagnostic Test |
Description |
|---|---|
|
Windows Memory |
Displays the allocation of memory on the client, providing information about locked, unlocked, and free memory on the remote client; swap file size; user and Graphical Device Interface (GDI) heap usage; and the largest amount of contiguous memory available on the remote client. |
|
Windows Modules |
Displays the drivers and libraries loaded on the client at the time the diagnostic was run and provides information such as the module handle, use count, path to the module, and memory objects reserved by the module. |
|
Windows Tasks |
Displays the tasks currently running on the client, providing information such as handle, instance, queue location and size, waiting events, current directory, and command- line options in effect. |
|
CMOS Information |
Displays the data stored in the client CMOS for only Intel- based AT-class and later chip sets. |
|
ROM Information |
Displays the IRQ hooks (if they exist) and ASCII strings for ROM entries on the client. |
|
DOS Memory Map |
Displays which programs are loaded into conventional (first 640 KB) and upper memory only. |
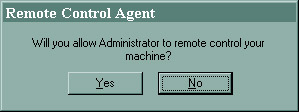
When you select one of these diagnostic tools, the client will first be asked to allow permission if that option was enabled for the Remote Tools Client Agent, as shown in Figure 10.16. When permission is granted, or if that option wasn’t enabled for the agent, the Remote Tools window will display the desired information.
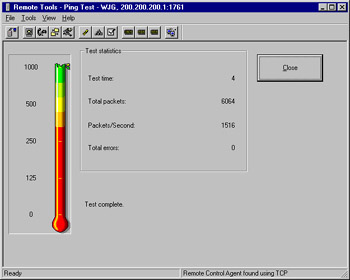
Another useful Remote Tools function is the Ping Test utility. You can use this utility to determine whether a client is accessible for a Remote Tools session. The Ping Test icon is the rightmost icon on the Remote Tools window toolbar; you can also run the utility from the Tools menu. Ping Test generates and sends packets to the client, waits for a response, and then sends additional packets over a 4-second period to determine the connection’s reliability and speed.
Figure 10.17 shows the results of running a ping test. These results include test statistics and a thermometer that visually represents the effectiveness of the connection—red means poor connectivity, yellow means fair, and green means good. To the right of the thermometer, two level indicators can be seen. The yellow (top) arrow indicates the maximum number of packets per second that the test generated; the green (bottom) arrow indicates the average number.
Five remote functions are available to the SMS administrator. In order of their position on the toolbar and on the Tools menu, they are (from left to right): Remote Control, Remote Reboot, Remote Chat, Remote File Transfer, and Remote Execute. All these functions are initiated from the Remote Tools window, but before we can use any of them, SMS must establish a remote connection with the client. If the client session can’t be established, the Remote Tools window will be closed. Remember that the inability to establish a Remote Tools session is typically due to network or client agent configuration problems, as we discussed in the sections “Client System Requirements” and “Client Protocol Considerations” earlier in this chapter. In this section we’ll look more closely at each of these functions.
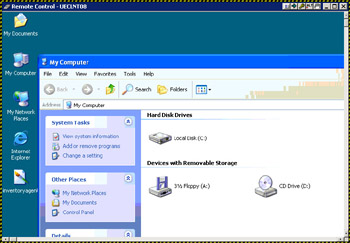
To initiate a Remote Control session through the Remote Tools window, either click the first toolbar icon or choose Remote Control from the Tools menu. The client will first be asked to grant permission for the Remote Control session if that option was enabled for the Remote Tools Client Agent. When permission is granted, or if permission isn’t required, the Remote Control window appears on the SMS Administrator Console computer, bordered with a moving yellow and black marquee. Figure 10.18 shows an example of a Remote Control window for a Windows XP client.
Here you’re viewing the client computer’s actual desktop, and you can manipulate that client’s mouse and keyboard. Currently, there’s no way to lock the keyboard and mouse from user input. If both the administrator and the user are manipulating the keyboard and mouse, some fascinating control wars can result. To avoid this conflict, it’s a good idea to present some kind of visual or audible signal to the user, and probably to require user permission as well, to notify the user that you’re establishing the Remote Control session. Otherwise, you could end up creating a whole new set of problems on the client.
| Note |
All mouse and key sequences are passed to the client except Ctrl+Alt+Del, Ctrl+Esc, Alt+Tab, and any hot key sequences you identify. |
The Remote Control window might not be large enough to display the entire client desktop. With SMS 2003, however, the window can be maximized. To help facilitate control of the desktop, the Remote Control window includes four toolbar buttons in the top-right corner for Windows 98 clients and five toolbar buttons for Windows NT 4.0 clients and higher.
The first button displays the Start menu on the client. The second button (an arrow) acts like the Alt+Tab combination on the client and toggles between active windows. The third button allows Alt-key combinations to be passed through to the client instead of being run locally. The fourth button (a hand) activates an area box that can be used to navigate in the Remote Control window when maximizing the screen isn’t sufficient or practical.
If you established a Remote Control session with a Windows NT 4.0 or higher client, you’ll also see a gold key button. Under certain circumstances, it’s necessary to log on to these clients as well as lock and unlock the desktop. For example, you might have a Windows Server 2003 server system acting as an application server. Servers are usually in a locked or “unlogged-in” state, making any user intervention to the Remote Tools function unavailable. Locking or unlocking a Windows computer and logging on require a Ctrl+Alt+Del sequence, which we know we can’t initiate from the SMS Administrator Console computer. This is what that gold key button is for. When you click the gold key button, you send a Ctrl+Alt+Del sequence to the Windows client.
| Caution |
After the Remote Tools Client Agent has been installed on a Windows NT 4.0 client, it’s necessary to restart the Windows NT 4.0 client at least once before all remote functionality, like the gold key button, becomes enabled. This extra step is needed because a new KBStuff.sys driver is written to the registry and it can only be read and enabled by restarting the system. A restart isn’t required for Windows 2000 or higher computers. |
In addition to the toolbar buttons, configuration options are available through the Remote Control window’s control menu, sometimes referred to as the system menu. This menu is displayed when you click the icon on the left in the title bar. The system menu contains the usual Minimize and Maximize options and also provides Configure, Hot Keys, and Help options.
If you choose Configure, the Control Parameters dialog box will appear, as shown in Figure 10.19.
From this dialog box, you can set configuration options. These options, which will vary slightly based on your clients, include:
Accelerated Mode Sends screen refreshes from the client at the fastest speed supported by the network
Hot Keys Enables hot-key sequences defined under the Hot Keys option to be passed to the client
System Key Pass Through Disables passing of system key sequences to the client
16 Color Viewing (Faster)Forces 16-color display resolution on the client to help speed screen transfer
Suppress Client Wallpaper Disables the client’s wallpaper during the Remote Control session—again to help speed screen transfer and minimize network traffic
Keyboard Settings Switches between BIOS and interrupt methods of sending key sequences to Windows 98 clients and is available for Windows 98 clients only
If you choose Hot Keys from the system menu, the Hot Key Settings dialog box appears, as shown in Figure 10.20. In this dialog box you can define hot key sequences for seven remote control commands, all of which are fairly self- explanatory.
To end the Remote Control session, simply close the Remote Control window.
You can restart the client computer in a couple of ways. One way is to establish a Remote Control session and then, through the Remote Control window, choose Shutdown from the client’s Start menu. The advantage of this method is that you can follow the shutdown process and see any messages that might appear, such as a request to close a file or a message indicating an error shutting down a service.
You can also click the Remote Reboot button or choose the Remote Reboot option from the Tools menu in the Remote Tools window. This method has the same result, but since you don’t have a Remote Control window open, you won’t see the shutdown process. Indeed, you might not know for sure whether the client actually shut down—it might be waiting for some kind of user input.
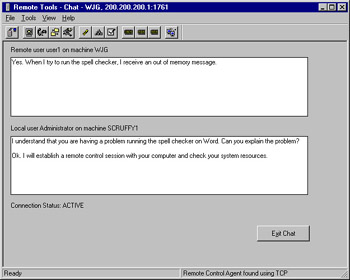
Remote Chat is similar to a chat room on the Internet. It provides an avenue through which the SMS administrator can communicate with the user. It can be used when a voice connection isn’t available, for example. When you start a chat session, the user is prompted first for permission, if that option was enabled. Then the SMS administrator and the user are presented with a chat window similar to the one shown in Figure 10.21. The top text box always represents the remote person, and the bottom text box represents the local person. When the session is over, either party can click Exit Chat to terminate the session.
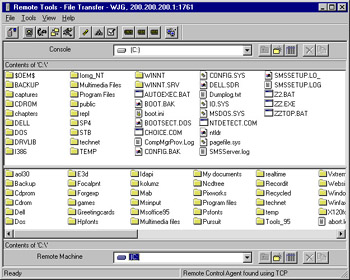
The Remote File Transfer tool provides a means to initiate file, folder, and tree copies between the SMS Administrator Console computer and the client computer. When the Remote File Transfer feature is started, and after the user has given permission (if necessary), the Remote Tools screen displays a Windows Explorer–type window, as shown in Figure 10.22. The SMS Administrator Console computer’s directories are controlled through the top pane, and the remote client’s directories are controlled through the bottom pane. You navigate this window in the same way you would Windows Explorer. You transfer files simply by dragging them from one pane to the other. This tool is especially effective when the client doesn’t have file sharing enabled or doesn’t have the necessary shares available to create network mappings.
The Remote Execute tool enables the SMS administrator to run a program on the client, such as a disk defragmentation program or a virus scan—or even a game of solitaire. When the Remote Execute option is selected and user permission is granted, a simple dialog box named Run Program At User’s Workstation is displayed. Enter the path and name of the program and click Run to execute that program on the client.
|
|
< Day Day Up > |
|