This tutorial describes the steps to create a report with
bookmarks (or a so-called Document Map). This feature allows you to
easily navigate through the report during its print preview.
To create a report with bookmarks, follow the steps below.
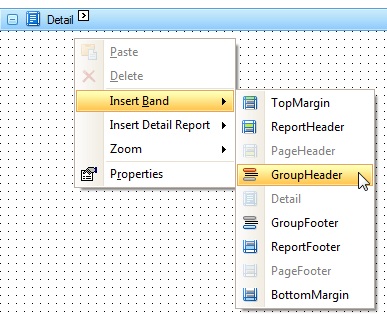
To do this, right-click anywhere over the report's surface, and
in the invoked
Context Menu, point to
Insert Bandand click
GroupHeader.
From the
Field List, drop data-fields
onto the created
GroupHeader1band.
Click the
Smart Tagof the
GroupHeader1band, and in the invoked actions list, click the
ellipsis button in the
Group Fieldsproperty. The
GroupField Collection Editordialog will appear.
In this dialog, click
Addto add a new grouping field, and set its
FieldNameproperty to the required field.
To apply the settings and close the dialog, click
OK.
To add a
Report Headerband to the
report, right-click anywhere over its surface, and in the invoked
Popup Menu, point to
Insert Bandand click
ReportHeader.
From the
Toolboxpanel, drop a
Labelonto the created Report
Header band, and set its text to
Products by Categories.
Then, drop a field representing the general report's data onto
the created Detail band.
Steps 9-11. Define bookmarks
Click the label in the Report Header band, to select it, and in
the
Property Grid, set its
Bookmarkproperty to the same value as its text (i.e.
Products by Categories).
Now, select the label in the report's Group Header band. As this
control is bound to data, we will bind its
Bookmarkproperty to the same data field, using the
(Data Bindings)property.
Then, for this field, set the
Parent Bookmarkproperty to the Report Header's label, to
define the document map's hierarchy.
Result
The report with bookmarks is now ready. Switch to the
Preview Tab, and view the
result.