Core synchronization is a new feature introduced in LANDesk Management Suite 9.0. With core synchronization, you can copy configurations and tasks from core to core, either manually or automatically. You can use this feature to keep multiple cores synchronized with a master core.
You can synchronize these items:
There are three ways to synchronize items:
When you export/sync tasks or software distribution package configurations, the export/sync data will contain associated queries and related items. Note that export/sync data only contains information from the Management Suite database. For example, software distribution export files won't contain the actual package being distributed.
Related to this, when working with export/sync scheduled tasks, make sure any package paths are the same for the source and target servers. Otherwise, when you import/sync the task and run it, the task will fail because the target server couldn't find the package.
When you copy or autosync an item, the following happens:
NOTE: The OS deployment and software license monitoring tools don't support core synchronization.
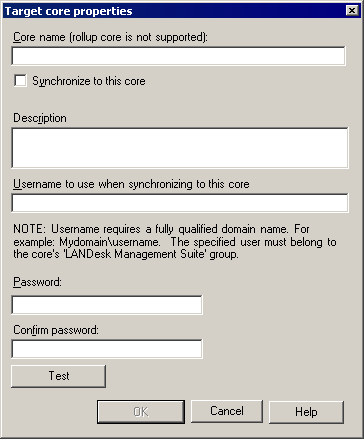
Before you can use synchronization, you need to configure the list of servers you want to synchronize with. Cores communicate via HTTPS and authenticate with a username and password you provide for each core.
IMPORTANT: Rollup core servers use the scheduler service credentials to authenticate for synchronization. On rollup cores, these scheduler service credentials must be a member of a group with console administrator privileges on the source core servers. If the credentials don't have these privileges, you'll see task handler errors in the source core server's synchronization log. For information on how to change the scheduler service credentials, see About the Change login dialog box.
Synchronize an item on demand by right-clicking it and clicking Copy to other core(s). When you do this, you can select the servers you want to receive the copy. Clicking Copy content immediately starts the copy operation. The copy only happens once, and the item you copied is available on the remote cores immediately. Note that you may have to manually refresh the remote core's console view by pressing F5 for the item to appear. The remote copies have the same name and location as the source copy and are editable. Any groups or subgroups containing the item will be created automatically.

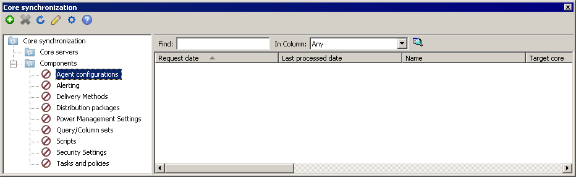
Before using auto sync, configure which Management Suite components you want to synchronize.
You can enable auto sync on individual items, but if an item's component doesn't have synchronization enabled, that item won't sync. Disabling synchronization on a component doesn't change the auto sync flag on flagged items, so if you disable and then later on enable synchronization, items you originally enabled auto sync for will resume synchronization.
You can also enable or disable auto sync by right-clicking a component and clicking Auto sync.
When you select a component in the Components tree, you can see synchronization activity for that component.
Synchronize an item automatically by right-clicking it in a component's tree view and clicking Auto sync. If the item's sync component isn't enabled, you'll be prompted to enable that component. The synchronization for this item will happen at the next synchronization interval. If you again right-click that item, you'll see a check mark next to Auto sync in the menu.
As with on-demand synchronization, auto sync items appear in the same location in the console. However, auto sync items are read-only on target cores and they can't be edited or deleted. Each time you change an auto sync item on the source core, the item gets synchronized to the target cores. If you want console users to be able to delete an auto synced item, just turn auto sync off. That won't remove the item from target cores, but those target items will become editable.
Synchronized scheduled task data doesn't include the task start time. If you synchronize a scheduled task, the only way to run it on the target server is to right-click it and click Start now. Since synchronized items are read only, you can't edit it on the target core and add a new start time. As a workaround, you can use the copy to core feature. The task still won't include a start time on the target core, but this way the task will be editable there.
Items that you can sync can also be exported and imported. Exporting an item creates a .ldms file in XML format that contains the data necessary to recreate that item and any items that item referenced. You can then take this file to another core, for example, and re-import it.
When importing, you'll be prompted to do one of these three things:
For more information on how conflict management works, see Conflict management.
You can configure the core server's auto synchronization interval. The default interval is two minutes. When your selected interval has passed, the core server checks auto sync items for changes. If any have changed, the core then sends those changes to the target cores you specified. Depending on the amount of data being synchronized, lowering this interval slightly increases the source core's processor load.
The Auto synchronization settings dialog box has these options:
When you select a Core server or Component in the tree view, you can see a log of syncs and real-time sync status. Scroll to the right to see the status columns that are available. When you select the root Core servers node, you can see a high-level sync status for target cores. This data includes the pending count, which if high or stuck may indicate there's a problem synchronizing to that core.
Sync items can have one of these states:
Exportable items have a unique ID that helps Management Suite track whether items are the same or not. This helps synchronization manage sync item conflicts. If you copy or sync an item on one server and that same item exists on the target server, that item will only be overwritten if the items share the same unique ID. That unique ID consists of the core server name and the database row number containing that item. You can see an item's unique ID and revision number in an item's information dialog (right-click the item and click Info).
If two items with the same name have a different ID, synchronization will leave the original alone on the target and add a %1 to the sync item's filename. Synchronization will keep creating new entries on subsequent sync conflicts and increment this number for each one until the limit of 99 is reached.