
The MRC Client Agent Service can be configured and installed in a variety of ways depending on the network setup and configuration.
1. Pushing the Service to the remote machine “on the fly.”
2. Using the MRC Application’s File menu.
3. Copying the Service files to the remote machine manually.
4. Using the MSI Builder to build an MRC Client Agent Service installation package.
5. Using DNTU’s batch installation functionality.
1. Pushing the Service to the remote machine "on the fly."
When an MRC connection is first attempted to a remote machine that does not have the MRC Client Agent Service installed and running, the MRC Application detects that the Service needs to be installed.
Select “OK” to remotely install the Service, or “Install Options” to be presented with the following options prior to installation:

***Because the MRC program now includes a 64-bit version of the MRC Client Agent Service, when upgrading the MRC Client Agent Service on a 64-bit machine, the following dialog may be received:

If the MRC Client Agent Service is successfully installed in this manner, the MRC Application user will see the status of the Service Installation and once completed, will be connected to the remote machine.
***Note, this method of installing the MRC Client Agent Service uses the Operating System’s installed protocols of File & Printer Sharing and will not work if the File & Printer Sharing Ports are blocked.
***Note: Version 7 MRC Client Agent Service cannot be downgraded "on the fly." To downgrade to a version prior to version 7, one of the following methods must be used to first remove the Service, then install the older one.
2. Using the MRC Application’s File menu.
The MRC Client Agent Service can be installed from the MRC Application’s File menu by selecting “File | Install Service.” Once selected, the following dialog will be displayed:
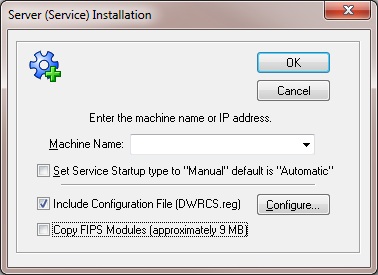
This method also uses the Operating System’s installed protocols of File & Printer Sharing. Simply enter the Machine Name or IP Address of the remote machine on which to install the MRC Client Agent Service. Select "Configure" to configure the settings of the MRC client agent service.
3. Copying the Service files to the remote machine manually.
The MRC Client Agent Service can be installed manually by copying the files listed below from the DameWare installation directory of the MRC Application, to the C:\Windows\dwrcs folder of the remote machine.
DWRCWXL.dll
DWRCST.exe
DWRCSh.dll
DWRCSET.dll
DWRCS.exe
DWRCRSS.dll
DWRCK.dll
To connect to the remote machine in FIPS Mode, the FIPS modules must be copied to the C:\Windows\dwrcs directory on the remote machine as well. The FIPS modules are the following:
ccme_base.dll
ccme_ecc.dll
ccme_eccaccel.dll
cryptocme2.dll
cryptocme2.sig
ccme_eccnistaccel.dll
DWRCRSA.dll
4. Using the MSI Builder to build an MRC Client Agent Service installation package.
The DameWare MSI Builder is a unique feature that builds an MSI package for the MRC Client Agent Service that can be sent to or downloaded on the remote machine and executed. The MSI package will not only install the Service on the remote machine but will also automatically open the necessary TCP Port through the Windows Firewall when it starts up.

Profile:
Build and save multiple MSI package profiles. This allows the MRC user to save multiple configurations of MSI packages. Select the “Save” icon to the right of this dialog to save a profile. Select the “Delete” icon to the right of this dialog to delete a profile.
Target O/S:
The Operating System of the remote machine that will be running the MSI package.
Include FIPS Modules:
This option includes the FIPS Modules in the MSI package.
Install the mirror driver:
This option includes the MRC Mirror Driver in the MSI package.
Install the keyboard driver:
This option includes the MRC Virtual Keyboard Driver in the MSI package.
Install the smart card driver:
This option includes the MRC Smart Card Driver in the MSI package.
Client Agent Settings:
Opens the MRC Client Agent Service settings. Configure the settings of the MRC Client Agent Service here, then select “Buid MSI” to build an MSI package that will install the MRC Client Agent Service on the remote machine with these pre-defined settings.
Output Folder:
The folder on the local machine where the completed MSI package will be stored.
Build MSI:
Builds the MSI package.
5. Using DNTU's batch installation functionality.
The DameWare NT Utilities program, used for remote administration, includes a Services View with the capability of batch installing the MRC Client Agent Service on remote machines.
Open DNTU, then open the Services View of the local machine.

Add the computers needing the MRC Client Agent Service to the batch pane at the bottom of the Services View. Highlight the computers in the batch pane and right click on them. Select “Batch Processing – DWMRC Service Install…”

The following dialog will be displayed with the options for the MRC Client Agent Service:

Enable the desired options, if any, and select "OK" to batch install the MRC Client Agent Service through DNTU.