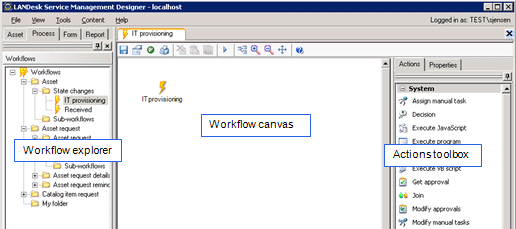
Use the workflow canvas to lay out your processes and assemble the pieces in the proper order. The workflow canvas appears when you edit a workflow (Process tab's Workflows panel).
Once you have launched the process canvas, design your processes by dragging and dropping actions onto the canvas from the Actions toolbox. By default, every process begins with a primary action, represented by a lightning bolt.
After adding actions, use the Check workflow for errors
button  on the toolbar to see
what attributes need to be defined to enable the workflow to
proceed. It reports any missing attributes in the window directly
below the canvas. To define an action's attributes, click and
select its icon and then provide the applicable information in the
Attributes window. You can also double-click errors in the status
pane after clicking the Check workflows for errors button
.
on the toolbar to see
what attributes need to be defined to enable the workflow to
proceed. It reports any missing attributes in the window directly
below the canvas. To define an action's attributes, click and
select its icon and then provide the applicable information in the
Attributes window. You can also double-click errors in the status
pane after clicking the Check workflows for errors button
.
Drawing an arrow from one action to another establishes the directional flow of the process. To draw the arrow, place your cursor over the first action. When the cursor changes to a hand pointer, click and drag the line to the next action and then release the mouse button.
 on the toolbar to redraw or
realign the actions in a symmetrical and balanced layout.
on the toolbar to redraw or
realign the actions in a symmetrical and balanced layout. on the toolbar to save your workflow
occasionally. You must save a workflow layout in order to run or
test it.
on the toolbar to save your workflow
occasionally. You must save a workflow layout in order to run or
test it.