Building a comprehensive structured asset repository takes commitment, patience, and determination. If you have looked at some of the data forms for assets and supporting resources in the Asset Content pack, you probably noticed how many pieces of information—how many data fields—are included in each of these forms. As you populate the various forms, you may decide to fill out the data for most fields, or only for those you consider to be the most important. Keep in mind, however, that the more fields you fill out, the more comprehensive data you can include in the various reports you generate with Asset Lifecycle Manager.
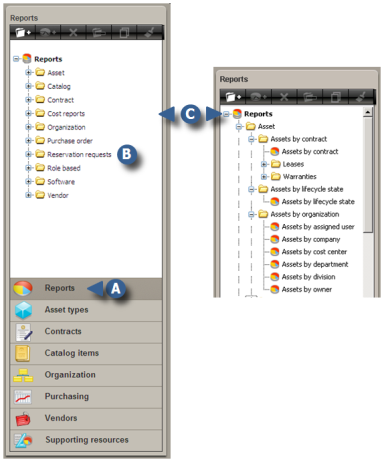
The Asset Content pack includes several dozen reports that are ready to use and easy to generate. As soon as you have relevant data in your repository, you can generate reports that give you all kinds of information about your assets; from high-level, summary reports to tightly focused, drill-down reports. To get an idea of some of the reports you can generate, open the Web console, click the Asset tab, and click Reports to open the Reports Explorer.


|
Click Reports to open the Reports explorer. |

|
The Reports explorer lists the various categories of available reports. |

|
Click [+] to expand any category and see what kinds of reports are available. |
Generating reports involves two separate activities; one in the Design console and one in the Web console.
Before you can generate reports, report views need to be created in the Design console. Once a report view has been created, it is available to users who are given access to it. You can decide whether to give the Read right—meaning the right to generate the report, or the Modify right—the right to make certain changes to the report from its default configuration. See also "Report view properties" in the Designer's Guide.
A report view is a collection of selected filters and field names, together with queries that define which data can be accessed from the asset repository. You can associate each view with a user or group and give that user or group read-only or read-write access to the view. Doing this allows you to limit the assets users can see to those they are responsible for or are authorized to view.
You can create views that are based on geography, cost center, asset type, lifecycle state, or any other criteria you choose. Information about how to create report views can be found in "Creating report view filter queries" in the Designer's Guide.
Report views are relatively simple to create, but they afford an Asset Manager almost endless options for displaying, analyzing, and understanding the information in the asset repository. However, you may never need to create report views because so many have already been created for you and are included in the Asset Content pack. The numerous reports you see in the Reports Explorer are ready to generate as soon as you have data in your repository.
An additional feature of reports is the ability to perform bulk updates of specific data fields. This is useful to instantly change the value in a given field, for multiple assets. For example, an order of laptops and hard drives has just arrived at your shipping dock. When the order was placed, a stub record was created for each item in the asset repository, and the lifecycle state was set to "Ordered". Now that the order has been received, the shipping clerk can quickly generate a report for the order, and then change the lifecycle state for all received items from "Ordered" to "Received". This eliminates the need to go into each individual item's asset record and change its state one by one. You will probably find many time-saving and handy uses for this feature once you begin generating reports.
You may find that there are reports you would like to run automatically on a periodic basis; for example, an inventory report that runs every week to determine whether inventory is running low on a particular item you need to keep in stock. Or you might run a report monthly to inform you of any equipment warranties or leases that will expire in the next 90 days.
You can create a workflow that runs a given report, and then set a schedule to execute that workflow. In this way, you can schedule reports to be generated automatically on a designated date or recurring time interval.
You can designate a "Run as" identity for the report so that it is generated as if it were run by a specific user that you specify. When the report is generated, you can set it to e-mail itself to a list of users you designate as recipients. You can set the "Send report" action to always e-mail the report, or only to e-mail the report when it returns results. For example, you can create a report that returns results for all computers with warranties that expire in the next 60 days. If no warranties expire in the next 60 days, you can set the action to not e-mail the report.
For more on scheduling reports, see "Schedules" in the Designer's guide.