
LANDesk Asset Lifecycle Manager includes many interconnected processes, forms, relationships, and tools that all work together as a robust and comprehensive asset management system. To understand how it all works, think of ALM in terms of its three primary functions: structured asset repository, state transition mapping and control, and workflow automation. All key functionality in the product is designed to support or enable one or more of these three components.
The structured asset repository refers to the database that stores all asset information, plus the structured design that lets you enter, synchronize, track, update, and report on asset details.
A structured asset repository creates a framework that enables you to implement a standards catalog, which is one of the keys to an efficient repository. The standards catalog consists of the standard assets you want individuals to be able to choose from, and which your IT department is prepared to support, in your organization.
Once you have determined the standard catalog items, you create the catalog by creating asset templates with the pertinent details about catalog items. The Asset Content pack included with ALM includes an extensive collection of forms, workflows, and data lists to make it easier for you to create and implement your own standards catalog.
In addition to the asset records, any items associated with an asset are included in the repository. This may include relationships to other assets, such as a monitor or a printer attached to a computer. It can also include a cost center, an employee’s manager, a vendor, a service contract, a physical location, and so on. An effective asset repository requires that all of these assets, details, supporting resources, and relationships can be included and identified.
An asset record stored in a database as a static entry is not sufficient for an effective asset management strategy. Assets are dynamic. The status of an asset, such as a computer, may change multiple times during its lifecycle. It changes assignment from one employee to another. It gets moved to different offices or locations. It may require repairs or upgrades or warranty replacement. Unless these state changes are recorded and tracked, this can lead to the asset itself being misplaced or lost and an incomplete picture of the asset's true costs, usage, and lifecycle history.
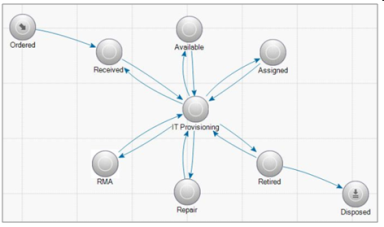
One of the keys to Asset Lifecycle Manager’s ability to manage and track assets throughout their lifecycle is state transition management. This uses state transition maps (illustrated above), which display a graphical representation of the various states you have defined for the asset type. State transition mapping enables you to manage how an asset, contract, request, or other resource may transition from state to state, the path it can take, and the requirements for each state as it moves along that path. A key technology that makes this transition mapping unique is ALM’s ability to automatically generate an audit trail of the state changes, including as much or little detail as you want, and to enable each state change to trigger an automated workflow that supports your asset management priorities.
Good planning and design are important, but quality asset management is dependent on effective deployment. By implementing a request system that operates within the framework of a standards catalog and is tied to a self-auditing workflow automation system, you bring control, compliance, and efficiency to your asset management processes. The following example illustrates how ALM's workflow designer enables the automation of what would otherwise be a collection of manual tasks.
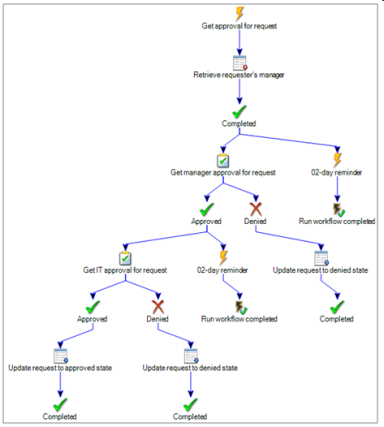
In the above example, an employee uses the ALM Request system to request access to a software application. When the employee submits the request, the request triggers a query to find out who the employee's manager is, retrieves the manager's ID, and then e-mails an approval request to that manager. A two-day timer is included, which triggers a reminder to be sent to the manager if there is no action within two days.
If the manager approves the request, it is forwarded to the IT department. If the manager denies the request, the request form is updated to a Denied state and the workflow terminates.
As with the manager's approval request, if IT hasn't responded within two days, a reminder message is sent. If IT approves the request, the request is updated to an Approved state and the task is marked Completed. If denied, the request state is updated to Denied and the task is marked completed. Secondary, or child, workflows can also be configured to automatically trigger other actions, such as sending a request to Purchasing to order the requested software, opening a service request to check for available licenses, and so on.
All of the above activities are triggered by a single request from an employee, and all details, including dates, times, names, responses, and actions, are automatically recorded in the audit history for the workflow.
For more information, including configuration details, examples, and step-by-step instructions for setting up automated requests, see Automated Request System.
The person who sets up an automated request process similar to the one described above—designing request forms, e-mail templates, and the workflow process itself—will use the Design console (sometimes referred to as the Admin console, or Windows console).
The Web console is where initial requests are submitted, approval requests are received and acted upon, and reports are accessed. For more information, see Web console vs Design console.
We recommend that you use the extensive collection of resources included in the Asset Content pack. The content pack contains the tools you need to implement a robust system for managing your assets, including dozens of pre-designed forms, reports, workflows, synchronization packages, and supporting resources (asset forms, forms for contracts, vendors, purchase orders, warranties, etc.). The forms include self-populating system fields, as well as custom fields you can populate by entering data manually or by synchronizing existing data from LANDesk Management Suite, ODBC sources, or CSV files.
See Asset Content pack for more information.
How you proceed from this point depends on your goals and priorities. The more familiar you become with the system, you will see that your options are numerous and you will be able to customize the system to fit your priorities and objectives. When you're ready to begin, turn to Getting started.