To deploy a PSP stored in a
centralized, network-based software repository using the graphical
RDU:
- Be sure that all minimum requirements are
fulfilled as listed in "Minimum requirements
for Microsoft Windows version 7.80 or earlier."
- Be sure that the centralized, network-based
software repository can be accessed by the administrative
system.
- Launch the RDU on the administrative system.
It does not matter where the utility resides on the host system.
However, HP recommends placing the utility in its own subdirectory.
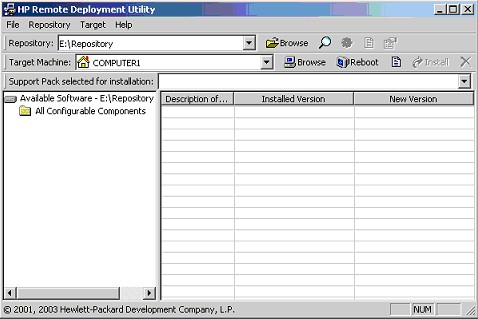
If no PSPs or components are in the same
directory as the RDU or if no applicable Support Packs are found, a
blank screen similar to the following appears when the utility
opens.
- Click Browse on the Repository toolbar to
navigate to the location of the centralized, network-based software
repository.
- Configure components by right-clicking a
component in the repository view tree and selecting Configure. Icons next to each component
indicate whether the icon must be configured. Refer to "Repository view tree" for descriptions of the
icons.
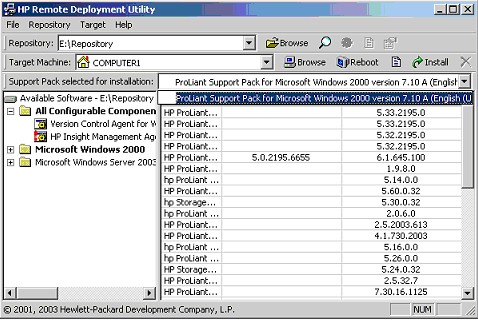
- Select components to be installed:
- To install all components in the applicable
Support Pack, select a Support Pack from the Support Pack Selected
for Installation toolbar. All the components in the Support Pack
appear in the target computer list, as shown in the following
figure.
|

|
IMPORTANT: All
components that make up a PSP must be present in the same directory
as the Support Pack File.
|
- To select individual components or
categories, drag selected files or folders from the repository view
tree and drop them in the target computer list. You can also select
a file or folder in the repository view tree, and then press the
Insert key to move the file or folder to the target computer
list.
- To remove any components that you do not
want to install, select them in the target computer list and press
the Delete key, or click
the Remove selected items chosen for
installation button (
 ) on the Target Machine toolbar.
If error text appears under a Support Pack
in the repository view tree, as in the following figure, a
component referenced in the Support Pack is not available in the
software repository.
To correct the situation, obtain the
missing component from the HP website, SmartStart CD, or Software
Maintenance CD and copy it to the software repository.

- Select the target machine. By default, the
RDU selects the system that launches the utility as the target
system.
If the target system is the local
administrative system, there is no need to modify the Target
Machine field. However, if the target system is a remote system
accessible over the network, enter or browse to the name of the
network target system in the Target Machine field and press the
Enter key to connect to the
target. You can also click Target, and use the Browse for Computer
window to navigate to the system accessible over the network
connection. Click OK to
select the target and return to the RDU main window.
|
|
NOTE: To
assist with entry of the target system name, the RDU maintains a
history of servers on which software has been developed. Access
this history from the Target Machine list.
|
If the user name and password for the
target machine do not match those for the machine running the RDU,
you are prompted to enter the user name and password for the target
machine.
- Deploy all components displayed in the
target computer list by clicking Install after the RDU identifies the
target system. A progress window tracks the progress of the
deployment.
- Click Cancel at any time to stop deployment.
There might be a slight delay before the installation is canceled
while the RDU finishes the last initiated task.
|
|
IMPORTANT:
Clicking Cancel stops the
installation of the PSP at the point when Cancel is clicked, so the target server
might end up with a partially installed PSP.
|
- View the installation results. When the
deployment process is complete, after deploying the PSP on the
target server, the RDU displays an installation confirmation
screen.
If one or more components are not installed
successfully, a screen similar to the following appears.
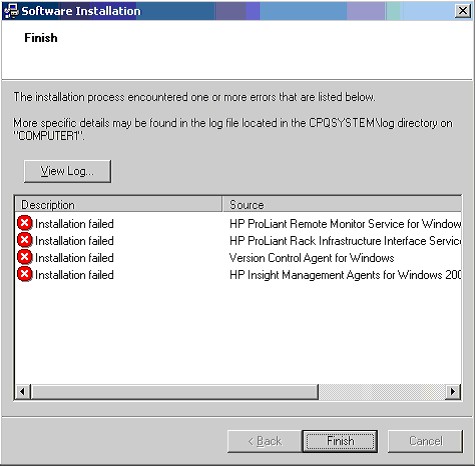
Each component writes installation activity
(including errors) to a common installation log file called
CPQSETUP.LOG on every target server. To view the installation log
file, select Target from
the menu bar and select View
Installation Log, or click View target installation log on the
Target toolbar.
- If necessary, reboot the target server to
complete the installation by clicking Reboot and confirming when prompted by
the system. The deployment is complete.
|
|
NOTE: If the
target system is the local administrative system, clicking Reboot
causes the system to reboot, and the RDU must be restarted to
deploy components or PSPs on another target system.
|
- Close the Installation Results window to
deploy components or PSPs on another target server.