


 Important: Important: |
|---|
| This is retired content. This content is outdated and is no longer being maintained. It is provided as a courtesy for individuals who are still using these technologies. This content may contain URLs that were valid when originally published, but now link to sites or pages that no longer exist. |
Christian Forsberg;
April 2007
 Summary
Learn about mobile claims processing and how to design and develop solutions for Windows Mobile-based devices using Visual Studio 2005 and the .NET Compact Framework. The source code in this article implements a server XML Web service, database, and a mobile client application. (68 printed pages)
Download
Applies To
Microsoft® Windows Mobile® 2005 for Pocket PC
Microsoft Visual Studio® 2005
Microsoft SQL Server™ 2005
Microsoft .NET Compact Framework 2.0
Microsoft SQL Server 2005 Compact Edition
Introduction
This article is about designing and developing a mobile application that is based on the .NET Framework, the Windows Mobile platform for Pocket PCs, and the .NET Compact Framework for an adjuster of insurance claims. The sample solution that this article describes addresses the needs of a fictitious insurance company from a field claims processing points of view. From a technology point of view, the sample solution demonstrates how to build extensible and orientation-aware user interfaces, manage connection state, online and offline authentication, accessing local databases, securely synchronize data with a server by using XML Web services, compression, encryption, and much more. The ability to extend existing systems and processes everywhere is what makes mobile client applications so interesting. Much of the actual work in claims processing happens in the field, and therefore that is where the information access and data entry should be done.
Mobile Claims Processing
Insurance claims professionals know the value of using time productively and making fair, accurate settlements that leave both the insured and the insurer satisfied. Key to achieving this is that field workers can access up-to-date information as well as instantly capture data while handling damage appraisals, negotiating with customers, and completing paperwork.
Some of the potential strategic benefits are:
-
Customer satisfactionwith a fast and efficient settlement
process.
-
Brand loyaltyby faster responsiveness and more professional
appearance.
-
Streamlined operationsthrough defined, automated work
processes.
-
Increased employee satisfactionby requiring less paperwork,
better information, and tools that save time.
The creation of such systems is already happening as insurance companies are implementing claims solutions to help their field agents to more easily access data and estimating tools, as well as capture, review, transmit, and share information directly from the claim site. The idea is to minimize "guesstimates," wasted time, paper forms, transcribing errors, and delays in submitting appraisals, reports, and even photos. As a result, companies may now be able to resolve claims faster without over- or underpaying, contributing to customer retention and profitability. Meanwhile streamlined administration and reduced IT costs leave more resources available to grow the business.
There are a number of areas where a mobile device can be particularly useful, and some of the most important areas are:
- Planning
- Inspection
- Filling out forms (questionnaires, check lists, and notes)
- Capturing artifacts (photos, videos, and sound)
- Estimating work and parts (time and material)
- Settlement
In the planning activities, the built-in functionality of a Windows Mobile device can be of great assistance. Communication with customers, appointments, tasks, and contact information can be handled by Microsoft Office Outlook® Mobile and synchronized with your desktop PC or Microsoft Exchange Server. Many of the other activities can make use of the other parts of Office Mobile (Word Mobile, Excel® Mobile, and PowerPoint® Mobile). However, to really help the mobile workers in their business processes, something more customized is required. There are two alternatives: buy and adapt to a commercially available product or roll out your own customized solution.
There are a number of commercial products on the market and
examples are the products from
This article focuses on getting you started on building you own mobile claims processing solution using the latest tools and practices available from Microsoft.
Claims Processing Scenario
There are many different claims scenarios, and the idea with an article like this is to choose a specific scenario while still being generic enough to apply the logic to many other scenarios. The scenario chosen is the claims processing of manufacturing machine insurance, and both the process and the sample application accompanying this article cover most of a generic business process for claims processing.
Assuming that only one field worker at a time works on a specific claim any given moment, there is no need for a constant connection to a server. The field worker just needs to download the claim data to manage, review, and update the information while disconnected. After a claim is updated, it can be uploaded to the server again.
However, at the core of any claims process is the ability to access and share some up-to-date information about the claim. Therefore, as soon as important information about the claim changes, it needs to be shared with everyone else involved in the handling of the claim. A typical example is the critical process step of claim assignment, which needs to be as efficient as possible to prevent valuable time passing from the point when the claim is received (usually in a call center) to the point when the claims adjuster shows up at the "loss site" (which is insurance claims jargon for the place where the claim occurred). In this article's sample, you will see that a claim assignment request is sent immediately as the claim is registered, and the adjuster can instantly respond with an acceptance. Another example is the current status of the claim, which is important for most parties, and if the claim status changes, everyone should be notified soon as possible. In the sample application, you will see that each status change on the mobile device is sent back to the server as soon as there is a connection available. These status updates enable an efficient workflow associated with the processing of the claim.
An overall business process for claims processing may look like this:
- New Claim / Not Assigned
- Assignment Sent / Claim Assigned
- Insured Contacted / Inspection Performed
- Estimate Completed / Approved
- Claim Proposed / Settled
- Job Started / Completed / Approved
- Close Claim / Claim Closed
Figure 1 illustrates this business process.
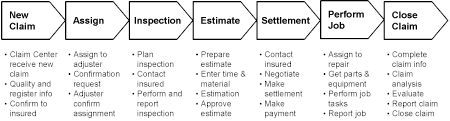
Figure 1. Overall business process for claims processing
The process illustrated in Figure 1 shows what is needed in both the back office and in the field. A new claim is probably received in something like a claim (call) center where the claim is qualified, registered, and a confirmation is returned to the insured. An adjuster is assigned the claim, and a confirmation request is sent to the adjuster that responds to it. The following four steps (inspection, estimation, settlement, and repair) are mostly done in the field, and finally the claim is closed in the back office when any necessary evaluation and reporting is done.
By focusing on the needs of the adjuster who are not always connected, the following business process can be defined:
- Check Out Claim
- Plan / Perform Inspection
- Plan / Perform Estimate
- Plan / Perform Settlement
- Check In Claim
Figure 2 shows this business process.

Figure 2. Claims process for adjuster
As shown in Figure 2, the main steps in the adjuster's business process involve a number of subactivities that work as main requirements for the new solution. Assuming that this is a good definition of the new process, the next step is to look at the solution's design.
Application Design
The article,
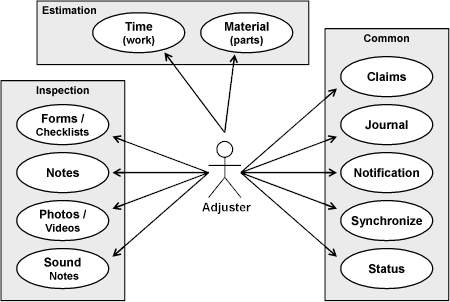
Figure 3. Use case model
Following is a short description of each use case:
-
Forms / Checklists handles entry of electronic forms
-
Noteshandles text notes entry
-
Photos / Videoallows the capture of visual media
-
Sound Notesallows the capture of audio media
-
Timeand
Materialhandles the entry of labor and parts for estimation
-
Claimsis responsible for the management of claims
-
Journalhandles the journal connected to each claim
-
Notificationhandles the notifications of assignments
-
Synchronizehandles the communication with the server
-
Statushandles the status updates sent to the server
Another very important artifact to create early in the design process is the dialog model and sample dialogs (forms). Figure 4 illustrates the dialog model for the sample application.
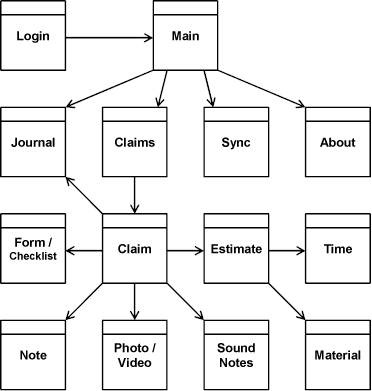
Figure 4. Dialog model
The dialog model gives an overview of the dialogs that the application includes. The dialog model also shows the ways a user can navigate between these dialogs.
Figure 5 shows some sample dialog designs.
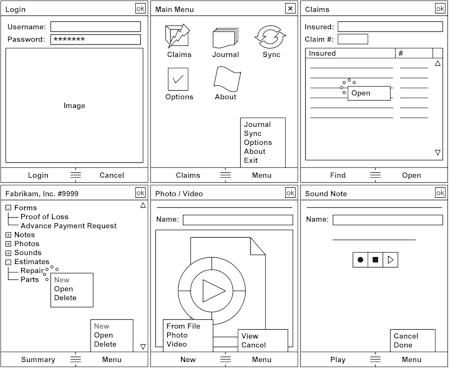
Figure 5. Sample dialog designs
The sample dialogs are drawn in a general drawing tool (in this example, Microsoft PowerPoint). I recommend involving someone who is knowledgeable in user interface design when creating dialogs. Visualizing the application dialogs early in the process gives users and other stakeholders an opportunity to understand how the application will look and work. Changes are very easy to make at this stage.
When the functionality (use cases) and appearance (dialogs) of the new system is in place, the next logical step is to look at the information or data model. Even if many data items (terms) can be derived from the dialogs, it is a good idea to verify the data model with the stakeholders of the new system. Figure 6 illustrates the data model for the sample application.
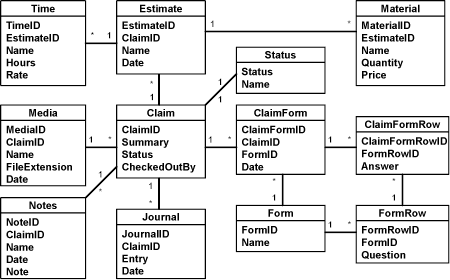
Figure 6. Data model
The verification of the data model can include questions such as "Do estimates include both time and material?" or "Are journal entries always connected to a specific claim?" and so on. The answers result in a normalized data model that includes the referential integrity (relations).
In the download code sample, you can find all of the previous figures in a PowerPoint presentation, which you can reuse when you create your own diagrams.
Mobile Client Software
Factory
To help developers apply best practices to Microsoft technology,
the
- Composite User Interface Application Block
- Orientation Aware Control Application Block
- Configuration Application Block
- Connection Monitor Application Block
- Password Authentication Application Block
- Data Access Application Block
- Disconnected Service Agent Application Block
- Endpoint Catalog Application Block
- Data Subscription Application Block
All but the last application block are used in this article's sample code. The following sections take a brief look at each application block. For more details, see the documentation included in the Mobile Client Software Factory.
Composite User Interface Application Block
The CAB (which when used in this article always refers to the Composite User Interface Application Block, and not to the Windows Mobile installation file format) was originally developed to handle complex user interfaces for smart client (Windows®) applications on the desktop. The idea is to create an extensible user interface that is composed of separate components (actually .NET assemblies) that provide a specific functionality while still sharing information with other user interface components in a structured way. This reduces the complexity of developing each part of the application and simplifies the deployment and maintenance.
Figure 7 shows a range of possible functionality related to claims processing.
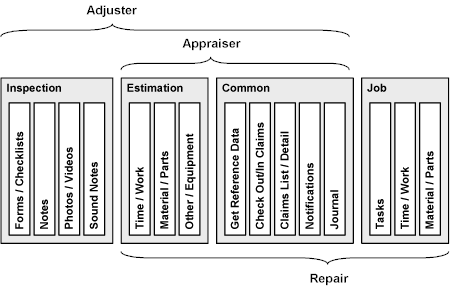
Figure 7. Partitioned claims processing functionality
The physical implementation of the various parts into modules can vary. For example, in this article’s sample application, the functionality related to the inspection (forms, notes, and so on) is implemented in separate modules, while the estimation functionality is a single module. All the common functionality is located in the application shell (the application executable) and the functionality related to the actual job is not included in this article's sample.
As shown in Figure 7, the various roles (adjuster, appraiser, and so on) need different parts of the functionality, and this is where the CAB really pays off. The same core set of modules can be used to put together a customized functionality for each role and even each individual, if needed.
Orientation Aware Control Application Block
This is a forms designer and a base class for creating form layouts that can differ depending on the screen orientation and resolution. By making a control inherit from this base class, the form layout can be created for the different orientations in design time with the forms designer. This way, the layout of the controls can be completely different whether the form is shown in portrait or landscape orientation.
Configuration Application Block
As there is no support for handling configuration information within the .NET Compact Framework, the Configuration Application Block offers the most important parts of the functionality for handling configuration information.
Connection Monitor Application Block
The Connection Monitor Application Block offers the functionality to enumerate the connection types and networks available for the device (whether they are connected or not). It also provides an indication of current connectivity that can be queried, and by raising events that the application can subscribe to so that it receives notification when the network connection status changes. A model is provided to put a price on each type of connection, and thereby allowing the application to only use expensive connections if the message delivery is important.
Password Authentication Application Block
Using the Password Authentication Application Block, you can store encrypted user information (username and password) locally on the device. This can be very useful for securing parts of the configuration file, and to authenticate users while in offline mode (without a live connection).
Data Access Application Block
The implementation of data access in a local database (SQL Server 2005 Compact Edition) is simplified by the Data Access Application Block. The functionality offered includes the creation of connections, commands, and parameters as well as the ability to query the database to return readers, result sets, a single value, and no value. This is the only application block that has been extended in the sample source code accompanying this article. The functionality added also allows for the creation of data adapters and command builders. In addition, the ability to query the database to return and update datasets has been added.
Disconnected Service Agent Application Block
The Disconnected Service Agent Application Block provides management features for the execution of Web services from occasionally connected mobile devices. With a disconnected service agent, the device can maintain a queue of Web service requests when offline (disconnected) and then replay them when a connection to the server application becomes available. This means that applications can work in a disconnected environment, which is a crucial requirement in many scenarios.
Endpoint Catalog Application Block
When you want to store physical addresses and authentication information (usually encrypted) on the device to simplify the access to remote services, the Endpoint Catalog Application Block will assist you with that. It stores a catalog of connection information for remote services and is used by both the Disconnected Service Agent Application Block and the Data Subscription Application Block.
Data Subscription Application Block
The Data Subscription Application Block exposes a feature named Subscription Manager that you can use in CAB applications as a service. Subscription Manager creates and manages subscriptions to data sources, such as a database that will provide offline data for the application.
As the sample application uses XML Web services to implement this functionality, this application block is not used. The advantage of using generic XML Web services is that no dependency is imposed on how the data and logic is handled on the server side. Most probably, the server side will connect to a business system that publishes an API for accessing its data. If you are using encryption and compression, the performance and bandwidth requirements are about the same.
Notifications
One of the most important challenges of a mobile solution is how to keep the mobile device in synchronization in the "far from always connected" reality. For larger amounts of data, it is probably best to have a solid synchronization in place over which the user has control. Most often, it is best to let the user choose when to synchronize reference and claims data. Nothing is more frustrating than a device that suddenly starts transmitting large amounts of data on its own.
For the smaller amounts of information that is mission critical, the situation is different. Notifications about a new claim assignment or that someone has changed the status of a claim, is information that needs to be shared as soon as possible. This functionality can be implemented as shown in Figure 8.
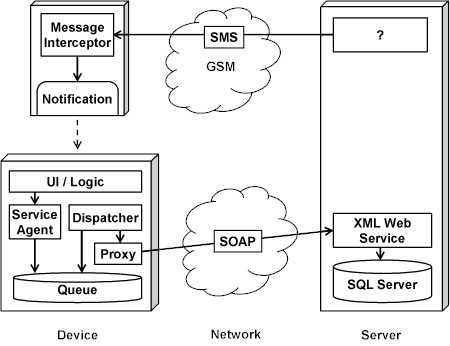
Figure 8. Claim assignment and status change
As soon as a claim is assigned, a Short Message Service (SMS) can be sent to the mobile device that can trigger a notification via a message interception filter. This is a stable way of transferring notification, but due to the cost of such messages, it is only suitable when the message volume is low. For more high-volume message scenarios, there are other solutions available (such as polling over the Internet and so on), and as usual, each solution has its pros and cons.
When a status change occurs on a claim (which is actually what also happens when the user accept the assignment sent via SMS), a service agent on the device places an update request in a message queue. If or when a connection to the server is available, a dispatcher checks the queue for new messages to send and, via a proxy, makes the actual call to the server. Although not shown in Figure 8, when the call from the server actually takes place, a callback defined by the service agent is called to notify the application of the completed call (or that an error occurred).
Synchronization
Because the Data Access Application Block for the .NET Compact Framework is a port from the application block for the full .NET Framework, you can access data on a server in a similar way as you access data on a mobile device. This article's sample application accesses data in this way when it synchronizes data between the mobile device and the server, as shown in Figure 9.
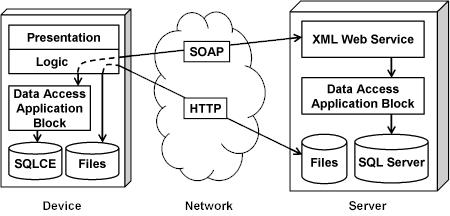
Figure 9. Data Access Application Block at work on both a device and a server
During synchronization, the application on the device accesses the local database using the application block, and then the device connects to an XML Web service on the server. The XML Web service also uses the application block to connect to the server database. The data access code on both the device and on the server is very similar, which allows for both reuse of code and for a common way of working among developers on both platforms. This is true for all the application blocks that exist both for the server (desktop) and for the device.
Also shown in Figure 9, the media files (photos, sound, and so on) are transferred to the server in a more direct way (using HTTP) to optimize performance. However, both ways of communicating are secure (encrypted) and efficient (compressed).
Additional Features
This article's download code sample also provides a number of features commonly desired when implementing an enterprise mobile application. Some of these features are introduced here, and discussed in more detail in the code walkthrough section below.
Authentication
This may be obvious to a desktop developer just starting mobile development, but to a mobile developer used to the .NET Compact Framework 1.0, it comes as good news that the .NET Compact Framework 2.0 has built-in support for Windows authentication (also known as NTLM authentication).
Encryption
This article's sample application uses Secure Sockets Layer (SSL) to secure the communication between the client and the server.
Compression
This article's sample application uses Simple Object Access
Protocol (SOAP) extensions and the gzip (
For more details about compression using SOAP extensions, see the code walkthrough section of this article.
Claims2Go Application
Walkthrough
The sample client scenario is a Pocket PC application that is
written with
The sample application shows how to support the claims business process by using a Pocket PC. Some of the design choices are commented during the walkthrough of the sample application. Also note that the article describes parts of the code after the application's user interface design is described. In the following walkthrough, you are assumed to take the role of the user, the adjuster.
Splash
When the application starts, the first screen displayed is the Splashscreen, as shown in Figure 10.
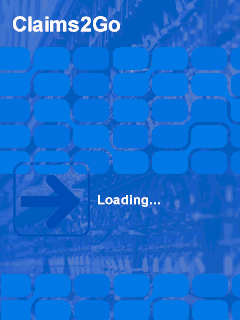
Figure 10. Splash screen
There could be many purposes of a splash screen, but the most common is to show something more interesting than the wait cursor while the application loads. Even if not shown here, it can also be used to show other information such as version number, copyright notices, announcements, and so on.
As you will see, the sample application is rotation-aware, and when the screen is rotated, the landscape version of the splash screen is shown in Figure 11.
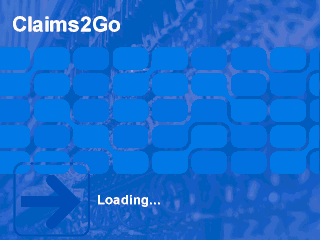
Figure 11. Splash screen in landscape mode
Note that this is another part of the same image, and not merely the same image stretched to fit the new orientation. The image is designed in the format 320 x 320 pixels to look good even on a minimal square screen of 240 x 240 pixels, and using the same technique, even greater resolutions could be supported.
Login
When the application starts, the first screen is the Loginscreen, as shown in Figure 12.
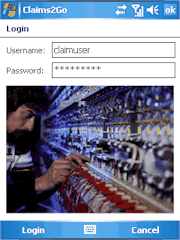
Figure 12. Login screen
The Loginscreen is branded with an application image. This screen can also show notification messages about news, new features, and important changes. In addition, this screen could be a good place to inform the user about copyrights and license conditions. When choosing to put information on the splash or the login screen, you should consider that the splash screen will eventually go away, and the login screen will wait for the user to move on.
A rotated version of the same screen is shown in Figure 13.
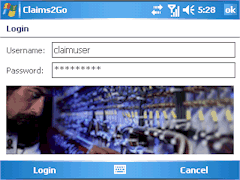
Figure 13. Login screen in landscape
Note how the text boxes are adjusted to the new width, and that a completely different image is used that better matches the landscape orientation. Throughout this walkthrough, you will see screenshots in sometimes both portrait and landscape orientation (but most often either of the two) to demonstrate the support for both orientations.
When you enter the user name and password and then tap Login, the application confirms that the credentials are valid by connecting to the server by using Windows authentication. If the log on is successful, the application displays the Main menuscreen (see Figure 14). If the log on is not successful, an error message appears, and then the application closes. It also closes if you tap Cancel.
Main Menu
After the user logs on to the application, the next screen displayed is the Main Menuscreen, as shown in Figure 14.
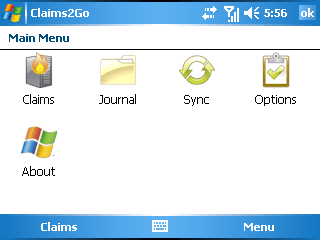
Figure 14. Main menu screen
The functionality of the application aligns with the business process of the adjuster. The main steps in this process are to receive notifications about claim assignments, check out jobs from the server (use the Syncicon in Figures 14 and 15), open the claim, perform tasks that are related to that claim ( Claims), and check jobs back into the server ( Sync). The adjuster can also perform general tasks such as checking the Journaland changing application Options.
A ListViewcontrol presents the main menu commands as icons that a user can tap. Using icons to represent the various functionality of the application is a very useful approach that increases usability. The same screen in portrait mode is shown in Figure 15.
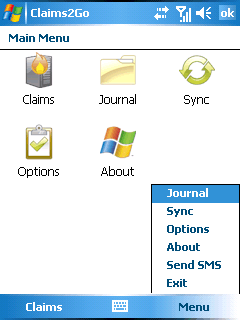
Figure 15. Menu commands
All of the options represented by icons on the Main Menuscreen are also available in the Menuoption (at the bottom of the screen). Providing several ways (icons and commands) to access the same functionality allows users to choose which approach is more efficient for them.
Claim Assignment
When a claim assignment is made in the back office, an SMS message is sent to the adjuster's mobile device, as shown in Figure 16.
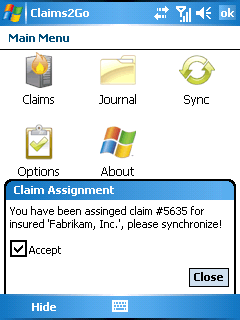
Figure 16. Claim assignment notification
The message is intercepted and shown to the adjuster that can choose to accept the assignment. If the adjuster accepts the assignment, a request is queued to update the claim's status on the server. If (or when) the device has a live connection, the queued request is sent to the server to update the claim's status. When the status is updated on the server, a confirmation is sent back to the device, as shown in Figure 17.
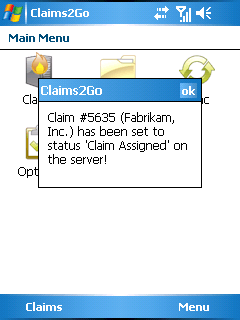
Figure 17. Claim status update confirmation
This way of handling the claim assignments allows the back office (management) full control of the claims workflow. If an assigned adjuster does not accept the assignment within a specific time, the claim can be reassigned to another adjuster.
Claim Check Out
The first step in processing a claim is to check it out from the server to the device; this step is done by synchronizing with the server. On the Main menuscreen, tap the Syncicon (or choose the Synccommand in the menu).
The Synchronizescreen allows you to synchronize claim data with the server. You can choose to check out or check in the selected claims. (The Check In option is covered in the Claim Check In section later in this article).
When you select Check out, the claims that are available for check out are retrieved from the server. Claims are available if another user does not have them checked out. The synchronization is implemented as a two-step wizard. First, you are required to select the claims that you want to check out, as shown in Figure 18.
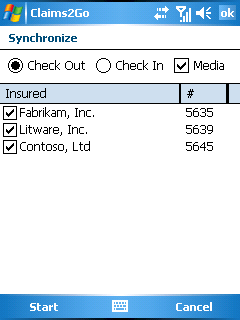
Figure 18. Synchronize screen with the Check Out option selected
You also choose whether the media associated with the selected claims should also be checked out. The reason for this is that media files can be large, and, using a low bandwidth connection, it can be both slow and costly to download the media.
When you have selected at least one job, tapping the Startbutton initiates the check out. During the synchronization the progress is reported, as shown in Figure 19.

Figure 19. Synchronization completed (for a check-out request)
When the synchronization is complete, tap Doneto return to the Main menuscreen.
Open Claim
The next step in the business process is to open and work with a specific claim. On the Main Menuscreen (shown in Figures 14 and 15), tap Claims.
Adjusters can use the Claimsscreen to search for claims that they are managing, and you can search for the name of the insured or the number of the claim. When you tap the Findoption, the claims that match the search criteria appear in the list.
You can open a claim by tapping and holding a claim in the list, and then by tapping Open, as shown in Figure 20.
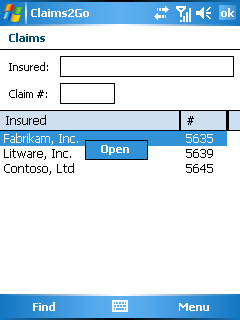
Figure 20. Opening a claim
You can also select the claim in the list, and use the Openoption in the Menu. After you have opened a claim, the claim screen appears, as shown in Figure 21.
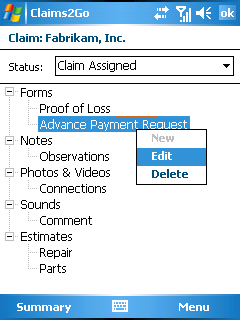
Figure 21. Claim screen
The Claimscreen displays the name of the insured in the heading and lists the various artifacts that are associated with the claim in a tree. It can be electronic forms, text notes, photos, videos, voice recordings or other sounds, and estimates.
This screen also shows the current status of the claim. If the status is changed and the claim is saved (by selecting Doneon the Menu), a request is queued to update the claim's status on the server. If (or when) the device has a live connection, the queued request is sent to the server to update the claim's status. When the status is updated on the server, a confirmation is sent back to the device (as shown in Figure 17). As already mentioned, this allows all interested parties to be updated on the current status of each claim.
By doing a tap-and-hold on any of the items in the tree, a pop-up menu appears with context-sensitive options. If it is a root item (such as Forms, Notes, and so on), only a Newoption will be available, and if it is any of the other items, the options to Editand Deleteare available. The same logic applies to the corresponding options in the Menu.
A summary of the claim is displayed when selecting the Summaryoption, as shown in Figure 22.
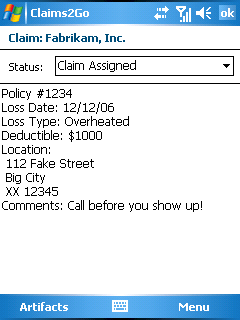
Figure 22. Claim summary
Selecting Artifactstakes you back to the artifacts tree (see Figure 21).
Claims Screen Options
The following five sections explain the various options on the Claimsscreen.
Forms
By selecting the Newoption on the Formsitem in the artifacts tree on the claims screen (Figure 21), you can select which form to create, as shown in Figure 23.
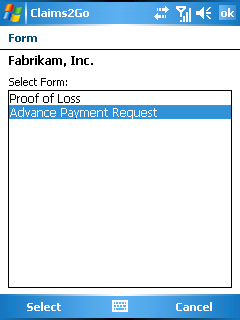
Figure 23. Select form to create
All of the screens that you can access from the claims screen (shown in Figure 21) include the name of the insured below the screen heading (in Figure 23, the name of the insured is Fabrikam, Inc.).
You simply select one of the form types in the list and then choose Selectto create the form, as shown in Figure 24.
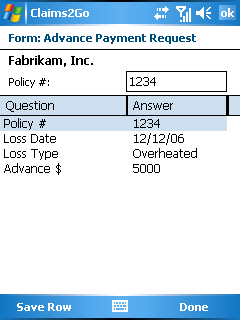
Figure 24. Form entry
The form type is shown in the screen heading above the name of the insured, and each of the lines in the list is a form field. You select a field in the list, and then you enter the value for that field in the text box just above the list. When you want to save the value in the text box, you select the Save Rowoption. Selecting Donesaves the form data and takes you back to the claims screen (Figure 21).
Note that this is the same screen that you will see when you select to Edita form in the claims screen.
Notes
By selecting the Newoption on the Notesitem on the claims screen (Figure 21), you create a new note, as shown in Figure 25.
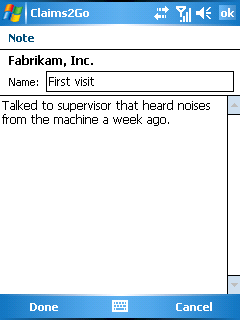
Figure 25. Note entry
On this screen, you can enter a name of the note and simply write the note text. When you want to save the note, select Doneand if not, select Cancel. Both options will take you back to the claims screen (Figure 21).
Note that this is the same screen that you will see when you select to Edita note in the claims screen.
Photos & Videos
By selecting the Newoption on the Photos & Videositem on the claims screen (Figure 21), you can associate a photo or video to the current claim, and that is done on the Photo / Videoscreen, as shown in Figure 26.
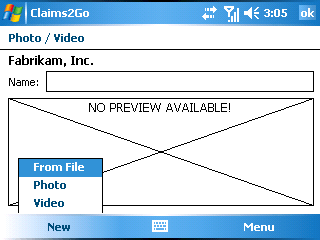
Figure 26. New photo or video
On this screen, you usually start by either selecting an existing media file or creating a new one. The Photoand Videooptions on the Newmenu will bring up the camera application to allow you to take a photo or record a video. The From Fileoption allows you to select an existing media file, as shown in Figure 27.
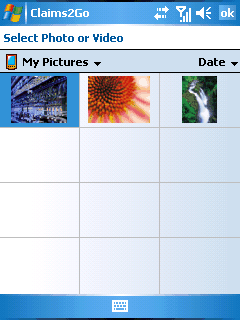
Figure 27. New photo or video
If you select a photo file, you are returned to the Photo / Videoscreen with a preview of the photo, as shown in Figure 28.

Figure 28. Photo selected
Now you can enter a name for the photo and save the photo by selecting Done(or Cancelto exit) and be returned to the claims screen (Figure 21).
Note that this is the same screen you will see when you select to Edita photo or video in the claims screen.
Sounds
By selecting the Newoption on the Soundsitem on the claims screen (Figure 21), you can associate a sound to the current claim, which is done on the Soundsscreen, as shown in Figure 29.
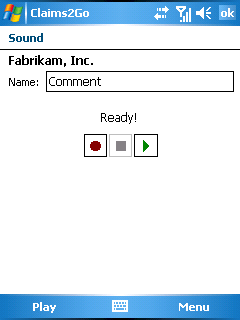
Figure 29. Sound recording
On this screen, you can enter a name of the recording and record the sound using either the buttons in the middle of the screen or the same options at the bottom left of the screen. When you want to save the sound association, you select Doneand if not, select Cancel. Both options will take you back to the claims screen (Figure 21).
Note that this is the same screen that you will see when you select to Edita sound in the claims screen.
Estimates
By selecting the Newoption on the Estimatesitem on the claims screen (Figure 21), you will create a new estimate, as shown in Figure 30.
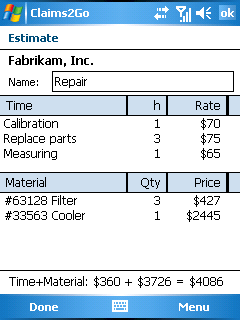
Figure 30. Estimate with time & material
On this screen, you can enter a name of the estimate, and then you can start adding time and material items. As you add items, a total is updated at the bottom of the screen.
You add items by doing a tap-and-hold in the respective list, and when you select Newin the Timelist, you will create a new time item, as shown in Figure 31.
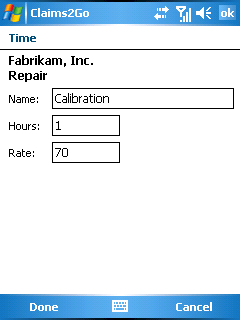
Figure 31. Time entry
The name of the estimate is shown below the name of the insured. Note how the same screen is designed differently in Figure 32 to make use of the landscape mode.
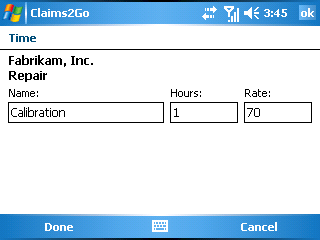
Figure 32. Time entry in landscape mode
This is a simple way to enter estimated time to spend on a specific task. In a real-world application the tasks and rates are probably loaded from a back-office business system. The same goes for the entry of material, as shown in Figure 33.

Figure 33. Material entry
On the estimate screen (Figure 30), select Doneto save or Cancelto exit. Both options will take you back to the claims screen (Figure 21).
Note that this is the same screen that you will see when you select to Editan estimate in the claims screen.
Claim Check In
The last step in the claims business process is to check in claims from the device back to the server by synchronizing the device with the server. On the Main menuscreen, tap Sync.
The Synchronizescreen allows you to synchronize claim data with the server. You can choose to check out or check in the selected claims. The check out option was covered in the preceding Claim Check Out section.
When you select Check In, the claims that are available for check in are retrieved from the database on the device. The synchronization is implemented as a two-step wizard. First, you are required to select the claims that you want to check in, as shown in Figure 34.
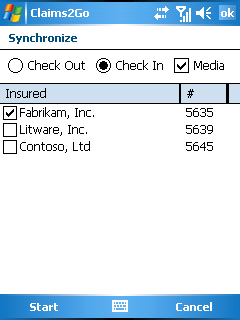
Figure 34. Synchronize screen with the Check In option selected
When you have at least one claim selected, tapping the Startbutton to initiate the check in. During the synchronization, the progress is reported, as shown in Figure 35.

Figure 35. Synchronization completed (for a check in request)
When the synchronization is complete, tap Closeto return to the main menu screen.
Journal
By selecting the Journaloption on the Main Menuscreen (as shown in Figures 14 and 15), you can view the claim journal, as shown in Figure 36.
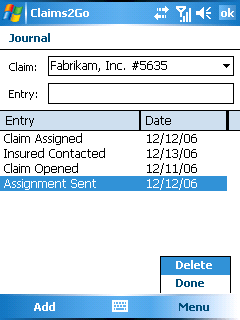
Figure 36. Journal entries
Here you first select if you want to see the journal for only one claim or for all claims, and also delete journal entries. When a specific claim is selected, you can add journal entries by adding a note in the Entrytext box and selecting Add.
Select Done to return to the main menu screen.
Options
When you select Optionson the Main Menuscreen (as shown in Figures 14 and 15), the Optionsscreen appears, as shown in Figure 37.
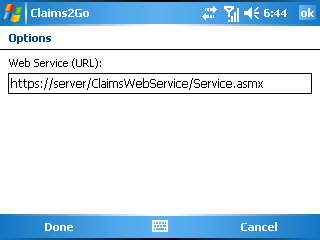
Figure 37. Options
The application uses the URL in the Web Service (URL)box for the XML Web service to synchronize (check out and check in) jobs. In this case, the URL points to a Web service that uses encrypted communication (that is, Secure Sockets Layer).
Selecting Donewill save any changes, selecting Cancelwill discard them; both options take you back to the main menu screen.
About
All applications should include a screen with the product name, version, copyright, and other legal information. The Aboutoption on the Main menuscreen displays this information, as shown in Figure 38.
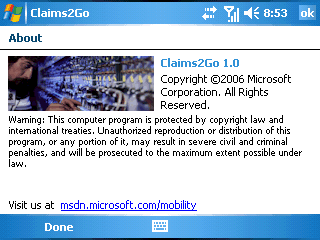
Figure 38. About screen
This screen can also include a link to a Web page that has product and support information.
Code Walkthrough
The previous section provided an example scenario for the sample application, and now it is time to look at the source code.
Composite User Interface Application Block
The most interesting part of the CAB is the ability to build extensible applications. This means that different functionality is implemented in separate modules (assemblies) completely separated from each other.
The functionality in the sample application is divided into 10 separate modules, and they extend the core shell (the application .exe) in two levels. The first level consist of modules that extend the application's main menu (see Figures 14 and 15), and the second level extends the claims screen (Figure 21), as shown in Figure 39.
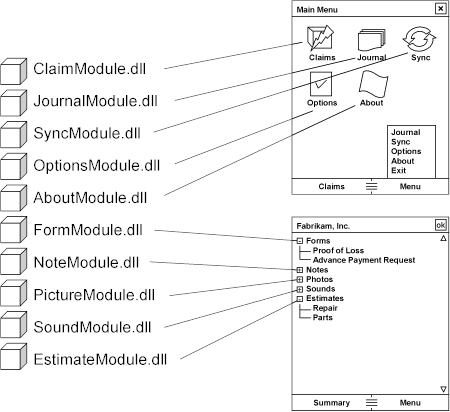
Figure 39. Functionality divided by module
Each module is responsible for extending the user interface with the functionality that it provides. For example, the journal module (JournalModule.dll) adds the icon and the menu option to the main menu screen as well as implement the journal screen (Figure 36). Another example is the form module (FormModule.dll) that add the root and child nodes to the claims screen as well as implements the form screens (Figures 23 and 24). The list of modules that is loaded should be included in the ProfileCatalog.xml file, and it looks like the following code:
 Copy Code Copy Code
|
|
|---|---|
<?xml version="1.0" encoding="utf-8" ?> <SolutionProfile xmlns="http://schemas.microsoft.com/pag/cab-profile"> <Modules> <ModuleInfo AssemblyFile="EstimateModule.dll" /> <ModuleInfo AssemblyFile="SoundModule.dll" /> <ModuleInfo AssemblyFile="PictureModule.dll" /> <ModuleInfo AssemblyFile="NoteModule.dll" /> <ModuleInfo AssemblyFile="FormModule.dll" /> <ModuleInfo AssemblyFile="AboutModule.dll" /> <ModuleInfo AssemblyFile="OptionsModule.dll" /> <ModuleInfo AssemblyFile="SyncModule.dll" /> <ModuleInfo AssemblyFile="JournalModule.dll" /> <ModuleInfo AssemblyFile="ClaimModule.dll" /> </Modules> </SolutionProfile> |
|
As the different modules are unaware of each other (except that some are dependent on others) they can be deployed separately, and only this file needs to be updated for each deployment. For example, if a specific device does not have a camera and that functionality is not needed, that line should be removed from the file and the PictureModule.dll does not need to be deployed to that device.
The CAB introduces many new concepts such as the
ObjectBuilder,
WorkItems,
Workspaces,
Services,
Commands,
SmartParts, UI Extension Sites, and so on. It is a good idea
to get to know all these concepts before you dig into this
article’s sample as it will help considerably in understanding the
code. The
The best way to get an idea of the benefits of the CAB is probably to look closer at one of the modules. We start by looking at the ModuleInitializerclass, which inherits from the standard CAB class ModuleInitof the NoteModule, and first the declarations and the constructor.
|
Copy Code
|
|
|---|---|
private WorkItem workItem;
private ClaimItemsCatalog claimItemsCatalog;

public ModuleInitializer([ServiceDependency] WorkItem workItem,
  [ServiceDependency] ClaimItemsCatalog claimItemsCatalog)
{
	this.workItem = workItem;
	this.claimItemsCatalog = claimItemsCatalog;
}
|
|
The first odd thing to notice is the attributes of the constructor parameters, and they are used by the ObjectBuilderto perform dependency injection. It allows access to shared instances of these classes (in CAB named Services) that are defined somewhere else (in this or another module on which this module is dependent). There are also other ways (using properties, and so on) to share services between modules. The WorkItemservice is important as it collects other instances related to a specific context. The constructor simply saves these services in private variables, and we move on to the method that is called when the module is loaded.
|
Copy Code
|
|
|---|---|
public override void Load()
{
	base.Load();

	ClaimItem claimItem = new ClaimItem(
	Properties.Resources.NotesText,
	Properties.Resources.NoteCommand,
	Properties.Resources.NoteItemsCommand);
	claimItemsCatalog.Add(claimItem);
}
|
|
Now the ClaimItemCatalogservice instantly comes into use as a new ClaimItemobject is added that corresponds to the node "Notes" in the TreeViewcontrol (as shown in Figure 21). The actual node is created in the ClaimModuleusing the same ClaimItemCatalogservice. Note that all constant strings are defined as resources to be easily translated to another language.
The last part of the ModuleInitializerclass defines a number of commands.
|
Copy Code
|
|
|---|---|
[CommandHandler("NoteItems")]
public void OnNoteItems(object sender, EventArgs e)
{
	if(!workItem.Services.Contains(typeof(NoteHandler)))
		workItem.Services.AddNew<NoteHandler>();
	NoteHandler noteHandler =
workItem.Services.Get<NoteHandler>();
	foreach(ClaimItem ci in claimItemsCatalog)
		if(ci.ItemsCommand ==
Properties.Resources.NoteItemsCommand)
		{
			string claimID = workItem.RootWorkItemItems.Get(
			"CurrentClaimID").ToString();
			DataSet ds = noteHandler.GetList(claimID);
			ci.SubItems.Clear();
			foreach(DataRow dr in ds.Tables[0].Rows)
				ci.SubItems.Add(dr["NoteID"].ToString(),
				dr["Name"].ToString());
			break;
	}
}
|
|
This command is used by the ClaimModuleto populate the SubItemscollection of the ClaimItemobject. These SubItemswill also be used by the ClaimModuleto populate the nodes below the "Notes" node (the notes). The actual data access is handled by the NoteHandlerservice (see below). Note that both that service and the currently selected claim's identity (CurrentClaimID) are stored in WorkItems.
The command used when opening a note (the Newand Editmenu options in the TreeViewcontrol's ContextMenuin the claim screen) is implemented like this:
|
Copy Code
|
|
|---|---|
[CommandHandler("Note")]
public void OnNote(object sender, EventArgs e)
{
	using(WaitCursor wc = new WaitCursor())
	{
		WorkItem wi = workItem.WorkItems.AddNew(
		typeof(ControlledWorkItem<NoteController>));
		wi.Run();
}
}
|
|
The command creates a new WorkItemobject with the controller set to the NoteControllerclass (see below). The following command is used when the Deletemenu option is selected on a note in the claims screen:
|
Copy Code
|
|
|---|---|
[CommandHandler("DeleteNote")]
public void OnDeleteNote(object sender, EventArgs e)
{
	using(WaitCursor wc = new WaitCursor())
	{
		string noteID = workItem.RootWorkItem.Items.Get(
		"CurrentClaimItemID").ToString();
		NoteHandler noteHandler =
		workItem.Services.Get<NoteHandler>();
		noteHandler.Delete(noteID);
}
}
|
|
The selected note's identity (CurrentClaimItemID) is retrieved and used to delete the note from the database.
The code for the complete NoteHandlerclass (service) looks like this:
|
Copy Code
|
|
|---|---|
private Database database;
public NoteHandler([ServiceDependency] Database database)
{
this.database = database;
}
public DataSet GetList(string claimID)
{
	return database.ExecuteDataSet(
	"SELECT NoteID, Name FROM Note WHERE ClaimID='" + claimID +
"'");
}
public void Delete(string noteID)
{
	database.ExecuteNonQuery(
	"DELETE Note WHERE NoteID='" + noteID + "'");
}
public DataSet GetForID(string noteID)
{
	return database.ExecuteDataSet(
	"SELECT * FROM Note WHERE NoteID='" + noteID + "'", "Note");
}
public DataSet GetEmpty()
{
	return database.ExecuteDataSet(
	"SELECT * FROM Note WHERE NOT 0=0", "Note");
}
public void Save(DataSet dataSetToSave)
{
	database.UpdateDataSet(dataSetToSave, "Note");
}
|
|
Using dependency injection, the centrally defined Databaseservice is retrieved and saved. This handler can handle most standard database operations (queries, updates, and so on). The Deletemethod is included to show an alternative to using DataSets. The same functionality could be achieved by a call to the GetForIDmethod followed by a delete of the row in the DataSetobject, and a final call to the Savemethod.
The purpose of the NoteControllerclass is to load the note form (as shown in Figure 25), and this is done with the following code:
|
Copy Code
|
|
|---|---|
noteDetailForm = WorkItem.Items.AddNew<NoteDetailForm>( "NoteDetailForm"); shell.DialogWorkspace.SmartPartClosing += new EventHandler<WorkspaceCancelEventArgs>(Workspace_SmartPartClosing); shell.DialogWorkspace.Show(noteDetailForm, new WindowSmartPartInfo(ControlBoxOptions.OkButton, false)); |
|
An instance of the NoteDetailFormclass is added to the WorkItem, and after an event is set up to capture when the form is closed, the form is added as a SmartPartand shown to the user. The Workspace_SmartPartClosingevent is implemented as follows:
|
Copy Code
|
|
|---|---|
if(e.SmartPart == noteDetailForm)
{
	this.WorkItem.Terminate();
}
|
|
The features of the CAB can easily cover several articles, but hopefully you have seen enough to be able to dig deeper yourself. Before we leave the CAB, let's have a look at an issue that is important to many mobile developers: form caching.
Most developers are faced with the tradeoff between performance and memory, and on a mobile device, this tradeoff is critical as both processor speed and memory is much more limited than on a normal desktop or laptop computer. Added to that is the fact that mobile users demand more responsive applications. Therefore, the navigation of the application needs to be highly optimized, and a common approach is to cache the forms in memory. Doing this using the CAB is not obvious, as the concept of modularity and extensibility does not match the concept of keeping things in memory that are not used. The approach selected in this article's sample is aligned with the use of WorkItems, but each form is loaded in the root WorkItemand stored there until the application ends (or programmatically removed). This means that other resources such as data handlers also need to be loaded into the root WorkItemto be accessible to the forms. However, some of these other items are unloaded from memory when the various WorkItemsare terminated. This way, only the necessary resources (such as the forms) are stored throughout the lifetime of the application. The difference this means to the responsiveness of the user interface is significant.
Going back to the code in the NoteControllerclass, the loading of the notes form using forms caching is implemented like this:
|
Copy Code
|
|
|---|---|
smartPartClosingEvent = new
EventHandler<WorkspaceCancelEventArgs>(
  Workspace_SmartPartClosing);
if(!shell.RootWorkItem.Items.Contains("NoteDetailForm"))
{
	noteDetailForm =
shell.RootWorkItem.Items.AddNew<NoteDetailForm>(
	"NoteDetailForm");
	shell.DialogWorkspace.SmartPartClosing +=
smartPartClosingEvent;
	shell.DialogWorkspace.Show(noteDetailForm, new
	WindowSmartPartInfo(ControlBoxOptions.OkButton, false));
}
else
{
	noteDetailForm =
shell.RootWorkItem.Items.Get<NoteDetailForm>(
	"NoteDetailForm");
	shell.DialogWorkspace.SmartPartClosing +=
smartPartClosingEvent;
	shell.DialogWorkspace.Activate(noteDetailForm);
	noteDetailForm.LoadComponent();
}
mainForm.SetTitle(false);
|
|
If the root WorkItemdoes not include an instance of the NotesDetailFormclass, it is created and shown just like before. If it already exists, it is activated and the LoadComponentmethod is called to restore the form to its original state. Note the last line of code that calls the main form to clear its title ( Textproperty). The reason for that is to prevent more than one instance of the application to appear in the "Running Programs" list of the device (accessed on the Start menu by clicking Settings, pointing to System, pointing to Memory, and then clicking Running Programs). The Workspace_SmartPartClosingevent now looks like this:
|
Copy Code
|
|
|---|---|
if(e.SmartPart == noteDetailForm)
{
	mainForm.SetTitle(true);
	shell.DialogWorkspace.SmartPartClosing -=
smartPartClosingEvent;
	shell.DialogWorkspace.Hide(noteDetailForm);
	e.Cancel = true;
	this.WorkItem.Terminate();
}
|
|
The main form title is restored, the event handler is removed, the form is hidden, and the closing of the form is prevented by setting Cancelproperty of the event arguments before the WorkItemis terminated.
Orientation Aware Control Application Block
When designing forms that support screen rotation, this application block can be of great help. The important thing is to set the modifier of the controls that should be available to the form to public, and in the form you can use the following declarations.
|
Copy Code
|
|
|---|---|
private Label claimNameLabel
{
	get { return this.noteDetailControl.ClaimNameLabel; }
}
private TextBox nameTextBox
{
	get { return this.noteDetailControl.NameTextBox; }
}
private TextBox noteTextBox
{
	get { return this.noteDetailControl.NoteTextBox; }
}
|
|
These example lines of code come from the notes form discussed earlier, and show how private properties are created that correspond to the controls in the orientation-aware control noteDetailControl. This way, you can use the names of the controls just as if they were added to the form itself, and thereby you are minimizing the dependency on the orientation-aware control. A rule of thumb is therefore also not to put any code in the orientation-aware control class.
Also, any other initialization of controls (such as connecting event handlers) need to be set up manually (normally at the end of the constructor) with code like the following:
|
Copy Code
|
|
|---|---|
nameTextBox.GotFocus += new EventHandler(textBox_GotFocus); nameTextBox.LostFocus += new EventHandler(textBox_LostFocus); nameTextBox.ContextMenu = editMenu; |
|
Note that the two event handlers are used to show and hide the Soft Input Panel (SIP) or soft keyboard of the device, and the context menu is used to implement the standard edit menu functionality when doing a tap-and-hold in the TextBoxcontrol.
Configuration Application Block
This application block offers the most important functionality for reading configuration file information as there is no support for the "System.Configuration" namespace within the .NET Compact Framework. The application block is therefore used by several of the other application blocks when they need to read information in the application’s configuration file.
Connection Monitor Application Block
The most important use of the connection monitor block is to keep track of the current connection state of the device. There can be several connections live at a given time, and the application block enumerates and consolidates information to be easily accessible by the application developer as well as other application blocks.
An example of how to use the application block is taken from the login form, as shown in the following example:
|
Copy Code
|
|
|---|---|
if(connectionMonitor.IsConnected)
{
	// Code that require a connection
}
|
|
Here the application block is used to check whether there is any connection available. Events can also be set up that will be fired when the connection state changes. The Disconnected Service Agent Application Block (see below) makes more advanced use of this application block.
Password Authentication Application Block
When the application starts, the services handling the password authentication are loaded as follows:
|
Copy Code
|
|
|---|---|
RootWorkItem.Services.AddNew<AuthenticationService, IAuthenticationService>(); RootWorkItem.Services.AddNew<PasswordAuthenticationService>(); |
|
The first service is important, as the CAB will look in the root WorkItemfor a service of the type IAuthenticationService. If present, it will call the Authenticatemethod on that instance, and in the sample application, this method is implemented like this:
|
Copy Code
|
|
|---|---|
LoginForm loginForm = rootWorkItem.Items.AddNew<LoginForm>();
loginForm.ShowDialog();
´
PasswordIdentity identity =
  rootWorkItem.Items.Get<PasswordIdentity>("Identity");
if(identity == null)
   throw new QuitApplicationException();
|
|
First, the login screen is shown, and when it is closed (by the user, after entering login information) the root WorkItemis checked for a PasswordIdentityitem (Identity). If it does not exist, the application is ended using a custom exception.
The PasswordAuthenticationServiceclass is implemented with the following code (with the empty constructor excluded):
|
Copy Code
|
|
|---|---|
private AuthenticationToken token;
internal void SetTokenData(string tokenData)
{
	token = new AuthenticationToken(tokenData);
}

public PasswordIdentity CheckCredentials(
  string userName, string password)
{
	using(RsaAesCryptographyProvider cryptoProvider =
	new RsaAesCryptographyProvider("Claims2Go"))
	{
		return token.Authenticate(userName, password,
cryptoProvider);
}
}
|
|
This class simply holds a private instance of type AuthenticationToken(defined by this application block), and implements the SetTokenmethod to set the token and another method, CheckCredentials, to authenticate a user name and password against that token.
With that in place, the following code is executed when the Loginoption is selected in the login form:
|
Copy Code
|
|
|---|---|
if(connectionMonitor.IsConnected)
{
	// Check using Web Service URL
	if(checkConnectionHelper.CheckHttp(common.WebServiceUrl))
	{
		// If new password, save new hash
		PasswordIdentity passwordIdentity =
		new PasswordIdentity(common.UserName, common.Password,
			new RsaAesCryptographyProvider("Claims2Go"));
		AuthenticationToken token =
		new AuthenticationToken(passwordIdentity);
		string hash = token.TokenData;
		if(hash != common.PasswordHash)
		{
			common.PasswordHash = hash;
			common.Save();
	}
}
	else
		throw new Exception();
}
else
{
	// Check if we have hash
	if(common.PasswordHash.Length < 1)
	{
		// Show error message that you need to be connected
		// first time you login (as hash need to be generated).
		return;
}
}
passwordAuthenticationService.SetTokenData(common.PasswordHash);
PasswordIdentity identity =
  passwordAuthenticationService.CheckCredentials(
	 common.UserName, common.Password);
if(identity != null && identity.IsAuthenticated)
	rootWorkItem.Items.Add(identity, "Identity");
else
	throw new Exception();
|
|
If the device is connected, the user provided user name and password is used to make a short connection attempt to the XML Web service. If successful, a password hash is generated and if it is different from the one stored locally on the device, the password has been changed on the server and therefore the locally stored hash is updated in the registry. If the device is not connected and there is not a password hash available, an error message is shown (see the preceding code comments).
Finally, the credential is checked using an instance of the PasswordAuthenticationServiceclass, and if successful, that instance is added to the root WorkItem.
This way, the user can be authenticated whether connected or not, provided that at least one successful login on the server has taken place.
Data Access Application Block
This is the only application block that has been updated in this article's sample code. The reason is that all the functionality related to DataSetswas excluded when the application block was ported from the desktop version. The updated application block now includes most of the functionality available in the desktop version to manipulate DataSetsincluding the LoadDataSet, ExecuteDataSet, and UpdateDataSetmethods, and their respective overloads. To support their functionality, the factory has also been updated to support the creation of data adapters and command builders.
The core of the all the overloads for the LoadDataSetand ExecuteDataSetmethods is the following implementation of the LoadDataSetmethod.
|
Copy Code
|
|
|---|---|
public virtual void LoadDataSet(DbCommand command,
  DataSet dataSet, string[] tableNames)
{
	DbConnection connection = GetConnection();
	PrepareCommand(command, connection);

	using(DbDataAdapter adapter =
	dbProviderFactory.CreateDataAdapter())
	{
		adapter.SelectCommand = command;

		string systemCreatedTableNameRoot = "Table";
		for(int i = 0; i < tableNames.Length; i++)
		{
			string systemCreatedTableName = (i == 0)
				 ? systemCreatedTableNameRoot
				 : systemCreatedTableNameRoot + i;

			adapter.TableMappings.Add(
			systemCreatedTableName, tableNames[i]);
	}
		adapter.Fill(dataSet);
}
}
|
|
Parameter validation has been removed for clarity, and except for the table mappings, the implementation is almost trivial.
A real time-saver that significantly simplifies the code is the use of the command builder in the UpdateDataSet.
|
Copy Code
|
|
|---|---|
public int UpdateDataSet(DataSet dataSet, string tableName,
  string fields)
{
	int rows = 0;
	DbConnection connection = GetConnection();
	using(DbDataAdapter adapter =
	dbProviderFactory.CreateDataAdapter())
	{
		DbCommand selectCommand =
dbProviderFactory.CreateCommand();
		selectCommand.CommandText =
		"SELECT " + fields + " FROM " + tableName;
		PrepareCommand(selectCommand, connection);
		adapter.SelectCommand = selectCommand;
		DbCommandBuilder commandBuilder =
		dbProviderFactory.CreateCommandBuilder();
		commandBuilder.DataAdapter = adapter;
		adapter.InsertCommand = commandBuilder.GetInsertCommand();
		adapter.UpdateCommand = commandBuilder.GetUpdateCommand();
		adapter.DeleteCommand = commandBuilder.GetDeleteCommand();
		rows = adapter.Update(dataSet.Tables[tableName]);
}
	dataSet.AcceptChanges();
	return rows;
}
|
|
Again, with the parameter validation removed, this is classic data access code. Many things can be said about the performance when using DataSets, but as always there is a tradeoff between performance and the time (and cost) it takes to write and maintain that code. There are definitely situations when other approaches need to be used, but explore them when needed and consider the tradeoff.
The following code shows how the database service is created and added to the root WorkItem.
|
Copy Code
|
|
|---|---|
string filename = Path.Combine(DirectoryUtils.BaseDirectory,
  "Claims.sdf");
string connectionString = String.Format(
  "Data Source=\"{0}\";Password={1}", filename,
  "pe4eGaWR46a4e+UPR-c??&wa!uFu#asw");
Database dbService = new SqlDatabase(connectionString);
WorkItem.Services.Add<Database>(dbService);
return dbService;
|
|
Note that it is a recommendation to use a password to encrypt the local database.
Disconnected Service Agent Application Block
As many of the other services, the disconnected service agent in the sample application is loaded into the root WorkItemwhen the application starts. The service agent is used to queue requests to the server, and the application block will then take care of dispatching the messages when there is a live connection available. The implementation of the service agent begins with the following code in the constructor.
|
Copy Code
|
|
|---|---|
IConnectionMonitor connections = new ConnectionMonitorAdapter(connectionMonitor); requestManager = RequestManager.Instance; requestManager.Initialize(endpointCatalog, connections, database); requestManager.StartAutomaticDispatch(); requestQueue = requestManager.RequestQueue; |
|
The RequestManagersingleton instance is created and initialized using the catalog of endpoints (for more information, see the next section), a connection adapter, and the database service. The endpoint catalog is used to look up addresses and credential information, the connection adapter is used to check the connection status, and the database service is used for storing the queued requests and any unsuccessful calls. Then the automatic dispatch of requests is started and the request queue instance is saved in a private variable used at the end of the following method.
|
Copy Code
|
|
|---|---|
public void SetClaimStatus(string claimID, int status, int claimNo,
string insured)
{
	OfflineBehavior behavior = new OfflineBehavior();
	behavior.MaxRetries = 0;
	behavior.Stamps = 5;
	behavior.Tag = "SetClaimStatus";
	behavior.Expiration = DateTime.Now + new TimeSpan(2, 0, 0, 0);
	behavior.ReturnCallback =
	new CommandCallback(typeof(ServiceAgentCallback),
	"OnSetClaimStatusReturn");
	behavior.ExceptionCallback =
	new CommandCallback(typeof(ServiceAgentCallback),
	"OnSetClaimStatusException");

	Request request = new Request();
	request.MethodName = "SetClaimStatus";
	request.Behavior = behavior;
	request.CallParameters =
	new object[] { claimID, status, claimNo, insured };
	request.OnlineProxyType =

typeof(Microsoft.Samples.Claims2Go.WebServices.ClaimsWebService);
	request.Endpoint = "ClaimsWebService";

	requestQueue.Enqueue(request);
}
|
|
When creating a disconnected request, you need to start with something called an offline behavior. The behaviorobject defines how the request will behave with regard to expiration, maximum number of retries, the number of "stamps" (the relative importance of the request), and the Tagvalue (a string property that allows you to categorize or otherwise identify requests). The OfflineBehaviorclass also exposes properties that provide information about the request, such as the date and time it was queued. This request will not be resent (no retries), it will expire in two days, and when the request is dispatched, the ServiceAgentCallbackclass will be called. A successful call will be to the OnSetClaimStatusReturnmethod, and if any exceptions occur, the OnSetClaimStatusExceptionmethod will be called.
The request will use any connection with a "price" less than 5. In the sample application, the connections in the configuration file are defined as follows:
|
Copy Code
|
|
|---|---|
<Connections> <ConnectionItems> <add Type="CellConnection" Price="8"/> <add Type="NicConnection" Price="2"/> <add Type="DesktopConnection" Price="1"/> </ConnectionItems> </Connections> |
|
This means that this request will only use a network card or a desktop connection. In a real-world application, the status changes are both small and probably mission-critical, and should be sent on whatever available connection, that is, a very high "stamp" value should be assigned to the request.
Next, the requestobject is created with the behavior attached and specifying the ClaimWebService(proxy) class, the method to call, the parameters, and the endpoint to use for addressing and credentials (for more information, see the next section). Finally, the request is queued using the request queue.
Note that the application block uses the database service to store the requests in a table named Requests, and any requests that are not successfully dispatched are stored in a "dead letter queue" in a table named Dlq.
The method on the server side is implemented like this:
|
Copy Code
|
|
|---|---|
[WebMethod]
public string SetClaimStatus(string claimID, int status, int
claimNo, string insured)
{
	using(SqlConnection cn = new SqlConnection(connectionString))
	{
		cn.Open();
		SqlHelper.ExecuteNonQuery(cn, CommandType.Text,
		"UPDATE Claim SET Status=" + status.ToString() +
		" WHERE ClaimID='" + claimID + "'");
		return SqlHelper.ExecuteScalar(cn, CommandType.Text,
		"SELECT Name FROM Status" +
		" WHERE Status=(SELECT Status FROM Claim" +
		" WHERE ClaimID='" + claimID +"')").ToString();
}
}
|
|
It simply set the status of the claim, and returns the name of the new status.
The following code is for the callback methods.
|
Copy Code
|
|
|---|---|
public void OnSetClaimStatusReturn(Request request, object[]
parameters, string returnValue)
{
	string s = string.Format(
	Properties.Resources.MsgSetClaimStatusReturn,
	request.CallParameters[2].ToString(),
	request.CallParameters[3].ToString(), returnValue);
	MessageBox.Show(s, Properties.Resources.DefaultTitle);
}

public OnExceptionAction OnSetClaimStatusException(Request request,
Exception ex)
{
	string s = string.Format(
	Properties.Resources.MsgSetClaimStatusException,
	request.CallParameters[2].ToString(),
	request.CallParameters[3].ToString(), ex.Message);
	MessageBox.Show(s, Properties.Resources.ExceptionTitle);

	return OnExceptionAction.Dismiss;
}
|
|
A successful return will show a confirmation message box (Figure 17) and, if any exception occurred, another message box will tell the user that the status was not updated and the message box will also include the error message. Note that the requestobject is available to both methods.
Endpoint Catalog Application Block
The main purpose of this application block is to manage a catalog of endpoints. An endpoint is one or more addresses (usually URLs) with optional credentials attached. The catalog can be loaded from the application configuration file or set up manually. If you want to load the catalog from the configuration file, you can use the following code:
|
Copy Code
|
|
|---|---|
IEndpointCatalogFactory factory =
	new EndpointCatalogFactory("Endpoints");
IEndpointCatalog catalog = factory.CreateCatalog();
|
|
As the sample is designed to capture the user credentials used for all remote calls in the Loginscreen (Figures 12 and 13) and the remote Web service address is entered in the Optionsscreen (Figure 37), a custom catalog is be created. A catalog entry is needed for the Disconnected Service Agent Application Block (see the preceding section), and it looks like the following:
|
Copy Code
|
|
|---|---|
IEndpointCatalogFactory factory =
  new EndpointCatalogFactory("Endpoints");
EndpointCatalog catalog = new EndpointCatalog();
Endpoint endpoint = new Endpoint("ClaimsWebService");
catalog.SetEndpoint(endpoint);
endpoint.Default = new EndpointConfig(common.WebServiceUrl,
  new NetworkCredential(common.UserName, common.Password));
WorkItem.Services.Add<IEndpointCatalog>(catalog);
return catalog;
|
|
The catalog is created, and an endpoint is added with the same name at the Web service. Finally, the catalog is added to the root WorkItemobject.
Notifications
To test the assignment notification functionality, an extra menu
option (
Send SMS) has been included in the sample application (as
shown in Figure 15) that sends a fake SMS message to the device
emulator (using a magic phone number). If you are using the
|
Copy Code
|
|
|---|---|
<?xml version="1.0"?> <root> <Claim> <ClaimID>16C39DDE-78FF-4073-99C8-189B71412F3D</ClaimID> <ClaimNo>5635</ClaimNo> <Insured>Fabrikam, Inc.</Insured> </Claim> </root>"; |
|
A message interception is set up on application start to look for SMS messages in XML format.
|
Copy Code
|
|
|---|---|
MessageCondition mc = new MessageCondition(); mc.Property = MessageProperty.Body; mc.ComparisonType = MessagePropertyComparisonType.StartsWith; mc.ComparisonValue = "<?xml"; messageInterceptor = new MessageInterceptor(InterceptionAction.NotifyAndDelete, true); messageInterceptor.MessageCondition = mc; messageInterceptor.MessageReceived += new MessageInterceptorEventHandler(messageInterceptor_MessageReceived); |
|
When a message that meets the message conditions arrive, the event handler messageInterceptor_MessageReceivedwill be called, and the message will be deleted from the device. The event is implemented with this code:
|
Copy Code
|
|
|---|---|
XmlDocument xml = new XmlDocument();
xml.LoadXml(((SmsMessage)e.Message).Body);
claimID = xml.SelectSingleNode("//Claim/ClaimID").InnerText;
claimNo = Convert.ToInt32(
  xml.SelectSingleNode("//Claim/ClaimNo").InnerText);
insured = xml.SelectSingleNode("//Claim/Insured").InnerText;

string s = string.Format(Properties.Resources.MsgNewClaimAssigned,
  claimNo, insured);
s = "<html><body>" + s + "<form method='GET'
action=assign>" +
	"<input type=checkbox name=chkbx checked>Accept<p
align=right>" +
	"<input type=submit value='" +
Properties.Resources.CloseButton +
	"'>" + "</p></form></body></html>";

Notification notification = new Notification();
notification.Caption = Properties.Resources.ClaimAssignment;
notification.Critical = false;
notification.Text = s;
notification.InitialDuration = 20;
notification.Visible = true;
notification.ResponseSubmitted +=
  new
ResponseSubmittedEventHandler(notification_ResponseSubmitted);
|
|
First, the data is retrieved from the XML message and used to create a notification message. That message is then used to create a notification that will be shown for 20 seconds. When the notification button ( Close) is tapped, the notification_ResponseSubmittedevent is raised and the following code is run:
|
Copy Code
|
|
|---|---|
void notification_ResponseSubmitted(object sender,
ResponseSubmittedEventArgs e)
	Notification notification = ((Notification)sender);
	notification.Visible = false;

	if(e.Response.Substring(0, 6) == "assign")
		if(e.Response.EndsWith("on"))
		{
			ServiceAgent serviceAgent =
			workItem.Services.Get<ServiceAgent>();
			serviceAgent.SetClaimStatus(claimID, 2, claimNo,
insured);
	}
}
|
|
The notification is hidden and if the Acceptcheck box of the notification was selected, a call is made to the disconnected service agent (see the preceding Disconnected Service Agent Application Block section) to set the status to "Claim Assigned," which corresponds to the value 2.
Data Synchronization
The functionality for data synchronization can be found in the easily reusable SyncHandlerclass in the SyncModule. It uses dependency injection to get the instance of the ClaimsWebService(Web reference or proxy) class stored in the root WorkItemobject and store it in a private variable, webService.
When tapping the Check Out option button on the synchronization screen (shown in Figure 18), the available claims are retrieved from the server with the following call:
|
Copy Code
|
|
|---|---|
public DataSet GetClaimsToCheckOut()
{
	return webService.GetClaimsToCheckOut();
}
|
|
On the server side, this method is implemented like this:
|
Copy Code
|
|
|---|---|
public DataSet GetClaimsToCheckOut()
{
	return SqlHelper.ExecuteDataset(this.connectionString,
	CommandType.Text,
	"SELECT * FROM Claim WHERE CheckedOutBy IS NULL");
}
|
|
When the user selects which claims to check out and start the synchronization, the first thing that happens is the retrieval of reference data from the server with the following call.
|
Copy Code
|
|
|---|---|
public void GetReferenceData()
{
	DataSet referenceDataSet = webService.GetReference();
	foreach(DataTable dt in referenceDataSet.Tables)
	{
		string table = dt.TableName;
		database.ExecuteNonQuery("DELETE " + table);
		DataSet ds = database.ExecuteDataSet(
		"SELECT * FROM " + table + " WHERE NOT 0=0", table);
		foreach(DataRow dr in dt.Rows)
			ds.Tables[0].Rows.Add(dr.ItemArray);
		database.UpdateDataSet(ds, table);
}
}
|
|
The SQL SELECT statement used in the preceding code creates a DataTableobject within the DataSetobject that has the correct schema, but does not contain any rows.
Here is the corresponding implementation on the server side:
|
Copy Code
|
|
|---|---|
[WebMethod]
[CompressionSoapExtension]
public DataSet GetReference()
{
	string sql;
	DataSet ds = new DataSet();
	using(SqlConnection cn = new SqlConnection(connectionString))
	{
		cn.Open();
		SqlHelper.FillDataset(cn, CommandType.Text,
		"SELECT * FROM Status", ds, "Status");
		SqlHelper.FillDataset(cn, CommandType.Text,
		"SELECT * FROM Form", ds, "Form");
		SqlHelper.FillDataset(cn, CommandType.Text,
		"SELECT * FROM FormRow", ds, "FormRow");
}
	return ds;
}
|
|
A DataSetobject is filled with the tables holding the reference data on the server side, and is then returned to the device. On the device, each of the tables first has all rows removed and then each of the rows transferred from the server is inserted.
You can see, the Data Access Application Block is at work both
on the device and on the server (although on the server an older
version is used). The server implementation is included in the
sample code merely for supporting the device application, and
therefore has a very primitive implementation. In a real-world
solution, the server side would probably connect to a business
system rather than just updating a database. Refer to the
As the method is marked with the
CompressionSoapExtensionmethod attribute, the data
transferred between the server and the client is compressed. For
some statistics on the compression rate and also impact on
performance for small and large payloads, please see the
When the reference data is transferred, it is time to check out the selected claims. This is done with the following code on the device:
|
Copy Code
|
|
|---|---|
public void CheckOutClaim(string claimID, bool media)
{
	// Check out claims
	DataSet ClaimDataSet = webService.CheckOutClaim(claimID);
	foreach(DataTable dt in ClaimDataSet.Tables)
	{
		string table = dt.TableName;
		DataSet ds = database.ExecuteDataSet(
		"SELECT * FROM " + table + " WHERE NOT 0=0", table);
		foreach(DataRow dr in dt.Rows)
		ds.Tables[0].Rows.Add(dr.ItemArray);
		database.UpdateDataSet(ds, table);
}
	if(media)
		checkOutMedia(claimID);
}
|
|
The code on the server looks like this:
|
Copy Code
|
|
|---|---|
[WebMethod]
[CompressionSoapExtension]
public DataSet CheckOutClaim(string claimID)
{
	DataSet ds = new DataSet();
	using(SqlConnection cn = new SqlConnection(connectionString))
	{
		cn.Open();

		// Mark claim as checked out
		SqlHelper.ExecuteNonQuery(cn, CommandType.Text,
		"UPDATE Claim SET CheckedOutBy = '" +
		HttpContext.Current.User.Identity.Name +
		"' WHERE ClaimID='" + claimID + "'");

		// Get claim data
		SqlHelper.FillDataset(cn, CommandType.Text,
		"SELECT * FROM Claim WHERE ClaimID='" + claimID + "'",
		ds, "Claim");
		SqlHelper.FillDataset(cn, CommandType.Text,
		"SELECT * FROM Journal WHERE ClaimID='" + claimID + "'",
		ds, "Journal");

		// ...and so on for the other tables
}
	return ds;
}
|
|
Again, the server method fills a DataSetobject with the data, and returns it compressed to the device. On the device, the local database is updated as with the reference data (however, table rows are not removed before the inserts as the checked out claims does not exist in the local database). Note also how the claim row on the server is marked with the current user name as the check out is done. The private checkOutMediamethod handles the media check out. For more details, see the Media Synchronization section that follows.
When selecting the Check Inoption on the synchronization screen (as shown in Figure 34), available claims are retrieved from the local database with the following call:
|
Copy Code
|
|
|---|---|
public DataSet GetClaimsToCheckIn()
{
	return database.ExecuteDataSet("SELECT * FROM Claim");
}
|
|
When the user selects which claims to check in and start the synchronization, the following code is called on the device:
|
Copy Code
|
|
|---|---|
public void CheckInClaim(string claimID, bool media)
{
	// Get claim data
	DataSet ds = new DataSet();
	string sql = "SELECT * FROM Claim WHERE ClaimID='" + claimID +
"'";
	database.LoadDataSet(sql, ds, "Claim");
	sql = "SELECT * FROM Journal WHERE ClaimID='" + claimID + "'";
	database.LoadDataSet(sql, ds, "Journal");
	// ...and so on for the other tables

	webService.CheckInClaim(ds);

	if(media)
		checkInMedia(claimID);

	// Remove local claim data
	database.ExecuteNonQuery("DELETE Material WHERE" +
	" EstimateID IN (SELECT EstimateID FROM Estimate" +
	" WHERE ClaimID='" + claimID + "')");
	// ...and so on for the other tables
}
|
|
Now the claim data from the database on the device is filled in a DataSetobject and sent to the server. When the server call returns successfully, the claims data is removed from the device database. Note that the removal needs to be done in reverse order so as not to violate the referential integrity of the database. The private checkInMediamethod handles the media check in. For more details, see the Media Synchronization section that follows.
The code on the server looks like the following:
|
Copy Code
|
|
|---|---|
[WebMethod]
[CompressionSoapExtension]
public void CheckInClaim(DataSet claimDataSet)
{
	// Get claim ID to check in
	string claimID =
	claimDataSet.Tables["Claim"].Rows[0]["ClaimID"].ToString();

	using(SqlConnection cn = new SqlConnection(connectionString))
	{
		cn.Open();

		DataSet ds;
		foreach(DataTable dt in claimDataSet.Tables)
		{
			string table = dt.TableName;
			string sql = string.Empty;
			switch(table)
			{
				case "ClaimFormRow": sql =
				"SELECT * FROM ClaimFormRow WHERE ClaimFormID" +
				" IN (SELECT ClaimFormID FROM ClaimForm WHERE" +
				" ClaimID='" + claimID + "')"; break;
				// ...and so on for some sub-tables
				default: sql = "SELECT * FROM " + table +
					" WHERE ClaimID='" + claimID + "'"; break;
		}
			ds = SqlHelper.ExecuteDataset(cn, CommandType.Text,
			sql, table);
			update(table, ds, claimDataSet);
			SqlHelper.ExecuteNonQuery(cn, CommandType.Text,
			"ALTER TABLE " + table + " NOCHECK CONSTRAINT ALL");
			SqlHelper.UpdateDataset(cn, ds, table);
			SqlHelper.ExecuteNonQuery(cn, CommandType.Text,
			"ALTER TABLE " + table + " CHECK CONSTRAINT ALL");
	}
		// Remove check-out indication
		SqlHelper.ExecuteNonQuery(cn, CommandType.Text,
		"UPDATE Claim SET CheckedOutBy = NULL WHERE ClaimID='" +
		claimID + "'");
}
}
|
|
The server database is updated with the data from the device, and note that referential integrity is turned off to allow the application to update the tables in the order that the DataSet stores them without needing to be concerned with temporary violations of referential integrity during the update process. When the update is complete, the check out indication is removed from the claim row. Most of the update logic is found in the private updatemethod shown here:
|
Copy Code
|
|
|---|---|
private void update(string table, DataSet serverDataSet, DataSet
clientDataSet)
{
	DataRow[] drs;
	foreach(DataRow dr in clientDataSet.Tables[table].Rows)
	{
		drs = serverDataSet.Tables[table].Select(
		table + "ID='" + dr[table + "ID"].ToString() + "'");
		if(drs.Length > 0) // Update
			for(int i = 0; i < dr.ItemArray.Length; i++)
				drs[0][i] = dr[i];
		else // Insert
		{
			DataRow row = serverDataSet.Tables[table].NewRow();
			for(int i = 0; i < dr.ItemArray.Length; i++)
				row[i] = dr[i];
			serverDataSet.Tables[table].Rows.Add(row);
	}
}
	// Delete
	foreach(DataRow dr in serverDataSet.Tables[table].Rows)
		if(clientDataSet.Tables[table].Select(table + "ID='" +
		dr[table + "ID"].ToString() + "'").Length < 1)
			dr.Delete();
}
|
|
All the rows from the table in the client DataSetobject, clientDataSet, are used to insert, update, or delete rows in the corresponding table in the server DataSetobject, serverDataSet.
Media Synchronization
As shown in the earlier application walkthrough, during a check out or a check in of a claim the user can select to also check out and check in media associated with the claim. The reason for this is that sometimes the required bandwidth is not available (or too expensive) to send large media files. When the media check box is selected during claim check out (as shown in Figure 18), the private checkOutMediamethod in the SyncHandlerclass starts by calling the following code on the server.
|
Copy Code
|
|
|---|---|
[WebMethod]
[CompressionSoapExtension]
public DataSet CheckOutMedia(string claimID)
{
	// Get files for claim
	DataSet ds = null;
	using(SqlConnection cn = new SqlConnection(connectionString))
	{
		cn.Open();
		ds = SqlHelper.ExecuteDataset(cn, CommandType.Text,
			"SELECT * FROM Media WHERE ClaimID='" + claimID + "'");
}
	if(ds.Tables[0].Rows.Count < 1)
		return ds;

	string[] files = new string[ds.Tables[0].Rows.Count];
	int i = 0;
	foreach(DataRow dr in ds.Tables[0].Rows)
		files[i++] = HttpContext.Current.Server.MapPath("media/" +
		dr["MediaID"].ToString() + "." +
		dr["FileExtension"].ToString());

	// Zip files
	string zipFileName = HttpContext.Current.Server.MapPath(
	"download/download.zip");
	if(File.Exists(zipFileName))
		File.Delete(zipFileName);
	ZipOutputStream s = new
ZipOutputStream(File.Create(zipFileName));
	// Set compression level (0=store only to 9=best compression)
	//s.SetLevel(6);
	ZipEntry entry;
	Crc32 crc = new Crc32();
	foreach(string file in files)
	{
		FileStream fs = File.OpenRead(file);
		byte[] buffer = new byte[fs.Length];
		fs.Read(buffer, 0, buffer.Length);
		entry = new ZipEntry(Path.GetFileName(file));
		entry.DateTime = DateTime.Now;
		entry.Size = fs.Length;
		fs.Close();
		crc.Reset();
		crc.Update(buffer);
		entry.Crc = crc.Value;
		s.PutNextEntry(entry);
		s.Write(buffer, 0, buffer.Length);
}
	s.Finish();
	s.Close();

	return ds;
}
|
|
First the data about the media is retrieved in a
DataSetobject from the database similar to what was done
with the other claims data (see the preceding Data Synchronization
section). Then a file array is created for the media files
associated with the claim, and that array is used to compress the
files into a zip archive file in a download folder using the
Please note that you can set the level of compression used (as indicated by the commented line of code), with zero indicating no compression and nine indicating maximum compression. The default compression level is six.
 Note: Note: |
|---|
| In a real-world scenario the temporary file created (download.zip) should have a name that makes it unique to a specific user to avoid conflicts if more than one user is downloading media at the same time. In the current implementation a second user requesting media may overwrite the download.zip file before the first user has finished downloading the file. |
The private method on the device looks like this:
|
Copy Code
|
|
|---|---|
private void checkOutMedia(string claimID)
{
	DataSet ClaimDataSet = webService.CheckOutMedia(claimID);
	if(ClaimDataSet.Tables[0].Rows.Count < 1)
		return;

	// Download and unzip
	string zipFileName = Path.Combine(Path.Combine(
	DirectoryUtils.BaseDirectory, "media"), "download.zip");
	downloadFile(zipFileName);
	unzipFiles(zipFileName);

	// Check out media data
	foreach(DataRow dr in ClaimDataSet.Tables[0].Rows)
		database.ExecuteNonQuery("DELETE Media WHERE MediaID='" +
		dr["MediaID"].ToString() + "'");
	DataSet ds = database.ExecuteDataSet(
	"SELECT * FROM Media WHERE NOT 0=0", "Media");
	foreach(DataRow dr in ClaimDataSet.Tables[0].Rows)
		ds.Tables[0].Rows.Add(dr.ItemArray);
	database.UpdateDataSet(ds, "Media");
}
|
|
As already mentioned, the server is called to get the media data and zip the media files associated with the claim. If there are media to download, the zip files is downloaded and extracted using two separate methods (see the following code example). Then, the database is updated with the media data. Note that because the user can choose not to check in media, and the media on the device may have been added since last check out, the media rows for checked in claims are left in the device database. Therefore, when a claim is checked out, rows may exist in the device database for the downloaded media. When a claim is checked out, any existing rows in the device database are replaced with the rows from the server, with the exception of media rows. Any media rows that only exist on the device (that were added during a previous check out) will remain intact, and will be included the next time media is checked in for that claim.
Here is the code to download the zip file:
|
Copy Code
|
|
|---|---|
private void downloadFile(string filePath)
{
	string serverDir = common.WebServiceUrl.Substring(0,
	common.WebServiceUrl.LastIndexOf('/'));
	Uri uri = new Uri(serverDir + "/download/" +
	Path.GetFileName(filePath));
	HttpWebRequest request =
	(HttpWebRequest)HttpWebRequest.Create(uri);
	request.Credentials = new NetworkCredential(
	common.UserName, common.Password);
	request.PreAuthenticate = true;
	HttpWebResponse response =
(HttpWebResponse)request.GetResponse();
	FileStream fs = File.Create(filePath);
	Stream s = response.GetResponseStream();
	int size = 2048;
	byte[] data = new byte[2048];
	while(true)
	{
		size = s.Read(data, 0, data.Length);
		if(size > 0)
			fs.Write(data, 0, size);
		else
			break;
}
	fs.Close();
}
|
|
The file is downloaded using HttpWebRequestand HttpWebResponseobjects, and is written to a local file using a FileStreamobject and a 2K buffer. The code to unzip the file looks like the following:
|
Copy Code
|
|
|---|---|
private void unzipFiles(string zipFileName)
{
	string mediaDir = Path.GetDirectoryName(zipFileName);
	ZipInputStream s = new
ZipInputStream(File.OpenRead(zipFileName));
	ZipEntry entry;
	while((entry = s.GetNextEntry()) != null)
	{
		string entryFileName = Path.GetFileName(entry.Name);
		if(entryFileName.Length > 0)
		{
			string entryFilePath = Path.Combine(
			mediaDir, entryFileName);
			if(File.Exists(entryFilePath))
				File.Delete(entryFilePath);
			FileStream fs = File.Create(entryFilePath);
			int size = 2048;
			byte[] data = new byte[2048];
			while(true)
			{
				size = s.Read(data, 0, data.Length);
				if(size > 0)
					fs.Write(data, 0, size);
				else
					break;
		}
			fs.Close();
	}
}
	s.Close();
	File.Delete(zipFileName);
}
|
|
Each file in the archive is written to disk using a 2K buffer, and finally the zip file is removed.
Note that when adding files to the zip file as shown above, no buffering was used, and when extracting files from the zip file a 2K buffer is used. In a real-world solution, the buffered approach would probably always be the best to minimize memory consumption. The reason for not buffering when adding files to the zip files was only to simplify the code and increase readability.
When the Mediacheck box is selected during claim check in (as shown in Figure 34), the private checkInMediamethod in the SyncHandlerclass is called.
|
Copy Code
|
|
|---|---|
private void checkInMedia(string claimID)
{
	// Get files for claim
	DataSet ds = database.ExecuteDataSet(
	"SELECT * FROM Media WHERE ClaimID='" + claimID + "'",
"Media");
	if(ds.Tables[0].Rows.Count < 1)
		return;
	string[] files = new string[ds.Tables[0].Rows.Count];
	string s = Path.Combine(DirectoryUtils.BaseDirectory, "media");
	int i = 0;
	foreach(DataRow dr in ds.Tables[0].Rows)
		files[i++] = Path.Combine(s, dr["MediaID"].ToString() +
		"." + dr["FileExtension"].ToString());

	// Zip and upload
	string zipFileName = Path.Combine(s, "upload.zip");
	zipFiles(zipFileName, files);
	uploadFile(zipFileName);

	// Check in media
	webService.CheckInMedia(ds);

	// Remove files and data
	foreach(string file in files)
		File.Delete(file);
	File.Delete(zipFileName);
	database.ExecuteNonQuery(
	"DELETE Media WHERE ClaimID='" + claimID + "'");
}
|
|
The data about the media is retrieved in a DataSetobject from the device database, and then a file array is created for the media files associated with the claim. If there are media to upload, that array is used to compress the files into a zip archive file, and the zip files is compressed and uploaded using two separate methods. Then, the server is called with the media data and when that call returns (successfully) the media data and the media files are deleted.
Following is the code to create the zip file:
|
Copy Code
|
|
|---|---|
private void zipFiles(string zipFileName, string[] files)
{
	if(File.Exists(zipFileName))
		File.Delete(zipFileName);
	FileStream zfs = File.Create(zipFileName);
	ZipOutputStream s = new ZipOutputStream(zfs);
	// Set compression level (0=store only to 9=best compression)
	//s.SetLevel(6);
	ZipEntry entry;
	Crc32 crc = new Crc32();
	foreach(string file in files)
	{
		FileStream fs = File.OpenRead(file);
		byte[] buffer = new byte[fs.Length];
		fs.Read(buffer, 0, buffer.Length);
		entry = new ZipEntry(Path.GetFileName(file));
		entry.DateTime = DateTime.Now;
		entry.Size = fs.Length;
		fs.Close();
		crc.Reset();
		crc.Update(buffer);
		entry.Crc = crc.Value;
		s.PutNextEntry(entry);
		s.Write(buffer, 0, buffer.Length);
}
	s.Finish();
	s.Close();
	zfs.Close();
}
|
|
Each media file is added to the zip file similar to what was done on the server side when checking out the files. Just as using the .NET Framework on the server and .NET Compact Framework on the device allows you to share knowledge between platforms, using the same compression library on both platforms allows for the same sharing of knowledge.
The code to upload the zip file looks like the following:
|
Copy Code
|
|
|---|---|
private void uploadFile(string filePath)
{
	FileStream fs = File.OpenRead(filePath);
	BinaryReader br = new BinaryReader(fs);
	byte[] data = br.ReadBytes((int)br.BaseStream.Length);
	br.Close();
	fs.Close();
	string serverDir = common.WebServiceUrl.Substring(0,
	common.WebServiceUrl.LastIndexOf('/'));
	string fileName = Path.GetFileName(filePath);
	Uri uri = new Uri(serverDir + "/upload/" + fileName);
	HttpWebRequest request =
	(HttpWebRequest)HttpWebRequest.Create(uri);
	request.Method = "PUT";
	request.Credentials = new NetworkCredential(
	common.UserName, common.Password);
	request.PreAuthenticate = true;
	request.AllowWriteStreamBuffering = true;
	// For large files (> 50KB) you may want to uncomment the
next line
	//request.SendChunked = true;
	request.ContentLength = data.Length;
	Stream requestStream = request.GetRequestStream();
	requestStream.Write(data, 0, data.Length);
	requestStream.Close();
	HttpWebResponse response =
(HttpWebResponse)request.GetResponse();
}
|
|
The file is uploaded using
HttpWebRequestand
HttpWebResponseobjects, and is written to the request stream
without a buffer because setting the
AllowWriteStreamBufferingproperty to
truetakes care of the buffering. However, if you are
transferring very large files, this approach can consume a lot of
memory. Also note that this will only work if the Web server
accepts the
PUTmethod, and with Internet Information Services (IIS) this
means that you need to allow WebDAV. For information on how to
enable WebDAV in IIS, see
Windows Authentication
This article's download code sample uses Windows authentication (also known as NTLM authentication) when connecting to the (Web) server. This authentication is natively supported in applications that use the .NET Compact Framework 2.0., and this means that you use the same approach as with other authentications, such as Basic and Digest Authentication with the NetworkCredentialclass in the "System.Net" namespace.
|
Copy Code
|
|
|---|---|
Using System.Net;
...
NetworkCredential credentials;
credentials = new NetworkCredential("username", "password");
|
|
As you can see, the constructor of the NetworkCredentialclass takes two parameters, and the login domain can be added either in the first parameter (in the format "domain\username") or as a third parameter. You should create the credentials by supplying the user name and password in the constructor as shown in the preceding code as this will set the domain to an empty string to allow a login as a local user.
|
Note: |
|---|
| If you start by creating a NetworkCredentialobject with an empty constructor, the user name, password, and domain values will be set to null. Then, if you only set the UserNameand Passwordproperties (leaving the Domainproperty with a value of null), you will not be able to login as a local user, unless you set the Domain property to the correct domain or an empty string. |
Because of the way that Windows authentication works, it can cause some extra network traffic with extra round trips just to negotiate the authentication. However, if you always set the PreAuthenticateproperty of an HttpWebRequestor SoapHttpClientProtocolobject (used by XML Web service proxy objects and the property is actually inherited from the WebClientProtocolclass), an authentication header will be sent with the first round trip to the server. When calling an XML Web service, it looks like the following:
|
Copy Code
|
|
|---|---|
ClaimsWebService webService = new ClaimsWebService();
webService.Credentials = new NetworkCredential("username",
"password");
webService.PreAuthenticate = true;
// Make call
|
|
Of course, if you prefer to update the Web reference (proxy) file generated for the XML Web service, the PreAuthenticateproperty can be set just like the Urlproperty in the constructor.
|
Copy Code
|
|
|---|---|
public ClaimsWebService() {
	this.Url = "http://...";
	this.PreAuthenticate = true;
}
|
|
In the sample application, a compressed zip file is uploaded to the server using an HTTP PUT, and when doing that in combination with Windows authentication, you should set the AllowWriteStreamBufferingproperty to trueas shown in the following code:
|
Copy Code
|
|
|---|---|
HttpWebRequest request =
(HttpWebRequest)HttpWebRequest.Create(uri);
request.Method = "PUT";
request.Credentials = new NetworkCredential("username",
"password");
request.PreAuthenticate = true;
request.AllowWriteStreamBuffering = true;
|
|
As mentioned earlier in this article, the AllowWriteStreamBufferingproperty can be set to true only when the Web server accepts the PUTmethod, and with IIS this means that you need to allow WebDAV. For more details on file uploading, see the preceding Media Synchronization section.
Encryption Using SSL
Because the .NET Compact Framework supports the encryption of
communication with a Web server (for example, XML Web services
calls) by using SSL (Secure Sockets Layer, also known as TLS,
However, when testing a .NET Compact Framework application, it
is a common practice to use test certificates that are created with
tools such as
|
Copy Code
|
|
|---|---|
public class TrustAllCertificatePolicy : ICertificatePolicy
{
	public TrustAllCertificatePolicy() {}

	public bool CheckValidationResult(ServicePoint sp,
		X509Certificate cert, WebRequest req, int problem)
	{
		return true;
}
}
|
|
To use this class, you should run the following code once per application session and before you make any Web requests (preferably when you start the application).
|
Copy Code
|
|
|---|---|
ServicePointManager.CertificatePolicy = new TrustAllCertificatePolicy(); |
|
When the ServicePointManagercalls the interface method ( CheckValidationResult), the method always returns true- thereby allowing any certificate. The fact that the device does not trust the certificate does not affect the encryption of the traffic. As soon as the certificate is accepted, SSL is used for all communications between the client and the server.
|
Note: |
|---|
| As this is an issue during development, this is not something that should be used when your code goes into production. To make sure this code is only used during development, it could be conditioned with a "#ifdef Debug" precompiler directive. |
XML Web Service Compression
You can use SOAP extensions to allow both requests to and
responses from XML Web services to be compressed as they allow the
possibility to intercept the SOAP message at various points of the
serialization process. You can separate the compression or
decompression of the messages from the implementation of the
application logic. For details about how this works, see the
To be able to mark each of the methods in the Web reference, the application creates the CompressionSoapExtensionAttributeclass, which inherits from the SoapExtensionAttributeclass (in the "System.Web.Services.Protocols" namespace). The following code example shows this approach.
|
Copy Code
|
|
|---|---|
[AttributeUsage(AttributeTargets.Method)]
public class CompressionSoapExtensionAttribute :
SoapExtensionAttribute
{
	private int priority;

	public override Type ExtensionType
	{
		get { return typeof(CompressionSoapExtension); }
}

	public override int Priority
	{
		get { return priority; }
		set { priority = value; }
}
}
|
|
The ExtensionTypeproperty returns the type that implements the logic of the extension ( CompressionSoapExtension). For more information, see the following code example. The .NET Compact Framework retrieves this property to find out which type to instantiate. The Priorityproperty indicates the order of processing when several extensions exist simultaneously.
The following code example implements the actual extension logic as a class that inherits from the SoapExtensionclass (in the "System.Web.Services.Protocols" namespace).
|
Copy Code
|
|
|---|---|
public class CompressionSoapExtension : SoapExtension
{
	Stream oldStream;
	Stream newStream;

	public override Stream ChainStream( Stream stream )
	{
		oldStream = stream;
		newStream = new MemoryStream();
		return newStream;
}

	public override object GetInitializer(LogicalMethodInfo
methodInfo,
		SoapExtensionAttribute attribute)
	{
		return attribute;
}

	public override object GetInitializer(Type type)
	{
		return typeof(CompressionSoapExtension);
}

	public override void Initialize(object initializer)
	{
		CompressionSoapExtensionAttribute attribute =
			(CompressionSoapExtensionAttribute)initializer;
}

	public override void ProcessMessage(SoapMessage message)
	{
		Byte[] buffer = new Byte[2048];
		int size;

		switch(message.Stage)
		{
			case SoapMessageStage.AfterSerialize:
				newStream.Seek(0, SeekOrigin.Begin);
				GZipOutputStream zipOutputStream = new
GZipOutputStream(oldStream);
				size = 2048;
				while(true)
				{
					size = newStream.Read(buffer, 0,
buffer.Length);
					if (size > 0)
						zipOutputStream.Write(buffer, 0, size);
					else
						break;
			}
				zipOutputStream.Flush();
				zipOutputStream.Close();
				break;

			case SoapMessageStage.BeforeDeserialize:
				GZipInputStream zipInputStream = new
GZipInputStream(oldStream);
				size = 2048;
				while(true)
				{
					size = zipInputStream.Read(buffer, 0,
buffer.Length);
					if (size > 0)
						newStream.Write(buffer, 0, size);
					else
						break;
			}
				newStream.Flush();
				newStream.Seek(0, SeekOrigin.Begin);
				break;
	}
}
}
|
|
First, the ChainStreammethod is called by the XML Web services infrastructure in the .NET Compact Framework with the stream as a parameter ( stream) that contains the data. This method has the opportunity to return a new stream for the data after the custom processing. The application stores the input stream in memory, and the application returns a new stream that stores the result of the compression and decompression. Then, the XML Web services infrastructure calls the main method, ProcessMessage, at each stage of processing the SOAP message. This example focuses on the AfterSerializeand BeforeDeserializestages. The AfterSerializestage indicates that a message has been serialized and is ready to be sent—and this stage is where the serialized data needs to be compressed (this is used when the Web service is returning data). The BeforeDeserializestage indicates that a message has arrived and is about to be deserialized—and this stage is where the not-yet-deserialized data needs to be uncompressed (this is used when the Web service is receiving data). Again, the application uses the valuable SharpZipLib library to do the actual compression and decompression.
With the two classes CompressionSoapExtensionand CompressionSoapExtensionAttributein place, the following code marks each method in the Web reference (on the client) and each method in the XML Web service implementation (on the server) with an attribute.
|
Copy Code
|
|
|---|---|
[WebMethod]
[CompressionSoapExtension]
public DataSet CheckOutPatient(string patientID)
{ ... }
|
|
An advantage of this approach is that you can specify which methods in the class should use compression without forcing all methods in the class to use compression. For very small payloads, compression might not be the most efficient solution, so you can leave those methods uncompressed.
In the future, hopefully a mobile (compact) version of the Windows Communication Foundation will provide this functionality.
Conclusion
Get going with your first mobile claim processing application using this article's sample application. Along with a core set of claims functionality it is also packed with powerful and reusable components for complex user interface design, database access, and queued remote communication as well as management of application configuration, heterogeneous connections, endpoints, online and offline authentication, encryption, and compression.