


 See Also
 Important: Important: |
|---|
| This is retired content. This content is outdated and is no longer being maintained. It is provided as a courtesy for individuals who are still using these technologies. This content may contain URLs that were valid when originally published, but now link to sites or pages that no longer exist. |
Alex Yakhnin, Microsoft Corporation
April 2009
 Summary
Learn how to use the alpha blending and gradient drawing APIs that are available on the Windows Mobile® platform to create a compelling and attractive user experience.
Download
Applies To
Windows Mobile 5.0 and later
Microsoft .NET Compact Framework 3.5
Introduction
Advances in hardware for Windows Mobile devices over the last few years have led to the appearance of devices that enable you to create attractive and functional user interfaces (UIs) with rich graphics and natural interfaces. The Windows Mobile platform is necessary for developers to deliver such creative solutions.
When you examine some attractive and functional UIs on mobile devices or even on the Windows Vista® desktop, you can see that most applications use the transparency and gradient fill techniques. The Windows Mobile platform provides several useful native APIs that can take advantage of these techniques.
You can call these APIs from the .NET Compact Framework 3.5, create a Graphicsextension class, and use a sample of the Framework to simplify creation of attractive UIs.
Drawing an Image with
Transparency
When drawing an image with transparency, the most common
approach is to draw an image or an icon with just one background
color being transparent. This can easily be done in managed code by
using the
The second most common approach is when the whole image becomes
transparent and looks as if you could see through it. This effect
is achieved by using a technique called "alpha blending". Alpha
blending is the process of combining a translucent foreground with
a background color, thereby producing a new, blended color with the
appearance of partial transparency. The Windows Mobile platform
includes the native
Chris Lorton, one of the members of the .NET Compact Framework
team at Microsoft, describes a set of declarations for using the
AlphaBlendfunction and
ImagingAPI through
P/Invoke
Displaying a Gradient Fill
Another way of spicing up your applications is by displaying a
gradient fill. Gradient fill is the process that blends two or more
colors together by gradually changing one into another. This could
be easily achieved through the
Extending Graphics
Now when you have all the required pieces, you are ready to wrap them all together in a more useful package. You can use the new functionality of the .NET Framework 3.5, which is called the Extensionmethods. Extension methods let developers add new methods to the public contract of an existing Common Language Runtime (CLR) type. You can extend the System.Drawing.Graphicsclass. The following code example shows these two methods.
 Copy Code Copy Code
|
|
|---|---|
/// <summary>
/// Draws an image with transparency
/// </summary>
/// <param name="gx">Graphics to drawn on.</param>
/// <param name="image">Image to draw.</param>
/// <param name="transparency">Transparency
constant</param>
/// <param name="x">X location</param>
/// <param name="y">Y location</param>
 public static void DrawAlpha(this Graphics gx, Bitmap image,
								 byte transparency, int x, int y)
 {
	using (Graphics gxSrc = Graphics.FromImage(image))
	{
		 IntPtr hdcDst = gx.GetHdc();
		 IntPtr hdcSrc = gxSrc.GetHdc();
		 BlendFunction blendFunction = new BlendFunction();
		 // Only supported blend operation
		 blendFunction.BlendOp =
(byte)BlendOperation.AC_SRC_OVER;
		 // Documentation says put 0 here
		 blendFunction.BlendFlags = (byte)BlendFlags.Zero;
		 // Constant alpha factor
		 blendFunction.SourceConstantAlpha = transparency;
		 // Don't look for per pixel alpha
		 blendFunction.AlphaFormat = (byte)0;
		 PlatformAPIs.AlphaBlend(hdcDst, x, y, image.Width,
						image.Height, hdcSrc, 0, 0, image.Width,
						image.Height, blendFunction);
		 // Required cleanup to GetHdc()
		 gx.ReleaseHdc(hdcDst);
	 // Required cleanup to GetHdc()
		 gxSrc.ReleaseHdc(hdcSrc);
}
 }

/// <summary>
/// Fills the rectagle with gradient colors
/// </summary>
/// <param name="gx">Destination graphics</param>
/// <param name="rc">Desctination rectangle</param>
/// <param name="startColorValue">Starting color for
gradient</param>
/// <param name="endColorValue">End color for
gradient</param>
/// <param name="fillDirection">The direction of the
gradient</param>
public static void FillGradientRectangle(this Graphics gx,
	Rectangle rc, Color startColorValue, Color endColorValue,
									FillDirection fillDirection)
{
			GradientFill.Fill(
			gx,
			rc,
			startColorValue,
			endColorValue,
			fillDirection);
 }
|
|
As you can see, the
DrawAlphaand
FillGradientRectanglemethods extend the
Graphicsclass and now can be easily used in your drawing
code. These methods are included in the
GraphicsExtensionclass incorporated into the sample solution
that is part of a
|
Copy Code
|
|
|---|---|
void Form1_Paint(object sender, PaintEventArgs e)
{
	 Rectangle rectangle = new Rectangle(0, 0, 200, 100);
	 // Create temporary bitmap
	 Bitmap bitmap = new Bitmap(200, 100);
	 // Create temporary graphics
	 Graphics tempGraphics = Graphics.FromImage(bitmap);
	 // Draw a red rectangle in the temp graphics object
	 using (Brush brush = new SolidBrush(Color.Red))
	 {
		tempGraphics.FillRectangle(brush, rectangle);
	 }

	 // Draw a gradient background on the form
	 e.Graphics.FillGradientRectangle(this.ClientRectangle,
				Color.Blue, Color.LightBlue,
					 FillDirection.TopToBottom);

	 // Draw temp bitmap with alpha transparency
	 e.Graphics.DrawAlpha(bitmap, 60, 20, 100);
 }
|
|
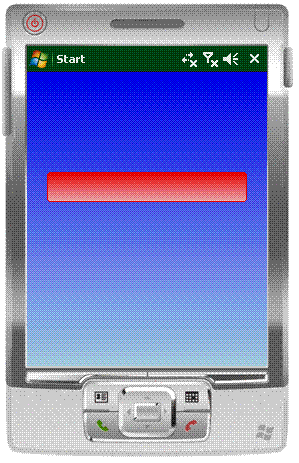
The previous code example paints a form with gradient colors and draws a red rectangle with alpha transparency on top. The following illustration shows the result.

The GraphicsExtensionclass also includes several other very useful methods that let you draw rounded rectangles which could be drawn with a gradient colors and drawn with transparency, such as FillGradientRectangle, DrawRoundedRectangleAlpha, and more. Feel free to explore the "goodies" in this class.
The following code example shows the usage of the DrawGradientRoundedRectanglemethod.
|
Copy Code
|
|
|---|---|
void Form1_Paint(object sender, PaintEventArgs e)
{

	 // Prepare rectangle
	 Rectangle rectangle = new Rectangle(20, 100, 200, 30);

	 // Draw a gradient background on the form
	 e.Graphics.FillGradientRectangle(this.ClientRectangle,
				Color.Blue, Color.LightBlue,
							 FillDirection.TopToBottom);

	 e.Graphics.DrawGradientRoundedRectangle(rectangle, Color.Red,
			Color.LightPink, Color.Red, new Size(6, 6));
 }
|
|
And the following illustration shows the result.
Drawing Rules
If you examine the previous code examples, you notice a certain rule for achieving transparency on a Windows Mobile platform: the drawing must be done in the same graphics context. This is dictated by the fact thatWindows Mobile does not support transparency on the windowing level. If you create a COM control deriving from the System.Windows.Forms.Controlclass, you will encounter difficulties when you try to make the control transparent in relation to the form that is hosting it.
Remember, too, that, even though the hardware is becoming more powerful, the memory and processor speeds are still somewhat limited compared with a desktop computer. Every allocation of the graphics context, brush, or a simple drawing operation takes time and resources. The most optimal way of drawing would be to use a single instance of the System.Drawing.Graphicsobject.
There is also a noticeable flickering when you run the sample.
To resolve the flickering issue, you should use double-buffering
technique which I explained in
Armed with this knowledge and the GraphicsExtensionclass described earlier, I have created a sample UI framework that you can use as a starting point when you develop your own applications for the .NET Compact Framework.
Starting from the UIElement
Class
This framework builds on the following premises:
- Every UI element should handle its own drawing.
- The single
Graphicsobject should be passed to the UI element to enable
drawing.
Look at the UIElementclass from the solution. This class is a base class that is used by the inheritors to create elements like ImageElement, TextBlock, and Border. This class implements a set of events, properties and the following methods.
|
Copy Code
|
|
|---|---|
  /// <summary>
  /// Renders the UIElement.
  /// </summary>
  /// <param name="graphics">Graphics object.</param>
  public void Render(Graphics graphics)
  {
	 this.OnRender(graphics);
  }

  /// <summary>
  /// Render method to implement by inheritors
  /// </summary>
  /// <param name="graphics">Graphics object.</param>
  protected virtual void OnRender(Graphics graphics)
  {

  }
|
|
As you can see from this code, the Rendermethod can be called from the form or control with an instance of the Graphicsobject. Therefore, the virtual OnRendermethod would be called on any concrete class that implements it. The following code example shows how the ImageElementclass implements the OnRendermethod.
|
Copy Code
|
|
|---|---|
protected override void OnRender(Graphics graphics)
{
	 if (this.image != null)
	 {
		 if (transparentBackground)
		 {
			 graphics.DrawImageTransparent(this.image, new
			 Rectangle(this.Left, this.Top, this.Width,
this.Height));
		 }
		 else if (alphaChannel)
		 {
			 graphics.DrawImageAlphaChannel(this.imagingImage,
												this.Left,
this.Top);
		 }
		 else
		 {
			 graphics.DrawAlpha(this.image, this.Opacity,
											 this.Left,
this.Top);
		 }
	 }
 }
|
|
In this method, you are taking advantage of the methods from the GraphicsExtensionclass to draw an image with transparency or with the alpha channel. The following code example shows the same OnRendermethod in the TextBlockclass.
|
Copy Code
|
|
|---|---|
protected override void OnRender(Graphics drawingContext)
{
	if (this.Text != null)
	{
		Size sizeContent = Size.Empty;
		// Prepare font
		Font font = new Font(this.fontFamily,
this.fontSize, fontStyle);
		// Measure the string
		SizeF sizeContentF =
drawingContext.MeasureString(this.Text,
 font);
		sizeContent.Width = (int)sizeContentF.Width;
		sizeContent.Height = (int)sizeContentF.Height;
		// Calculate the location of the text
		Point point =
GetLocationFromContentAlignment(this.alignment,
 sizeContent);
		// Draw the text
		using (Brush brushText = new SolidBrush(this.Foreground))
		{
			 Rectangle textRect = new Rectangle(point.X, point.Y,

this.Width - 1, this.Height - 1);
				drawingContext.DrawString(this.Text, font,
brushText,
textRect);
		 }
		 // Clean up
		 font.Dispose();
}
}
|
|
Creating a Host
To use the UI elements from the framework, you have to have a valid form or control class to provide a Graphicsobject for the elements. The following code example shows the added UIFormclass, which inherits from the System.Windows.Formclass and overrides its OnPaintmethod.
|
Copy Code
|
|
|---|---|
public class UIForm : Form
{
private Canvas canvas;

public UIForm()
	{
			this.canvas = new Canvas(this);
// Don't show title bar and allocate the full screen
			this.FormBorderStyle = FormBorderStyle.None;
			this.WindowState = FormWindowState.Maximized;
}

	protected override void OnPaint(PaintEventArgs e)
	{
		// Draw a background first
		this.offGx.Clear(this.BackColor);
		// Draw background image
		if (this.backgroundImage != null)
		{
			this.offGx.DrawImage(this.backgroundImage, 0, 0);
	}

		// Pass the graphics to the canvas to render
		if (this.canvas != null)
		{
			 this.canvas.Render(offGx);
	}

		// Blit the offscreen bitmap
		e.Graphics.DrawImage(offBitmap, 0, 0);
	 }
}
|
|
From the previous code example, you can see that we are using the Canvasclass from the framework. This class plays the role of the parent to all UI elements by holding its instances in the VisualCollectionand relaying the Rendermethod call to each of the UI elements in the collection. The following code example shows what the Rendermethod looks like in the Canvasclass.
|
Copy Code
|
|
|---|---|
protected override void OnRender(Graphics graphics)
{
	 // Draw a back color
	 if (this.Background != null)
	 {
		 using (Brush brush = new SolidBrush(Background))
		 {
			graphics.FillRectangle(brush, new
Rectangle(this.Left,
this.Top, this.Height, this.Width));
		 }
}

	// Pass the graphics objects to all UI elements
	for (int i = 0; i < children.Count; i++)
	{
		UIElement element = children[i];
		if (element.Visible)
		{
			element.Render(graphics);
	}
}
}
|
|
Custom Title and Menu Bar
Because we are making the UIFormto show full screen, you can implement a custom version of the title bar and menu bar on the form. You will find TitleBarand MenuBarclasses in the Msdn.UIFrameworkproject and declared in the UIForm. Both classes of course are derived from UIElementand implement its drawing in the Rendermethod. You can easily customize the way that they both look by changing the colors for the gradient or back color. Both TitleBarand MenuBarare exposed from UIFormby using appropriate properties.
Sample
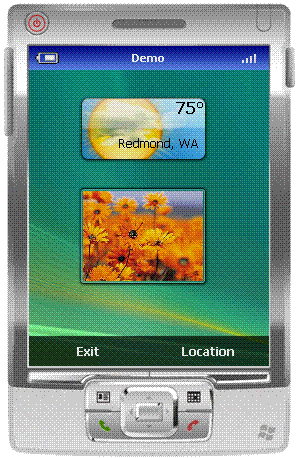
In order to show how to use the UI framework, I have created a sample project that you will find in the Msdn.TestClientproject. It contains the DemoFormclass which is derived from UIForm. The following code example shows what the constructor of the DemoFormlooks like.
|
Copy Code
|
|
|---|---|
public DemoForm()
{
	 InitializeComponent();
	 // Set gradient for title bar
	this.TitleBar.Fill = new LinearGradient(Color.DarkBlue,
										Color.CornflowerBlue);
	this.TitleBar.Text = this.Text;
	 // Set values for menu
	 this.MenuBar.LeftMenu = "Exit";
	 this.MenuBar.RightMenu = "Location";

	 this.InitializeWeatherUI("75", "Redmond, WA", 50, 50);
	 this.InitializeSlideShow(50, 140, "Garden.jpg");
 }
|
|
In the constructor, we set a custom gradient to the TitleBarand some text values to the LeftMenuand RightMenuproperties for the MenuBar. Also, to demonstrate the capabilities of the UI framework, I have decided to reproduce the appearance of some Sidebar gadgets which are available in Windows Vista, Weather and Slide Show. I have "borrowed" some images that are included with the gadgets and included them as a part of the Msdn.TestClientproject in the Images folder. These images are created by using the alpha transparency and should be perfect to test the capabilities of the UI framework. This is why you see the InitializeWeatherUIand InitializeSlideShowmethods being called in the constructor code earlier. Look at one of the methods and see how it is done:
|
Copy Code
|
|
|---|---|
private void InitializeSlideShow(int left, int top, string
imageFile)
{
	 this.Canvas.AddElement<ImageElement>(() => new
ImageElement()
	 {
		Source = @"Images\slideshow_glass_frame.png",
		Top = top,
		Left = left,
		AlphaChannel = true,
	 });

	 this.Canvas.AddElement<ImageElement>(() => new
ImageElement()
	 {
		Name = "Slide",
		Source = @"Images\" + imageFile,
		Top = top + 5,
		Left = left + 4,
		Stretch = true,
		Width = 120,
		Height = 90
	 });
 }
|
|
As you can see, the InitializeSlideShowmethod accepts several parameters to set the position and an image file for the ImageElement.We add two ImageElementsto the Canvasby using the AddElementmethod. This method is declared the following way in the Canvasclass:
|
Copy Code
|
|
|---|---|
public T AddElement<T>(Func<T> buildFunc) where T :
UIElement
{
	if (buildFunc == null)
		 throw new ArgumentNullException("buildFunc");

	T instance = buildFunc();
	 this.children.Add(instance as UIElement);
	 return instance;
}
|
|
As you can see, the AddElementmethod has a parameter of a Funcdelegate which accepts an instance of the UIElement. This is why you can use the Object initializers when they create an instance of the ImageElement.
In order to reproduce the Weather gadget appearance in the sample, you can use a set of ImageElementand some TextBlockclasses to display the temperature and a city.
|
Copy Code
|
|
|---|---|
private void InitializeWeatherUI(string temperature,
string city, int left, int top)
{

	this.Canvas.AddElement<ImageElement>(() => new
ImageElement()
	{
		 Source = @"Images\BLUEDOCKED-base.png",
		 Top = top,
		 Left = left,
		 AlphaChannel = true,
});

	this.Canvas.AddElement<ImageElement>(() => new
ImageElement()
	{
		 Source = @"Images\docked_sun.png",
		 Top = top,
		 Left = left,
		 AlphaChannel = true,
});

	// Display temperature
	this.Canvas.AddElement<TextBlock>(() => new
TextBlock()
	{
		 Text = temperature + Convert.ToChar(176),
		 Top = top + 2,
		 Left = left + 97,
		 FontSize = 12f,
		 FontStyle = FontStyle.Bold
});

	// Display city
	this.Canvas.AddElement<TextBlock>(() => new
TextBlock()
	{
		 Text = city,
		 Top = top + 40,
		 Left = left + 40,
		 Width = 200,
	 });
  }
|
|
And finally, this is what the DemoFormlooks like when you execute the project.
Conclusion
In this article, I have shown how to extend the capabilities of the Graphicsclass in the .NET Compact Framework, by using some helpful drawing APIs that are available on the Windows Mobile platform. I have also described the UI framework that I built to demonstrate the capabilities of the Windows Mobile platform. However, this framework should not be considered production-ready code. Think of it as an example that you can extend and change to suit your own needs.
Author Bio
Alex Yakhnin is a Senior Mobility Consultant for the Mobility Global Practices group at Microsoft Corporation. Before his work with Microsoft, Alex was the architect and developer of small and large systems for many financial companies. He has written several MSDN articles, and for many years he has been a .NET Compact Framework/Device Application Development MVP and also a part of the OpenNETCF initiative.