


 Important: Important: |
|---|
| This is retired content. This content is outdated and is no longer being maintained. It is provided as a courtesy for individuals who are still using these technologies. This content may contain URLs that were valid when originally published, but now link to sites or pages that no longer exist. |
Microsoft Corporation
February 2007
 Summary
Learn how to use Microsoft® SQL Server™ 2005 Mobile Edition (SQL Mobile) to synchronize data between a Microsoft Windows Mobile®–based device and a SQL Server 2005 back-end database. This HOL will take 1 hour and 30 minutes to complete. (80 printed pages)
Download
Applies To
Microsoft Visual Studio® 2005Microsoft SQL Server 2005Microsoft SQL Server 2005 Mobile EditionMicrosoft .NET Compact Framework version 2.0Windows Mobile version 5.0 software for Pocket PCsWindows Mobile version 5.0 software for Smartphones
The following applications are required to run this HOL:
- Microsoft Windows® XP Professional
- Internet Information Services (IIS)
This HOL uses IIS for Windows XP Professional. Be sure that the IIS component is installed. For more information, see Appendix B. - Visual Studio 2005
This HOL requires Visual Studio 2005 Standard, Professional, or Team System Editions. It will not work with any of the Express Editions. If you do not have the correct edition of Visual Studio 2005, find out how you can acquire it from theVisual Studio 2005 Developer Center . - SQL Server 2005
Find out how to acquire a copy at theSQL Server Developer Center . You also need to install the AdventureWorks sample database with SQL Server 2005. - SQL Server 2005 Mobile Edition
Find out how to acquire a copy atHow to Obtain SQL Server 2005 Mobile Edition . - Microsoft ActiveSync® 4.0 or higher
ActiveSync 4.0 or higher allows for connectivity between a Windows Mobile–based device and your computer.
Download and install ActiveSync 4.0 .
Download and install ActiveSync 4.1 . - Windows Mobile 5.0 SDKs
The Windows Mobile 5.0 SDKs for Pocket PC and Smartphone enable development for Windows Mobile–based devices in Visual Studio 2005.
Download and install Windows Mobile 5.0 SDK for Pocket PC .
Download and install Windows Mobile 5.0 SDK for Smartphone . - Set up your computer
Follow the directions in the Additional Information section to set up your computer for this HOL.
Credentials Used
In this HOL, you will need the following information:
- Computer's name
Introduction
You will use SQL Server Management Studio to create a SQL Mobile database, set up, and configure SQL Server 2005 and Internet Information Services (IIS) for merge replication. You will use Visual Studio 2005 to create a Microsoft .NET Compact Framework application to maintain SQL Mobile data and synchronize it with SQL Server data. You will also learn how to synchronize SQL Mobile data with any back-end data store using a Web service. When you have completed this hands-on lab (HOL), you will know how to easily build a mobile application that must keep mission-critical data in synchronization with a back-end database.
Lab 1: Developing a SQL Mobile
Application with Visual Studio 2005 and SQL Server 2005
Learn how to use SQL Server 2005 Mobile Edition (SQL Mobile) to synchronize data between a Windows Mobile–based device and a SQL Server 2005 back-end database. You will use SQL Server Management Studio to create a SQL Mobile database and to set up and configure SQL Server 2005 and IIS for merge replication. You will use Visual Studio 2005 to create a .NET Compact Framework application to maintain the SQL Mobile data and synchronize it with SQL Server data. You will also learn how to synchronize SQL Mobile data with any back-end data store using a Web service. When you have completed this lab, you will know how to easily build a mobile application that keeps mission-critical data in synchronization with a back-end database.
Because completing all exercises in the lab may take more time than you have available, you may select only those exercises that are most useful for you. Each exercise provides you with files that offer a starting point as if you had completed the previous exercise. While there is no explicit order in which you have to perform the exercises, each exercise builds on the activities performed in the previous one.
In this lab, you will perform the following exercises:
- Creating and using a SQL Mobile database in a Windows Mobile
5.0 application
- Synchronizing data between a SQL Server 2005 and SQL Mobile
database
- Synchronizing data between any back-end database and SQL Mobile
database using a Web service
Exercise 1: Creating and Using a SQL Mobile Database in a Windows Mobile 5.0 Application
In this exercise, you will use SQL Server Management Studio to create a stand-alone SQL Mobile vendor database. You will then create a Windows Mobile 5.0 application to view and maintain the vendor data within the SQL Mobile database. The vendor database will be based on the AdventureWorks sample database that ships with SQL Server 2005.
-
Start SQL Server Management Studio by clicking Start| All Programs| Microsoft SQL Server 2005| SQL Server Management Studio.
-
In the Connect to Serverdialog box, select SQL Server Mobilein the Server typebox, as shown in Figure 1.
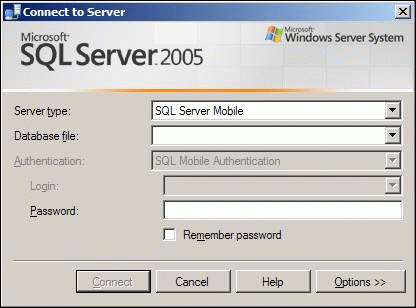
Figure 1. Selecting SQL Server Mobile as the server type
-
In the Database filebox, select <New Database…>.
The Create New SQL Server 2005 Mobile Edition Databasedialog box appears, as shown in Figure 2.
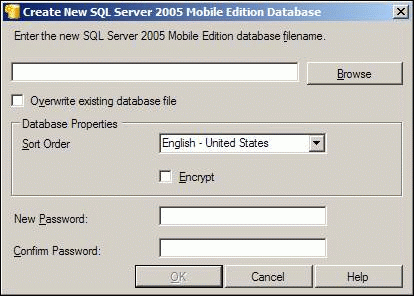
Figure 2. Creating a new SQL Server 2005 Mobile Edition database
-
Under Enter the new SQL Server 2005 Mobile Edition database filename, type C:\Program Files\Windows Mobile Developer Samples\HOLs\HOL302_SQL_Mobile\Exercises\Exercise1\Vendors.sdf.
-
Leave the other values as their defaults, and then click OK.
-
If you are prompted with a message that says, Password is either not provided or blank, click Yesto continue with the blank password.
 Note:
Note:Step 6 is not a recommended security practice, but for the purpose of simplicity in this lab, you will use this setting. -
Click Connectto connect to the new SQL Mobile database, as shown in Figure 3.
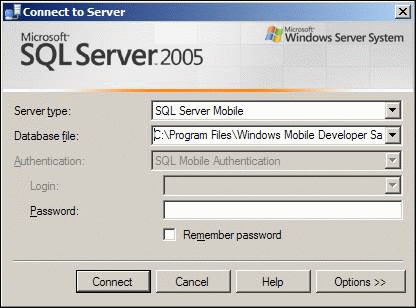
Figure 3. Connecting to the new SQL Server 2005 Mobile Edition database
Conclusion
Although you can create tables and other database objects interactively, just as you can when connected to a SQL Server 2005 database, a script is provided for convenience to create the Vendor table in your new SQL Mobile database in the next procedure.
-
In SQL Server Management Studio, click File| Open| File.
-
Browse to C:\Program Files\Windows Mobile Developer Samples\HOLs\HOL302_SQL_Mobile\Setup, and then select CreateVendor.sqlce. Click Open.
-
Verify that the full path of your new Vendors.sdf database file is selected in the Database filebox, and then click Connect.
-
Click Query| Executeto create the Vendor table. The Messagepane appears with the message (1 row(s) affected)repeated four times.
-
In the Object Explorerpane, right-click the Tablesfolder, and then click Refresh.
-
Expand the Tables folder, and then verify that there is now a Vendor table.
-
Expand the Vendor table and its Columns folder to familiarize yourself with the table’s structure, which happens to conform to the schema of the Vendors table in the AdventureWorks sample database.
In the next exercise, you will see why having the table's structure conform to the schema is desirable. The table contains four records that you can browse by right-clicking the SQL Server Mobile database node, and then by clicking New Query. In the query editor, type SELECT * FROM Vendor, and then click Query | Execute. When you are finished browsing, close the Query Editor window. There is no need to save your changes when prompted.
-
Close SQL Server Management Studio.
Conclusion
-
Start Visual Studio 2005 by clicking Start| All Programs| Microsoft Visual Studio 2005| Microsoft Visual Studio 2005.
-
Click File| New| Projectto create a new Windows Mobile application.
-
In the New Project dialog box under Project types, browse to Visual C#| Smart Device| Windows Mobile 5.0 Pocket PC.
Note:Depending on your Visual Studio configuration, Visual C# may appear under Other Languages. -
In the Templatesbox, select Device Application.
-
Change the Nameto AdvWorksMobile.
-
Change the Locationto C:\Program Files\Windows Mobile Developer Samples\HOLs\HOL302_SQL_Mobile\Exercises\Exercise1.
-
Be sure Create directory for solutionis selected, and then click OK, as shown in Figure 4.
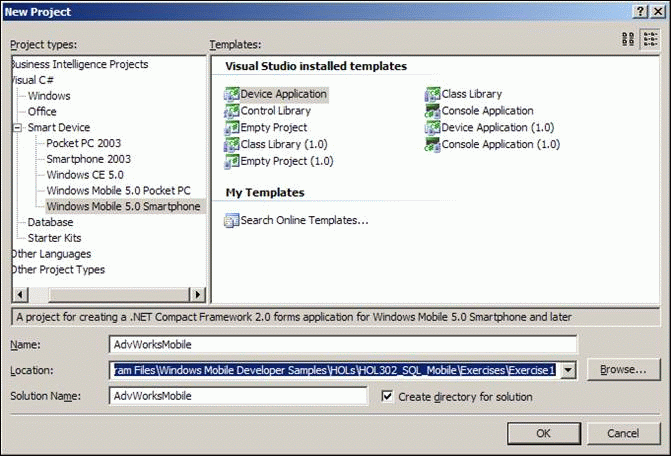
Figure 4. The New Project dialog box
Visual Studio creates a new project and opens Form1 in the form designer.
-
In Solution Explorerin Visual Studio, right-click Form1.cs, and then click Rename.
-
Type VendorList.csas the new file name, and then press ENTER.
-
Click Yesin response to the prompt to rename all references of the Form1 code element in the project.
-
If the VendorList form is not already open in the form designer, double-click VendorList.csin the Solution Explorerpane to open it in the form designer.
-
In the form designer, right-click the blank area of the form, and then click Properties.
-
In the Propertiespane, change the Text property value to Vendor List.
-
Change the MinimizeBoxproperty value to False.
This step causes an OKbutton to appear at the top right corner of the form when it is displayed on the device instead of the default smart minimize button (which looks like an x). Normally, when the x is clicked, Windows Mobile applications are minimized to the background where they are still running. Changing this property value to Falsecauses the form to actually be closed when clicking OK, making debugging easier because the application needs to be deployed multiple times, which would not be possible if the application were still running in the background.
-
In Visual Studio, click Data| Add New Data Source.
The Data Source Configuration Wizardappears.
-
Select Databaseas the data source type, and then click Next, as shown in Figure 5.
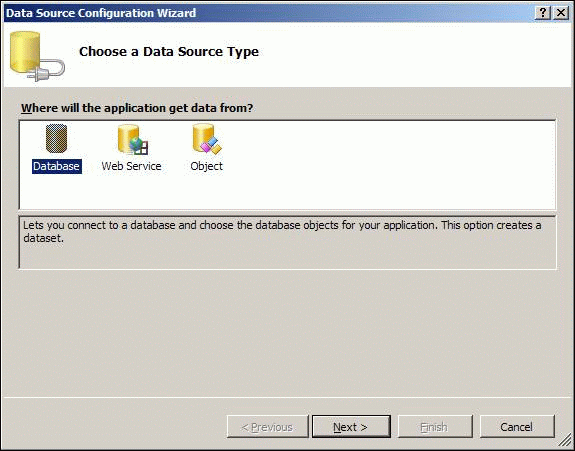
Figure 5. Choosing a data source type in the Data Source Configuration Wizard
-
On the Choose Your Data Connectionpage, click New Connection.
-
In the Add Connectiondialog box, click Change.
-
Select Microsoft SQL Server Mobile Edition, and then click OK, as shown in Figure 6.
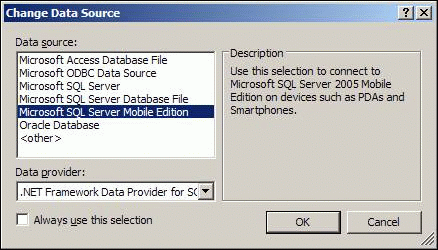
Figure 6. Changing the data source
-
In the Add Connectiondialog box, be sure the My Computeroption is selected as the Data Source.
-
Under Connection Properties, click Browseto select the database.
-
Browse to C:\Program Files\Windows Mobile Developer Samples\HOLs\HOL302_SQL_Mobile\Exercises\Exercise1, click Vendors.sdf, and then click Open.
-
Click OKto add the connection, as shown in Figure 7.
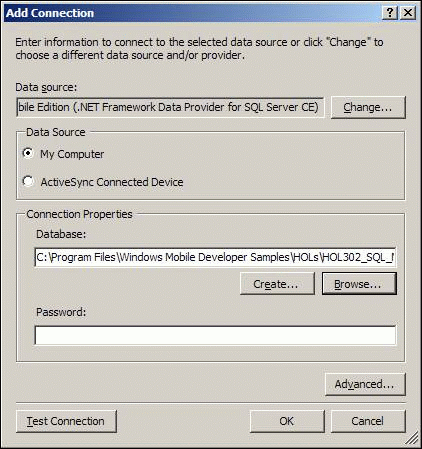
Figure 7. The Add Connection dialog box
-
On the Choose Your Data Connectionpage, after the new connection appears in the Which data connection should your application use to connect to the databasebox, click Next, as shown in Figure 8.

Figure 8. Choosing Your Data Connection page with the new connection selected
-
When Visual Studio prompts you to copy the local data file to your current project and modify the connection, click Yes, as shown in Figure 9.

Figure 9. Message to copy the local data file to your current project
Visual Studio copies the Vendors.sdf file into your project folder and sets its properties such that the file will also be copied to your device when the application is deployed.
-
On the Choose Your Database Objectspage, expand Tables, and then select Vendor.
-
Change the DataSet nameto AdvWorksDataSet, and then click Finish, as shown in Figure 10.
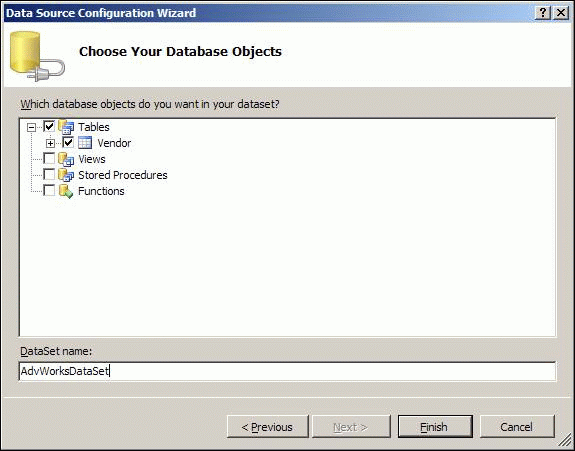
Figure 10. Choose Your Database Objects page
Visual Studio adds the AdvWorksDataSet.xsd schema and other related files to your project.
-
The VendorList.csForm Designer should still be visible in Visual Studio, but if it is not, double-click VendorList.csin Solution Explorerto open it in the form designer.
-
Click Data| Show Data Sourcesto show the Data Sourcespane if it is not already visible, as shown in Figure 11.
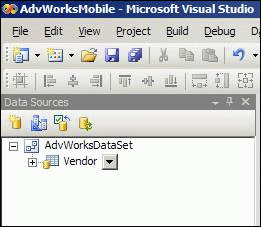
Figure 11. The Data Sources pane
You can drag and drop tables and individual columns to the form designer to create controls that are bound to the data source. By default, a DataGrid control is created when dragging an entire table to a form designer.
-
In the Data Sourcespane, expand AdvWorksDataSet.
-
Click and drag the Vendortable, and then drop it anywhere in the blank area on the VendorList.csform designer.
Visual Studio creates a DataGrid control for the Vendor table, as shown in Figure 12.
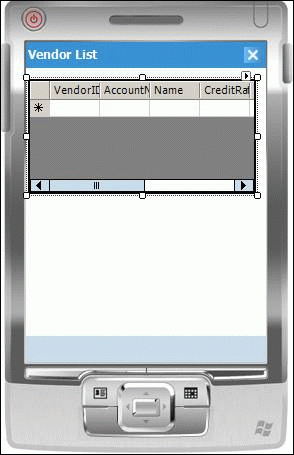
Figure 12. The DataGrid control for the Vendor table in the form designer
Notice that in the component tray (located at the bottom of the form designer) Visual Studio has also created the advWorksDataSet DataSet, the vendorBindingSource BindingSource, and the vendorTableAdapter TableAdapter, as shown in Figure 13. Visual Studio uses these controls that are invisible at run time to bind the vendor data to the DataGrid.

Figure13. The component tray in Visual Studio
-
Right-click the DataGrid control, and then click Properties.
-
In the Propertiespane, set the Locationproperty to 0, 0,and then set the Sizeproperty to 240, 268, effectively filling the whole screen.
You are now ready to test the application’s functionality.
-
In Visual Studio, click Debug| Start Debugging.
-
In the Deploy AdvWorksMobiledialog box that appears, be sure Windows Mobile 5.0 Pocket PC Emulatoris selected, and then click Deploy, as shown in Figure 14.
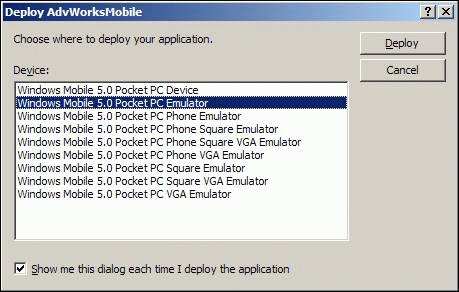
Figure 14. The Deploy AdvWorksMobile dialog box
Note:If you receive an error message that there was an error deploying the application any time that you deploy the application during this lab, be sure the application is not already running by following the steps in Appendix A at the end of this HOL. Visual Studio launches the Pocket PC - Windows Mobile 5.0 device emulator and begins to deploy the application to the device. Deploying the first Windows Mobile 5.0 application may take some time because the .NET Compact Framework version 2.0 and your application’s files—including the SQL Mobile database in this case—need to be copied to the device.
When the application appears in the device emulator, as shown in Figure 15, you should see the list of four vendors that were inserted into the table when you created the database. You can scroll right and left and resize the columns with the column dividers on the header row to see all of the fields in the table.
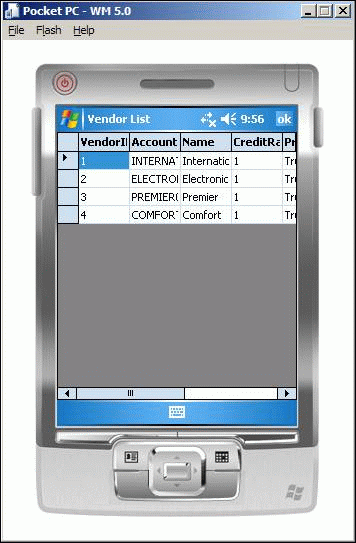
Figure 15. The emulator running the application with the Vendor table
-
Click OKto dismiss the form, and then close the application.
Besides simply viewing a list of vendors, your application needs to allow the user to edit the vendor data. You will use the DataGrid’s smart tag tasks to generate additional data forms, but before you do that, you need to set the default values for some data columns that do not allow null values.
-
In Visual Studio, open the VendorList.csform in the form designer if it is not open already.
-
In the component tray, click the advWorksDataSetcomponent, and then click the smart tags button at the top-right corner of the control. The smart tag menu appears, as shown in Figure 16.

Figure 16. The smart tag menu for the advWorksDataSet component
-
In the smart tag menu for AdvWorksDataSetTasks, click Edit in DataSet Designer.
The AdvWorksDataSet DataSetdesigner opens, displaying the Vendor table, as shown in Figure 17.
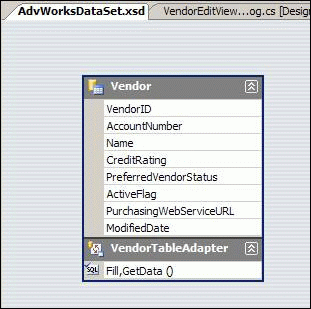
Figure 17. The AdvWorksDataSet DataSet designer
-
Click the row in the Vendor table that contains the PreferredVendorStatuscolumn name. In the Propertiespane, locate the DefaultValueproperty, and then change its value to True.
-
In the same way as Step 4, click the ActiveFlagcolumn name in the Vendortable, and then change its DefaultValueproperty to True.
Now you need to add the ability to write data changes from the DataSet to the SQL Mobile database.
-
In the DataSet Designer, click VendorTableAdapter.
-
In the Propertiespane, locate the UpdateCommandproperty.
-
In the Update Commandproperty box, select (New).
-
Expand the UpdateCommandproperty, click the CommandTextproperty, and then click its ellipsis button.
The Query Builderdialog box appears with the Add Tabledialog box, as shown in Figure 18.

Figure 18. The Query Builder and Add Table dialog boxes
-
On the Add Tabledialog box, click Close.
-
In the Query Builderdialog box, type or paste the following SQL statement, as shown in Figure 19, which follows the code.
 Copy Code
UPDATE
	Vendor
SET
	AccountNumber = @AccountNumber,
	Name = @Name,
	CreditRating = @CreditRating,
	PreferredVendorStatus = @PreferredVendorStatus,
	ActiveFlag = @ActiveFlag,
	PurchasingWebServiceURL = @PurchasingWebServiceURL,
	ModifiedDate = @ModifiedDate
WHERE
	VendorID = @VendorID
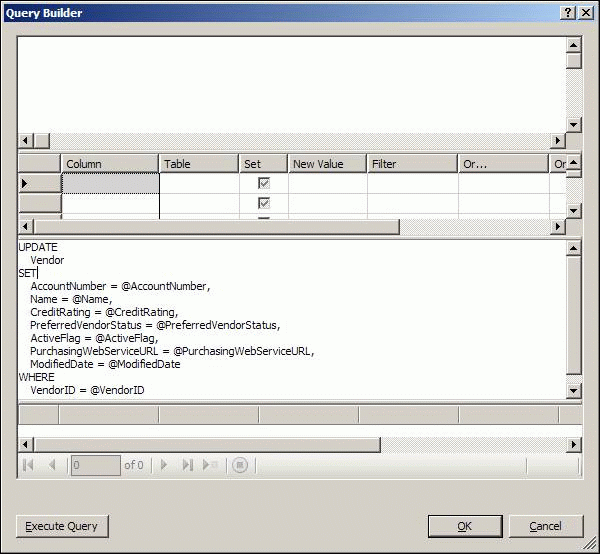
Figure 19. The Query Builder dialog box with a SQL statement
-
Click OK.
-
Close the AdvWorksDataSet.xsdDataSet designer. When you are prompted to save your changes, click Yes.
-
In the VendorList.csform designer, click the DataGrid control, and then click the smart tags button at the top-right corner of the control. The smart tag menu appears, as shown in Figure 20.
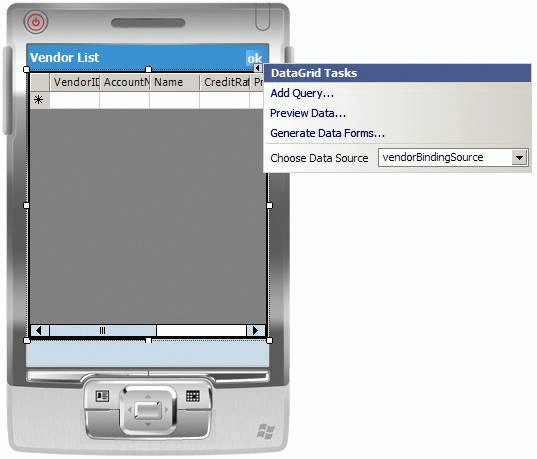
Figure 20. The smart tag menu for the DataGrid control
-
In the smart tag menu for DataGrid Tasks, click Generate Data Forms.
Visual Studio generates two new forms in Solution Explorer: VendorEditViewDialog.csand VendorSummaryViewDialog.cs, as shown in Figure 21.
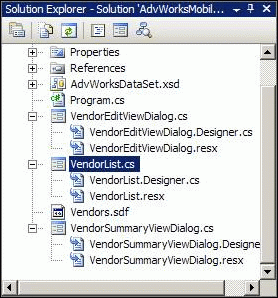
Figure 21. Two new forms in Solution Explorer
Visual Studio has also added a Newmenu to the VendorList main menu, as shown in Figure 22.
Figure 22. The New menu in the VendorList main menu
In addition to these readily-visible changes Visual Studio has made to your project, Visual Studio has also added code behind the VendorList form and the new forms it has generated.
-
In Solution Explorer, right-click VendorList.cs, and then click View Code.
-
In Code view, locate the newMenuItemMenuItem_Clickmethod. This new method that has been added to the form’s code responds to the user clicking the Newmenu. The method begins by adding a new record to the vendorBindingSourcedata binding source; next, it creates an instance of the VendorEditViewDialogform, passing it the vendorBindingSourcevariable; finally, it displays the form instance that it just created.
-
Locate the vendorDataGrid_Clickmethod. This method has been added to the form’s code, and it responds to the user clicking the DataGrid control. The method creates an instance of the VendorSummaryViewDialogform, passing it the vendorBindingSourcevariable, and then it shows the form.
-
In Solution Explorer, double-click VendorEditViewDialog.csto open the form designer.
-
Notice that the form has an individual data-bound control for each column in the Vendor table.
-
Scroll to and right-click the text box under Modified Date, and then click Properties.
-
Double-click the Lockedproperty to change its value to True, and then change the BorderStyleproperty to None. In a moment, you will add code to modify this control’s value before the record is saved, so the control’s text should not be edited by the user.
-
Click View| Codeto view the form's code.
-
Notice that in the VendorEditViewDialog_Closingmethod, it calls the EndEditmethod of the vendorBindingSourcedata binding source that it received when it was instantiated, thus saving any data that has been added or edited since the form was opened.
-
Create a new line before the call to EndEditand assign the current date and time to the ModifiedDatecolumn. You can easily access the data binding source as shown in the following code example.
Copy Code
	DataRowView dataRowView =
		(DataRowView)this.vendorBindingSource.Current;
	AdvWorksDataSet.VendorRow vendorRow =
		(AdvWorksDataSet.VendorRow)dataRowView.Row;
	vendorRow.ModifiedDate = DateTime.Now;
Note:A more full-featured implementation of this form would be to provide functionality that would allow the user to cancel their changes, but to save time, that functionality is left as an optional exercise. -
In Solution Explorer, double-click VendorSummaryViewDialog.csto open the form designer.
-
Notice that this form also has an individual data-bound control for each column in the Vendor table, but the controls are read-only. Also notice that the form has an Editcommand.
-
View the form’s code and locate the editMenuItemMenuItem_Clickmethod, which responds to the Editcommand being clicked. It behaves much like the newMenuItemMenuItem_Clickmethod on the VendorList form; it simply relies on the fact that the vendorBindingSourcevariable’s current record will be edited when the VendorEditViewDialogform is opened. This command works because the controls on this form are databound to the same vendorBindingSource instance as the DataGrid on the VendorList form.
You need to add the ability to add any data changes made in your application to the SQL Mobile database file when the user closes the application.
-
In Solution Explorer, double-click VendorList.csto return to the VendorListform designer.
-
Click the form’s title bar. In the Propertiespane, click the Eventsbutton (with a lightning bolt symbol on it).
-
Locate and double-click the Closingevent to generate an event handler and open the event in Code view.
-
Add the following code to the VendorList_Closingevent handler.
Copy Code
this.vendorTableAdapter.Update(advWorksDataSet);
This code uses the vendorTableAdaptertable adapter to update the SQL Mobile database file with the data changes that have been made to the advWorksDataSet DataSet.
Conclusion
|
Note: |
|---|
| While the generated forms and code provide add and edit functionalities with the single click of a command, a more full-featured implementation would be to provide functionality that would allow the user to delete a record, but to save time, that functionality is left as an optional exercise. |
-
In Visual Studio, click Debug| Start Debugging.
-
In the Deploy AdvWorksMobiledialog box, be sure Windows Mobile 5.0 Pocket PC Emulatoris selected, and then click Deploy.
-
When the application appears in the device emulator, click a row in the DataGrid.
Note:You may need to click the device emulator’s button on the Windows taskbar to bring the emulator to the foreground. -
Notice that the VendorSummaryViewDialogform appears with the details of the row that you clicked, as shown in Figure 23.
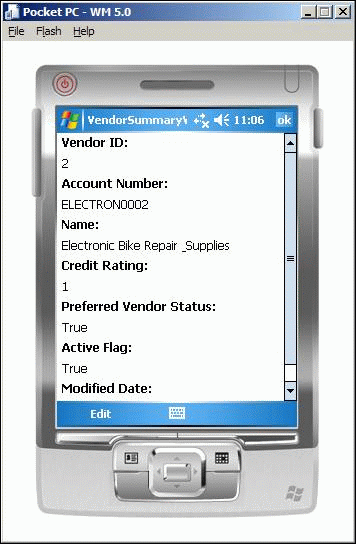
Figure 23. Details about a row that was clicked in the Vendor table
-
Click Editto open the data form that you can edit, as shown in Figure 24.
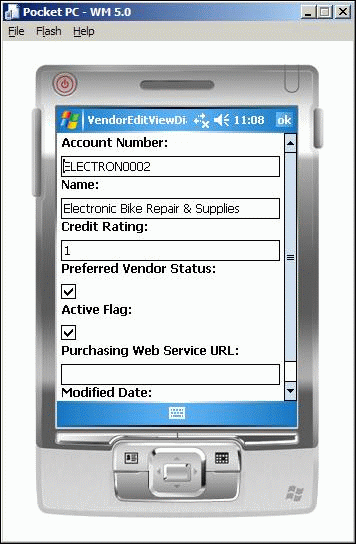
Figure 24. Editing a data form in the emulator
-
After the VendorEditViewDialogform appears, modify some of the data, and then click OKto save it. Notice that the Vendor Listform’s DataGrid is updated to reflect the data changes you made, as shown in Figure 25.

Figure 25. The updated Vendor List
-
Click New.
-
After the VendorEditViewDialogform appears, enter data for a new record, as shown in Figure 26.
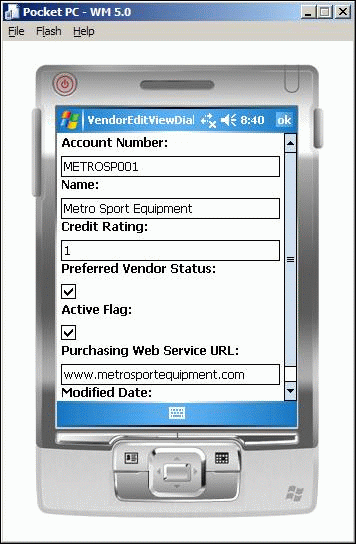
Figure 26. Entering a new record
-
Click OKto save the data. Notice that the Vendor Listform’s DataGrid is updated to reflect the new record that you entered, as shown in Figure 27.
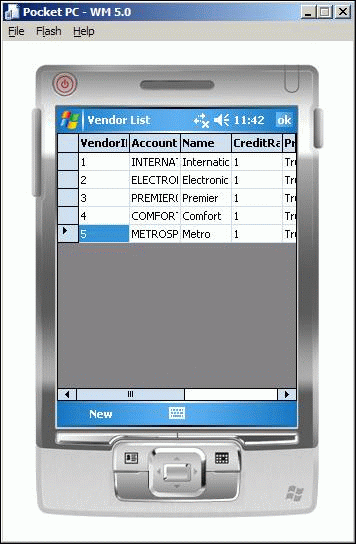
Figure 27. The updated Vendor List with the new record
-
Click OKto dismiss the form, and then close the application.
In this exercise, you have learned how to create a stand-alone SQL Mobile database and how to create a Windows Mobile application that can be used to maintain this stand-alone data. In the next exercise, you will learn how to synchronize data between your mobile database and a back-end SQL Server database.
Exercise 2: Synchronizing Data Between SQL Server 2005 and SQL Mobile
In this exercise, you will enhance the Windows Mobile 5.0 application that you created in Exercise 1 to synchronize data between the SQL Server 2005 AdventureWorks sample database and the SQL Mobile database that your application uses. You will use merge replication to accomplish the synchronization so your device does not always need to be connected to a network or back-end database to be fully functional.
-
If SQL Server Management Studio is not already running, click Start| All Programs| Microsoft SQL Server 2005| SQL Server Management Studioto open it.
-
In the Connect to Serverdialog box, click the Server typebox, and then click Database Engineif it is not already selected.
-
In the Server namebox, select your computer name if it is not already selected.
Note:Be sure that you select the entry with just your computer name, and not the entry with your computer's name followed by \SQLEXPRESS. -
In the Authenticationbox, be sure Windows Authenticationis selected.
-
Click Connect.
-
In the Object Explorerpane, expand Replication, right-click Local Publications, and then click New Publication.
The New Publication Wizardappears, as shown in Figure 28.
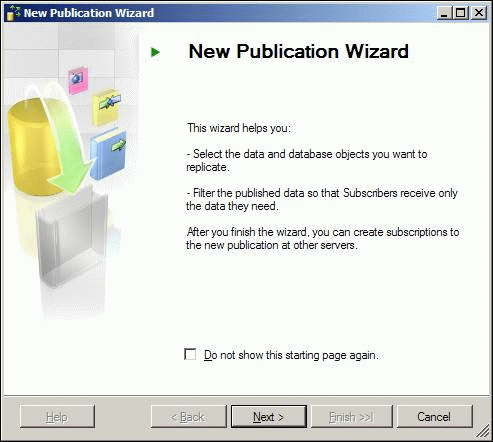
Figure 28. The New Publication Wizard
-
Click Next.
-
On the Distributorpage, be sure computer name will act as its own Distributor; SQL Server will create a distribution database and logis selected, where your computer's name replaces the italicized text, as shown in Figure 29.
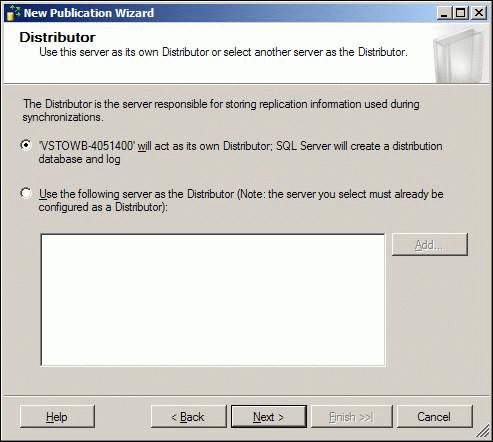
Figure 29. The Distributor page
-
Click Next.
Note:If the Snapshot Folderpage does not appear, your computer has already been configured for merge distribution. If you are sure that your Windows user account has permissions to read the network snapshot share, you may skip to Step 19; however, it is highly recommended for the purposes of this lab to configure merge distribution as described in the following steps. -
On the Snapshot Folderpage, make a note of the Snapshot foldervalue or copy it to Clipboard (by pressing CTRL+C), as shown in Figure 30.
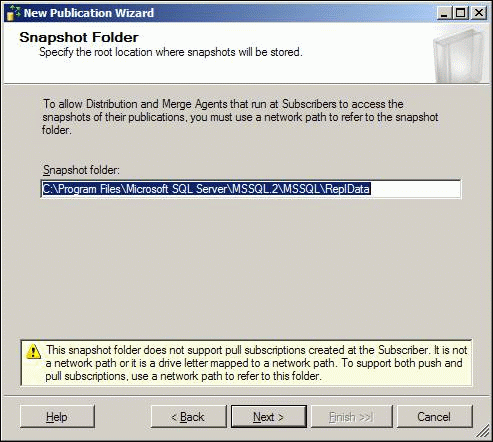
Figure 30. The Snapshot Folder page
-
On the desktop computer, click Start| Run.
-
On the Snapshot folderpage of the wizard, copy the path from Snapshot folderbox.
-
In the Rundialog box, paste the path into the Openbox, and then click OK, as shown in Figure 31.
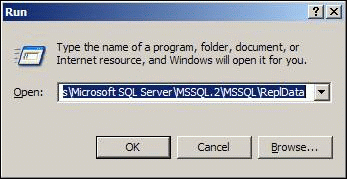
Figure 31. The Run dialog box
-
In the Windows Explorer window, click Tools| Folder Options.
-
In the Folder Optionsdialog box, click the Viewtab, and then scroll to the bottom of the Advanced settingslist.
-
Be sure to clear the Use simple file sharing (Recommended)option, and then click OK, as shown in Figure 32.
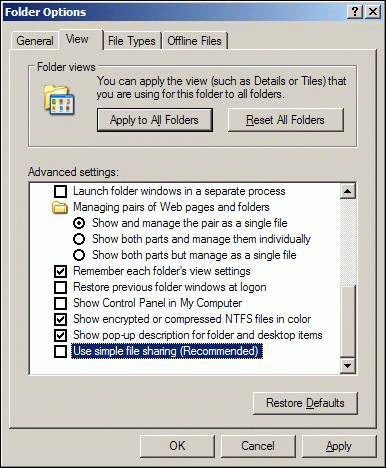
Figure 32. The Folder Options dialog box
-
Right-click anywhere in the blank area of the Windows Explorer file and folder area (it is probably empty), and then click Properties.
-
In the Propertiesdialog box, click the Sharingtab, and then select Share this folder, as shown in Figure 33.
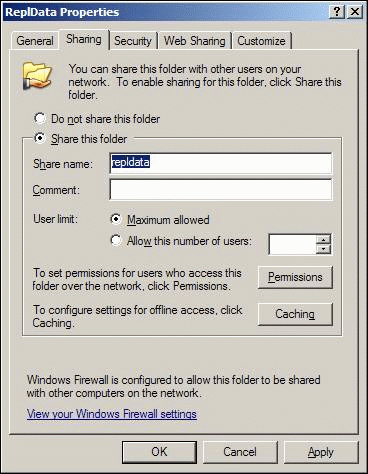
Figure 33. Sharing a folder
-
Click OK, and then close the Windows Explorer window.
-
In the New Publication Wizard, click Nexton the Snapshot Folderpage.
-
On the Publication Databasepage, be sure AdventureWorksis selected as the publication database, as shown in Figure 34, and then click Next.
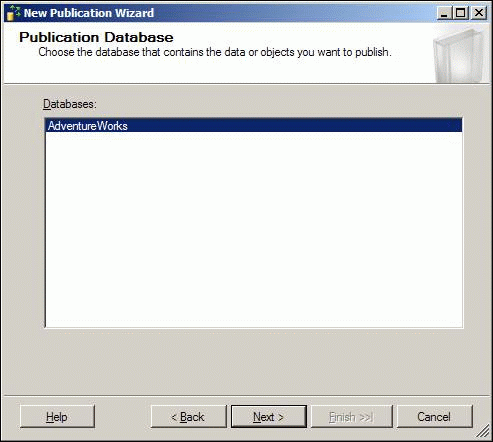
Figure 34. The Publication Database page
-
On the Publication Typepage, select Merge publicationas the Publication type, and then click Next, as shown in Figure 35.
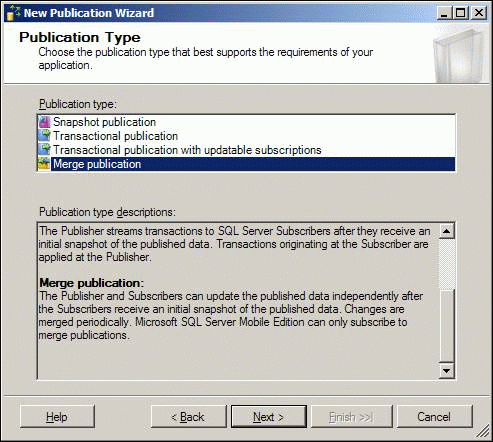
Figure 35. Selecting a publication type
-
On the Subscriber Typespage, clear the SQL Server 2005option, and then select SQL Server 2005 Mobile Edition, as shown in Figure 36. Click Next.
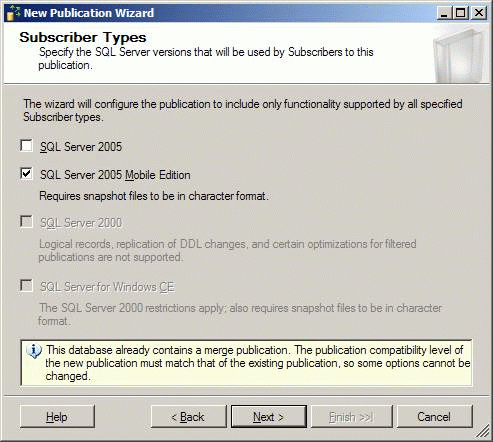
Figure 36. The Subscriber Types page
-
On the Articlespage under Objects to publish, expand Tables, select Vendor, and then click Next, as shown in Figure 37.
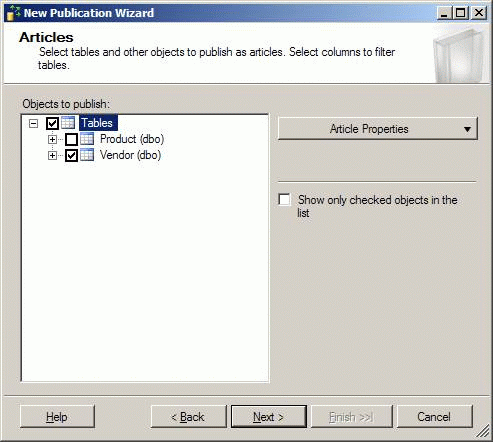
Figure 37. The Articles page
Note:Additional tables may appear in the Objects to publishlist than those in Figure 37. -
On the Article Issuespage, click Nextwhen the Uniqueidentifier columns will be added to tablesissue appears in the list, as shown in Figure 38.
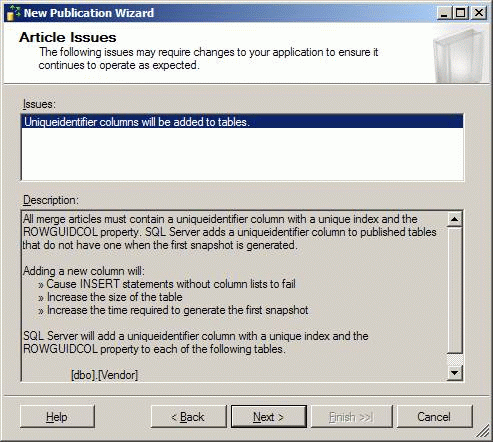
Figure 38. The Article Issues page
-
On the Filter Table Rowspage, click Nextto indicate that no row filtering is necessary, as shown in Figure 39.
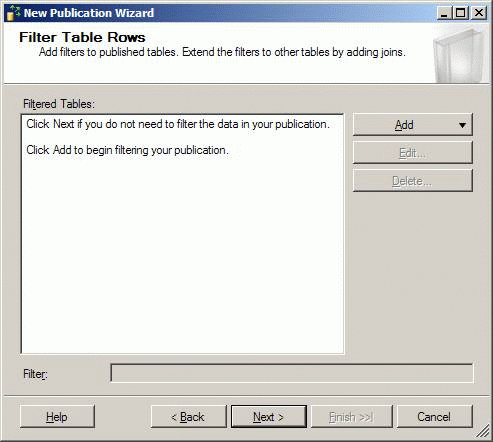
Figure 39. The Filter Table Rows page
-
On the Snapshot Agentpage, clear the Schedule the Snapshot Agent to run at the following timesoption, and be sure that Create a snapshot immediatelyis selected, as shown in Figure 40. Click Next.
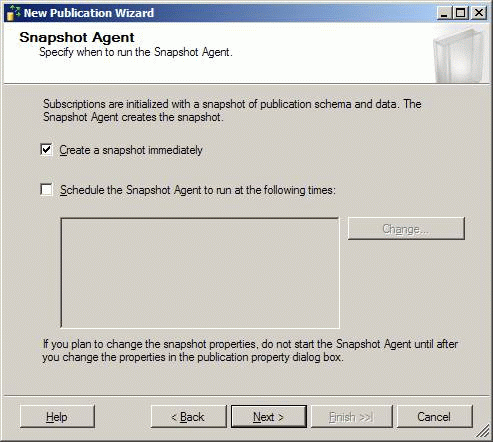
Figure 40. The Snapshot Agent page
-
Click the Security Settingsbutton to display the Snapshot Agent Securitydialog box.
-
Select the Run under the SQL Server Agent service accountoption, and then click OK, as shown in Figure 41.
Note:Step 29 is not a recommended security practice, but for the purpose of simplicity in this lab, use this setting. 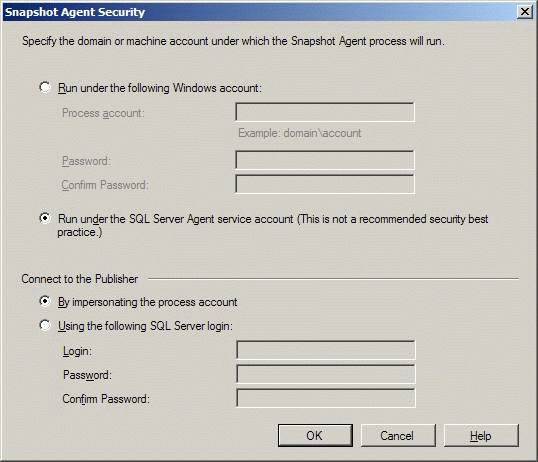
Figure 41. The Snapshot Agent Security dialog box
-
On the Agent Securitypage, click Next, as shown in Figure 42.
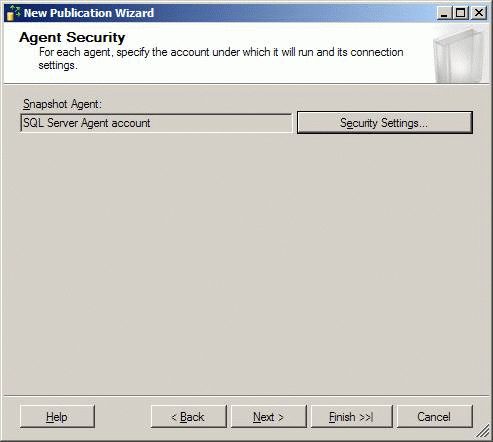
Figure 42. The Agent Security page
-
On the Wizard Actionspage, be sure that Create the publicationis selected, and be sure that the Generate a script file with steps to create the publicationoption is clear, and then click Next, as shown in Figure 43.
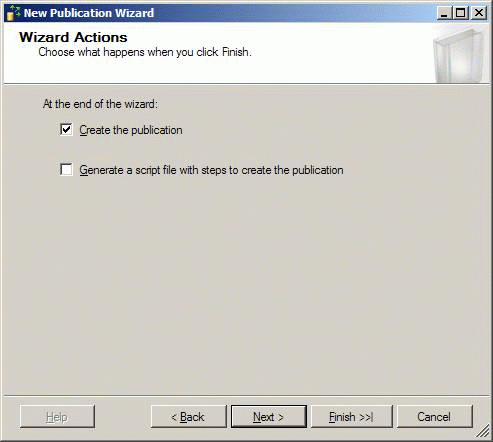
Figure 43. The Wizard Actions page
-
On the Complete the Wizardpage, type AdvWorksMobileas the Publication name, and then click Finish, as shown in Figure 44.
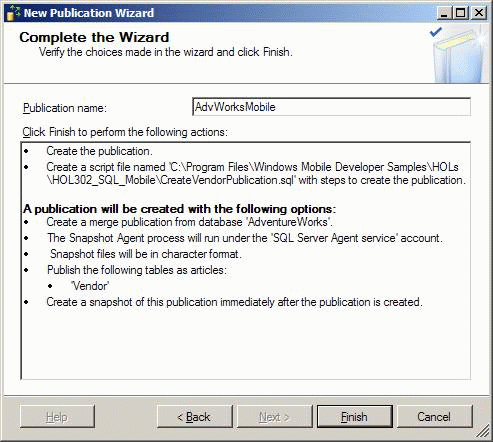
Figure 44. The Complete the Wizard page
-
Wait for the publication wizard to finish successfully, and then click Close, as shown in Figure 45.
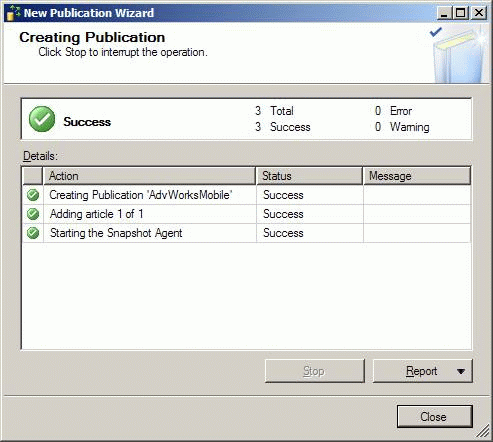
Figure 45. The New Publication Wizard successfully finishes
-
In the SQL Server Management Studio Object Explorer pane, expand Local Publications to reveal the newly created publication.
-
Right-click the new [AdventureWorks]: AdvWorksMobilepublication, and then click Configure Web Synchronization.
The Configure Web Synchronization Wizardappears, as shown in Figure 46.
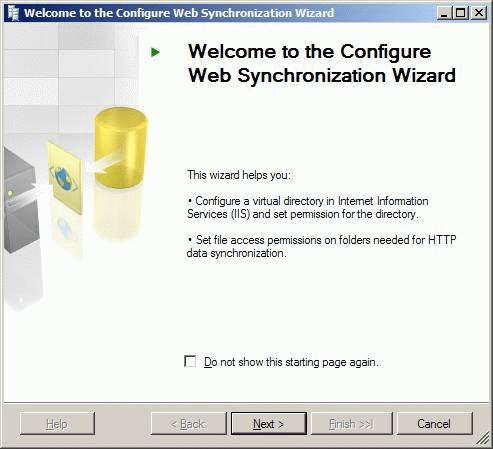
Figure 46. The Welcome page for the Configure Web Synchronization Wizard
-
Click Next.
-
On the Subscriber Typepage, select SQL Server Mobile Edition, and then click Next, as shown in Figure 47.
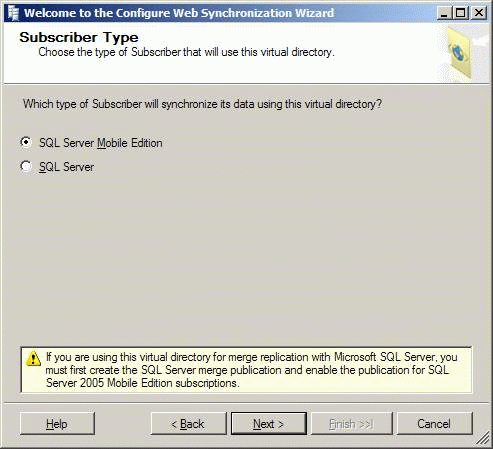
Figure 47. The Subscriber Type page
-
On the Web Serverpage, be sure your computer name appears in the Enter the name of the computer running IISbox.
-
Select Create a new virtual directory.
-
Under Select the Web site in which to create the new virtual directory, expand the local computer, expand Web Sites, and then select Default Web Site, as shown in Figure 48. Click Next.

Figure 48. The Web Server page
-
On the Virtual Directory Informationpage in the Aliasbox, type AdvWorksMobilefor the virtual directory that will be created, and then click Next, as shown in Figure 49.
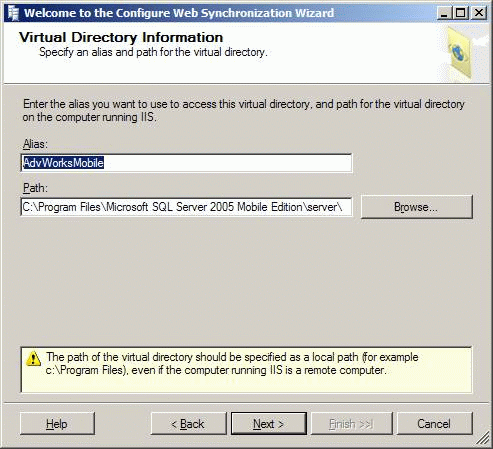
Figure 49. The Virtual Directory Information page
-
If you are prompted with a message that says The folder does not exist, click Yesto create the folder.
-
If you are prompted with a message that says This folder does not contain a copy of the SQL Mobile Server Agent, click Yesto copy and register the agent.
-
On the Secure Communicationspage, leave the Do not require secure channel (SSL)option selected, and then click Next, as shown in Figure 50.

Figure 50. The Secure Communications page
-
On the Client Authenticationpage, select the Clients will connect anonymouslyoption, and then click Next, as shown in Figure 51.
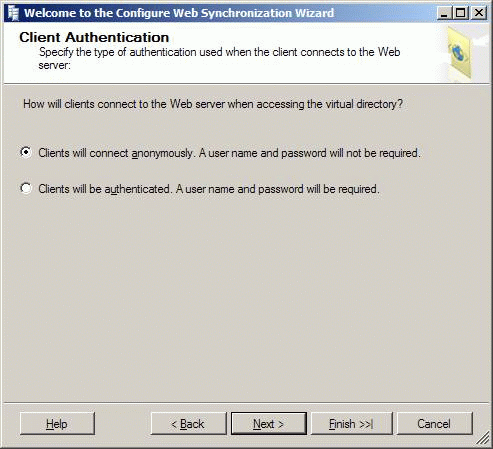
Figure 51. The Client Authentication page
-
On the Anonymous Accesspage, leave the default values, and then click Next, as shown in Figure 52.
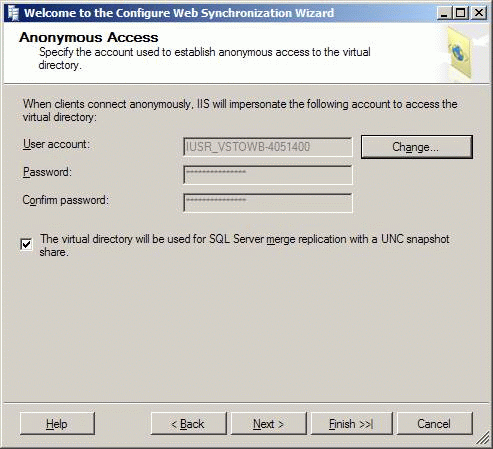
Figure 52. The Anonymous Access page
-
On the Snapshot Share Accesspage in the Sharebox, type \\your_computer's_name\ repldata, where your computer's name replaces the italicized text, as shown in Figure 53. The share name, repldata, corresponds to the merge distribution share that you created in the previous procedure. Click Next.
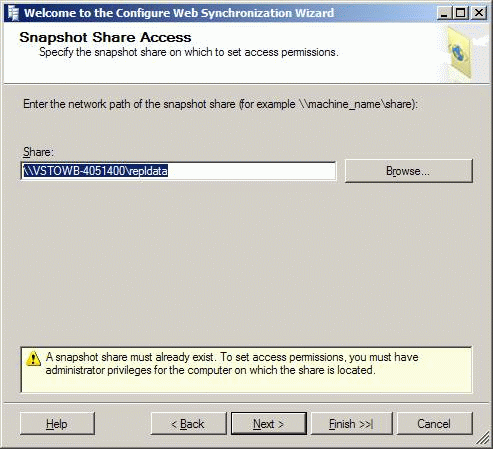
Figure 53. The Snapshot Share Access page
-
On the Complete the Wizardpage, click Finishto complete the configuration.
-
After the Configure Web Synchronization Wizardcompletes successfully, click Close, as shown in Figure 54.
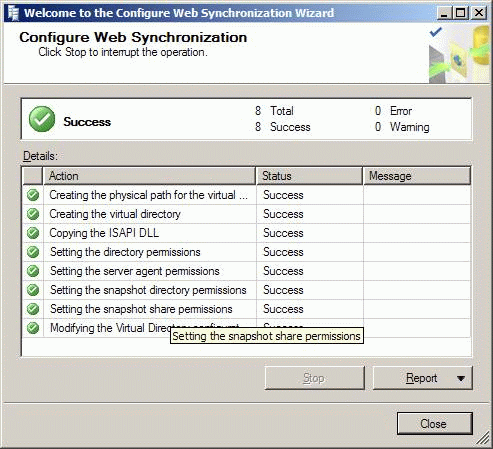
Figure 54. The Configure Web Synchronization Wizard successfully finishes
Because the publication's virtual directory will be accessed anonymously, you need to allow your computer’s anonymous Internet user account to access the SQL Server publication database.
|
Note: |
|---|
| The following procedure is not necessarily a recommended security practice, but it meets the demonstration purposes of this lab. In a production system, you would use some form of authentication to identify the users who access the publication database based on the security requirements of your system. |
-
In the SQL Server Management Studio Object Explorerpane, right-click the Securityfolder, and then click New| Login.
-
In the Login - Newwindow, click the Searchbutton.
-
In the Select User or Groupdialog box, click the Advancedbutton.
-
Click the Find Nowbutton.
-
Scroll through the list of names, and then select the name that starts with IUSR_and contains your computer's name, as shown in Figure 55.
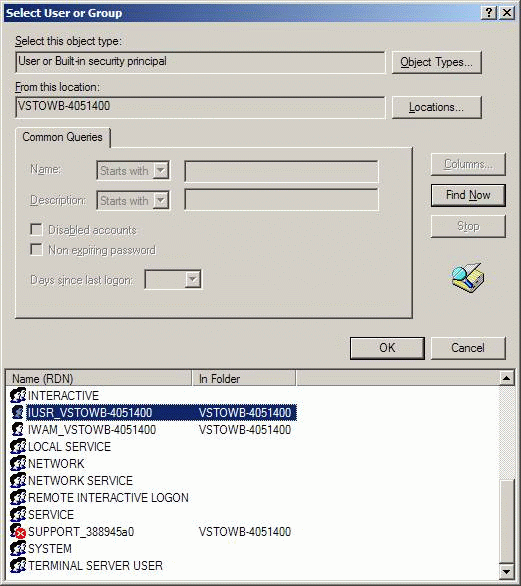
Figure 55. The Select User or Group dialog box
-
Click OK.
-
Click OK. The name of the user that you selected in Step 5 is displayed in the Login namebox, as shown in Figure 56.
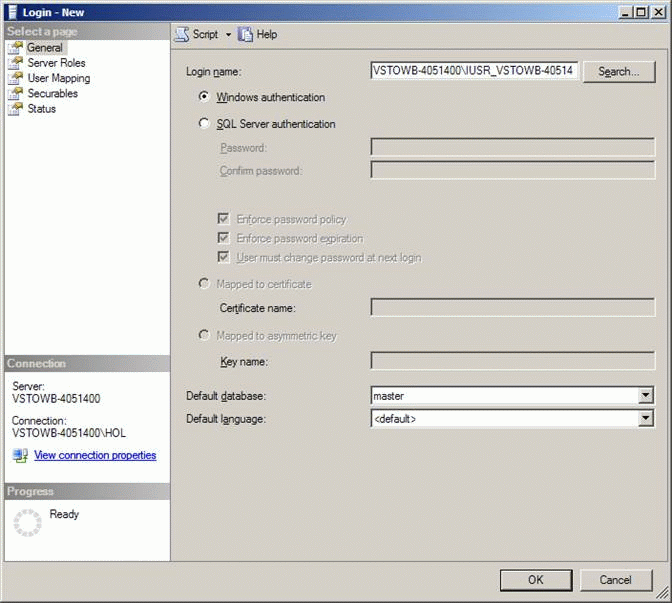
Figure 56. The Login name box is populated with your selection
-
Under Select a page, select User Mapping.
-
Under Users mapped to this login, select the Mapcolumn to the left of AdventureWorks.
-
In the Database role membershipbox, be sure MSmerge_PAL_roleand publicare selected, as shown in Figure 57.
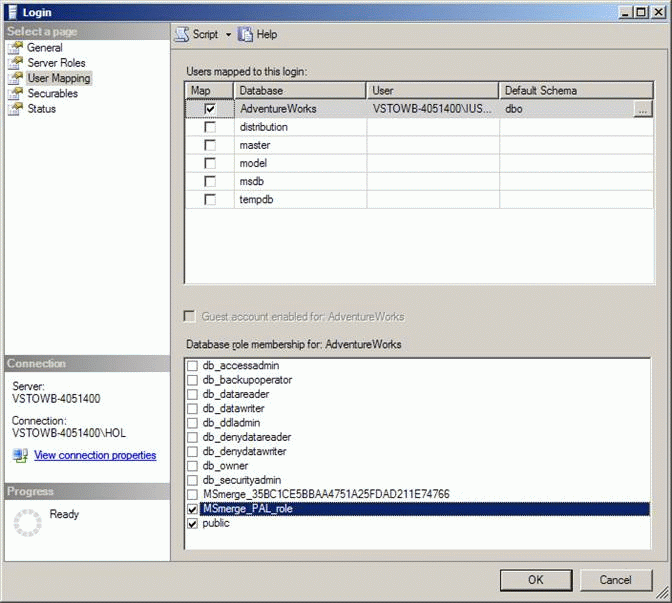
Figure 57. The user mapping settings in the Login window
-
Click OK.
-
In the Object Explorerpane, expand Replication| Local Publicationsif it is not already expanded.
-
Right-click the [AdventureWorks]: AdvWorksMobilepublication, and then click Properties.
-
Select the Publication Access Listpage, and then click the Addbutton.
-
In the Add Publication Accessdialog box, select the anonymous Internet user ( IUSR_*), and then click OK, as shown in Figure 58.
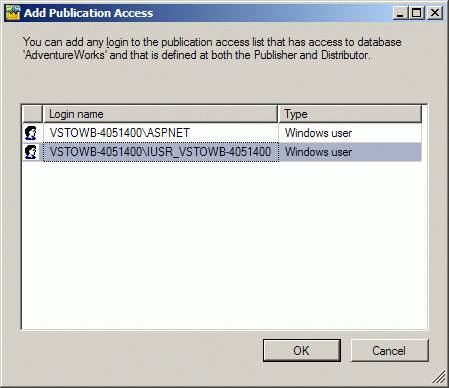
Figure 58. The Add Publication Access dialog box
-
Confirm that the user has been added to the Publication access list, and then click OK, as shown in Figure 59.

Figure 59. Verifying that a user has been added to the publication access list
Now that you have created a publication and configured the Web server and database for replication, you can programmatically subscribe to the publication and synchronize data in your application. Instead of connecting your application’s data source to the SQL Mobile database file that you created manually in Exercise 1, you will now connect to a SQL Mobile database that will be created and populated from the AdvWorksMobile publication. Because the schema of the Vendor table that you created in the previous exercise is compatible with that of the Vendor table in the AdventureWorks database, you can simply swap the new database for the old one.
-
If it is not already running, start Visual Studio by clicking Start| All Programs| Microsoft Visual Studio 2005| Microsoft Visual Studio 2005.
-
Click File| Open| Project/Solution.
-
Browse to C:\Program Files\Windows Mobile Developer Samples\HOLs\HOL302_SQL_Mobile\Exercises\Exercise2\AdvWorksMobile, and then select AdvWorksMobile.sln. Click Open. This is a copy of the solution that you created in Exercise 1.
-
In Solution Explorer, double-click VendorList.csto open the form designer.
-
Click the light blue area above the right soft key. The area changes to gray and contains the text Type Here.
-
Click the same area again to turn it dark blue, so you can replace the Type Heretext, as shown in Figure 60.

Figure 60. Preparing to change the soft key's text
-
Type the word Menu, and then press ENTER. This menu will provide multiple synchronization functions.
-
Type Init Sync, and then press ENTER. This command will be used to create a synchronized copy of the vendor data and display it to the user.
-
Type Sync, and then press ENTER. This command will be used to synchronize the database that has already been created via the Init Synccommand.
-
Verify that the menu editor now looks like Figure 61.
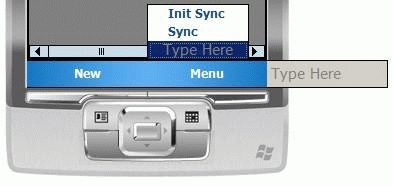
Figure 61. The commands for the right soft key
-
Right-click the Init Synccommand, and then click Properties.
-
Change the (Name)property to menuInitSync.
-
In the same way, change the Synccommand's (Name)property to menuSync.
-
Double-click the Init Synccommand to create a click event handler for the command. The Code view opens.
-
Return to the form designer, and then double-click the Synccommand to create a click event handler for it. You will add code to the event handlers that you have just created in a few steps.
-
Locate the usingstatements at the beginning of the file, and then add the following three usingstatements.
Copy Code
using System.Data.SqlServerCe;
using System.IO;
using System.Reflection;
-
Declare a class-level variable of type SqlCeReplicationthat is named _repl. A good place to put the following line of code is near the beginning of the VendorListclass.
Copy Code
SqlCeReplication _repl = new SqlCeReplication();
-
Create a private read-only string property named DataFileName, as shown in the following code example.
Copy Code
private string DataFileName
{
	get { return Path.ChangeExtension(
			Assembly.GetExecutingAssembly().GetName().CodeBase,
".sdf"); }
}
This property generates and returns the name of the SQL Mobile database file that will be created and updated with subscription data. It uses the System.IO.Path.ChangeExtension()method and System.Reflection.Assembly.GetExecuting.Assembly(). GetName().CodeBaseproperty to generate the path and name for the database file. The database file is stored in the same folder and has the same base file name as the application’s assembly with an .sdf extension added.
-
Create another private read-only string property named DataSourceConnectionStringto generate and return the data source connection string for the SQL Mobile database, as shown in the following code example.
Copy Code
private string DataSourceConnectionString
{
	get { return string.Format("Data Source = {0};",
this.DataFileName); }
}
This code uses the DataFileNameproperty that you just created and returns a string in the format expected for a connection string to a SQL Mobile database.
-
Create a private boolmethod named Connectthat conditionally connects to the SQL Mobile database, as shown in the following code example.
Copy Code
private bool Connect()
{
	if (File.Exists(this.DataFileName))
	{
		this.vendorTableAdapter.Connection =
			new SqlCeConnection(this.DataSourceConnectionString);
		return true;
}
	else
		return false;
}
This code uses the DataFileNameproperty that you just created and the System.IO.Fileclass’s Existsmethod to check if the SQL Mobile database file is available for connection. If it is available, the connection is made between the SQL Mobile database and the vendorTableAdaptertable adapter and a value of true is returned; otherwise, falseis returned.
-
Create a private method named GetDatathat uses the vendorTableAdaptertable adapter to fill the advWorksDataSetdata set from the SQL Mobile database, as shown in the following code example.
Copy Code
private void GetData() { this.vendorTableAdapter.Fill(this.advWorksDataSet.Vendor); } -
Likewise, create a private method named SaveDatathat uses the vendorTableAdaptertable adapter to save the advWorksDataSetdata set contents to the SQL Mobile database, as shown in the following code example.
Copy Code
private void SaveData() { this.vendorTableAdapter.Update(advWorksDataSet); } -
Create a private method named InitReplicationthat sets up the _repl SqlCeReplicationobject, as shown in the following code example.
Copy Code
private void InitReplication()
{
	_repl.InternetUrl =
@"http://vstowb-4051400/AdvWorksMobile/sqlcesa30.dll";
	_repl.Publisher = @"VSTOWB-4051400";
	_repl.PublisherDatabase = @"AdventureWorks";
	_repl.PublisherSecurityMode = SecurityType.NTAuthentication;
	_repl.Publication = @"AdvWorksMobile";
	_repl.Subscriber = @"AdvWorksMobile";
	_repl.SubscriberConnectionString =
this.DataSourceConnectionString;
}
This code applies several property values to the _replobject to set it up for proper merge replication.
The InternetUrlproperty should contain the name of the computer that has been set up as the merge publication Web share, and it needs to end with sqlcesa30.dll. Be sure to replace the italicized your_computer_namewith your computer’s actual name or IP address. Be aware that because this code will run on a device or emulator—and not your computer—you cannot use localhosthere.
Set the Publisher property to be the name of the database server that has been set up as the publisher, again replacing the italicized your_computer's_namewith your computer's name or IP address.
The name of the PublisherDatabaseis the AdventureWorksdatabase that was set up for replication.
The PublisherSecurityModeis set to SecurityType.NTAuthentication, so the IUSR_* user is automatically logged in to the publishing database server.
The Publicationproperty is set to the name of the publication that you previously created: AdvWorksMobile.
The Subscriberis named the same as the publication for simplicity.
The SubscriberConnectionStringuses the DataSourceConnectionStringproperty that you previously created to connect to the device’s SQL Mobile database.
It is no longer desirable to load the locally stored data that you created manually in Exercise 1 when the application starts.
-
Locate the VendorList_Loadmethod, and then comment out or remove the line of code that fills the vendorTableAdaptertable adapter, as shown in the following code example.
Copy Code
//this.vendorTableAdapter.Fill(this.advWorksDataSet.Vendor);
-
In its place, add the following code that calls the InitReplication, Connect, and GetDatamethods that you previously created to retrieve any data that may exist.
Copy Code
	this.InitReplication();
	if (this.Connect())
		this.GetData();
-
Create a private method named SyncVendorsthat commits any pending data changes in the advWorksDataSetDataSet to the SQL Mobile database, synchronizes the data via merge replication, and rebinds the synchronized data to the advWorksDataSet DataSet, as shown in the following code example. This should all be conditional upon the existence of the SQL Mobile database file.
Copy Code
private void SyncVendors()
{
	if (File.Exists(this.DataFileName))
	{
		this.SaveData();
		_repl.Synchronize();
		this.GetData();
}
	else
		MessageBox.Show("The subscription database has not yet been
created. You must first select the Init Sync menu item.");
}
This code uses the DataFileNameproperty that you previously created and the System.IO.Fileclass’s Existsmethod to determine if synchronization is valid at this point based on the existence of the SQL Mobile database file. Assuming the file exists, the code saves the data to the SQL Mobile database file by using the SaveDatamethod that you created. Next, it calls the _replobject’s Synchronize method to make changes in both the publishing SQL Server database and the subscribing SQL Mobile database. All modifications made in the local SQL Mobile database are applied to the SQL Server database, and any modifications that have been made to the SQL Server data are applied to the SQL Mobile database. Finally, it retrieves the updated data by using the GetDatamethod that you created.
If the database file does not yet exist, the code gives the user feedback and instructions to first initialize the synchronization.
-
Locate the empty menuInitSync_Clickmethod. Add the following code to create a subscription to the merge publication and synchronize the data for the first time.
Copy Code
	bool okToContinue = !File.Exists(this.DataFileName);

	if (!okToContinue)
		okToContinue = MessageBox.Show("The SQL Mobile database
already exists on this device and will be overwritten. Continue?",
			"Warning", MessageBoxButtons.YesNo,
MessageBoxIcon.Exclamation,
			MessageBoxDefaultButton.Button1) == DialogResult.Yes;

	if (okToContinue)
	{
		File.Delete(this.DataFileName);
		_repl.AddSubscription(AddOption.CreateDatabase);
		this.Connect();
		this.SyncVendors();
}
Before the subscription is synchronized, this code checks for and deletes any existing SQL Mobile database file using the System.IO.Fileclass’s FileExistsand Deletemethods, first giving the user a chance to cancel the initialization if the user doesn’t want to delete the existing subscription data.
Next, the _repl AddSubscriptionmethod is called with the CreateDatabase AddOptionenumeration value to create the SQL Mobile database file and set it up for synchronization.
Now that the SQL Mobile database file exists, the Connectmethod that you previously created is used to connect to it.
Finally, the code calls the SyncVendorsmethod that you created to perform the first actual synchronization. During this first synchronization, the table is created in the SQL Mobile database with the same schema it has on the server. The data from the SQL Server table is downloaded into the table that is contained in the SQL Mobile database. At the end of the synchronization, the table in the SQL Server database and the table in the SQL Mobile database have the same data.
-
Locate the VendorList_Closingevent handler, and then replace the call to the vendorTableAdapter.Updatemethod with the following code.
Copy Code
	this.SaveData();
	_repl.Dispose();
This code uses the SaveDatamethod that you created, which now has the code to update the SQL Mobile database. The code also properly disposes of the _replobject’s resources after they are no longer needed.
-
Locate the menuSync_Clickmethod, and then add a line of code that calls the SyncVendorsmethod. This option allows the user to initiate synchronization.
Copy Code
this.SyncVendors();
To enable the emulator to connect to the merge publication Web site that is running on your local computer, you need to provide the emulator with network connectivity. The easiest way to provide network connectivity is to use ActiveSync 4.0 or later to connect to the emulator. This is a newly provided feature of Visual Studio 2005 and ActiveSync 4.0.
-
On the desktop computer, click Start| All Programs| Microsoft ActiveSync.
-
In ActiveSync, click File| Connection Settings.
-
In the Connection Settingsdialog box, select Allow connections to one of the following, if it is not already checked, and then select DMAin the corresponding list.
-
Click OK.
ActiveSync is now able to connect to the emulators and physical devices. The next step is to connect and cradle the emulator by using the new Visual Studio 2005 Device Emulator Manager.
-
In Visual Studio, click Tools| Device Emulator Manager.
-
In Device Emulator Manager, scroll to and select Windows Mobile 5.0 Pocket PC Emulator. You may have to expand the Windows Mobile 5.0 Pocket PC SDKnode to locate Windows Mobile 5.0 Pocket PC Emulator.
-
If there is not already a green arrow next to Windows Mobile 5.0 Pocket PC Emulator, click Actions| Connect in Device Emulator Manager. A green arrow should appear next to Windows Mobile 5.0 Pocket PC Emulator.
-
With Windows Mobile 5.0 Pocket PC Emulatorstill selected, click Actions| Cradlein Device Emulator Manager.
ActiveSync should begin the connection process, which may take a minute or two.
-
If the Microsoft Office Outlookdialog box appears, click OK.
-
If the Microsoft ActiveSyncdialog box appears, click OK.
-
On the Synchronizing Setup Wizardpage, click Cancel.
Clicking Cancelestablishes connectivity between the emulator and the desktop computer without requiring that ActiveSync be configured to keep files and Microsoft Office Outlook® information on the emulator and desktop computer synchronized.
You are now ready to test the application.
-
In Visual Studio, click Debug| Start Debugging.
-
In the Deploy AdvWorksMobiledialog box that appears, be sure Windows Mobile 5.0 Pocket PC Emulatoris selected, and then click Deploy.
-
When the application appears in the emulator, click Menu.
-
Click the Init Synccommand. After going through the synchronization setup and actual synchronization, the emulator displays the updated vendor list, as shown in Figure 62.

Figure 62. The updated vendor list in the emulator
-
Click the first vendor row (with a Vendor IDof 1) to display the summary screen.
-
Click the Editcommand, and then wait for the Editscreen to appear.
-
Change some of the data values, and then click OKto save your data changes.
-
Verify that your changes are reflected in the DataGrid.
-
Click New.
-
When the Editscreen appears, fill in the fields with new data, and then click OK.
-
Verify that your new record appears in the DataGrid.
-
Return to SQL Server Management Studio, and then connect to your computer’s SQL Server database engine if it is not already connected.
-
In the Object Explorerpane, expand Databases| AdventureWorks| Tables.
-
Right-click the Vendortable (it may have a prefix), and then click Open Table.
-
Browse to the second vendor (with a VendorIDof 2), and then change the AccountNumberand Nameto new values, like those in Figure 63.
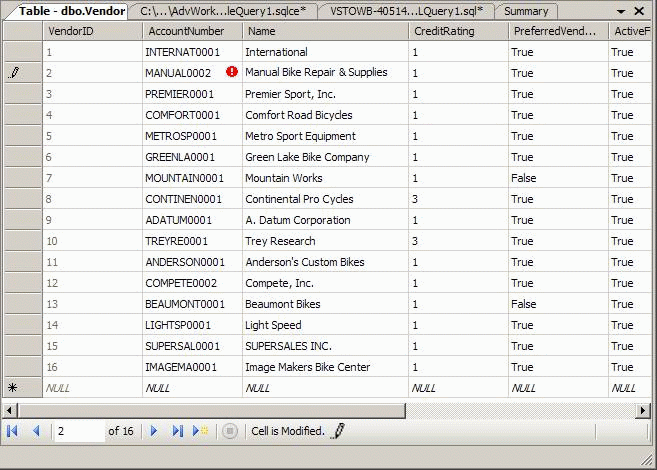
Figure 63. Changing the second vendor's account number and name
-
Use the mouse or arrow keys to browse to another row in the table to save your changes. The editing pencil icon disappears from the left column.
-
Browse to the new row (with an asterisk in the left column), and then add a new record. You don’t need to add values for the VendorIDcolumn or any columns beyond and including the ModifiedDatecolumn. The merge replication procedure created the additional rowguidcolumn to identify records for replication. The column’s value is generated automatically.
-
Browse to another row to save your new record.
-
In the application on the emulator, click Menu| Syncto synchronize the data in the SQL Server and SQL Mobile Vendor tables. Be sure you click Syncthis time, and not Init Sync. Selecting Init Syncwould delete and recreate the SQL Mobile database rather than synchronizing it with the SQL Server database.
-
After the synchronization is complete, view the list of records in the device application’s DataGrid. Verify that the changes you made on the device and on the server by using SQL Server Management Studio are reflected on the device.
-
On the vendor table in SQL Server Management Studio, click Query Designer| Execute SQLto refresh the data, and then verify that the changes you made in both places are reflected on the server as well.
-
On the emulator, click OKto close the application.
In this exercise, you have learned how to use merge replication to synchronize data between a SQL Mobile database and a back-end SQL Server database, retaining a fully functional mobile application that only needs to connect to a network for synchronization.
Exercise 3: Synchronizing Data Between Any Back-end Database and SQL Mobile Database Using a Web Service
In this exercise, you will modify your application to synchronize its SQL Mobile data with any back-end data store using a Web service.
|
Note: |
|---|
| For the purposes of this exercise, the Web service synchronization will only be one way—from the SQL Mobile database to the SQL Server database. A more full-featured implementation would synchronize data both ways, but the purpose of this exercise is to demonstrate how simple it is to use a Web service as the mechanism for transmitting data from a mobile device to a back-end data store. |
-
If it is not already running, start Visual Studio by clicking Start| All Programs| Microsoft Visual Studio 2005| Microsoft Visual Studio 2005.
-
Click File| Open| Project/Solution.
-
Browse to C:\Program Files\Windows Mobile Developer Samples\HOLs\HOL302_SQL_Mobile\Exercises\Exercise3\AdvWorksMobile, and then select AdvWorksMobile.sln. Click Open. This is a copy of the solution that you created in Exercise 2.
-
In Solution Explorer, right-click References, and then click Add Web Reference.
The Add Web Referencedialog box appears, as shown in Figure 64.
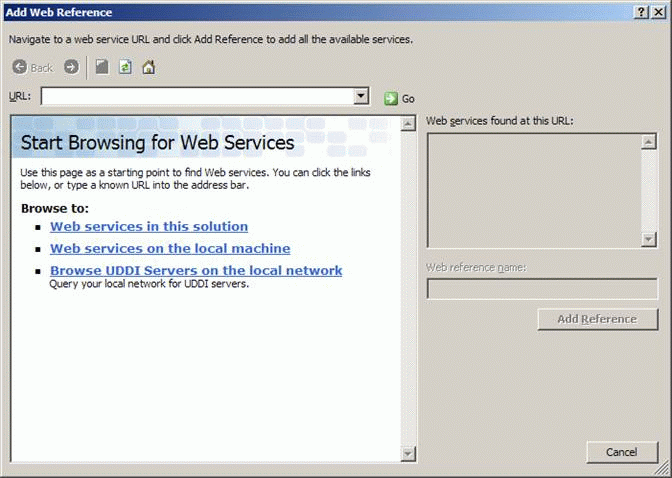
Figure 64. The Add Web Reference dialog box
-
In the URLbox, type http ://your_machine_name/ AdvWorksServices/DataService.asmx, replacing the italicized text with your computer's name, and then click Go.
The Web service that appears is a simple service that was installed with the files for this HOL. As you will see, the Web service provides Createand Updatemethods that accept an AdvWorksDataSet.VendorDataTable DataTablewhose schema is compatible with the AdvWorksDataSet.VendorDataTablein your mobile application. The Create method expects to receive any new records that the caller has added since the last synchronization, and the Updatemethod expects to receive any records the caller has updated since the last synchronization.
-
In the Web reference namebox, type AdvWorksServices, and then click Add Reference, as shown in Figure 65.
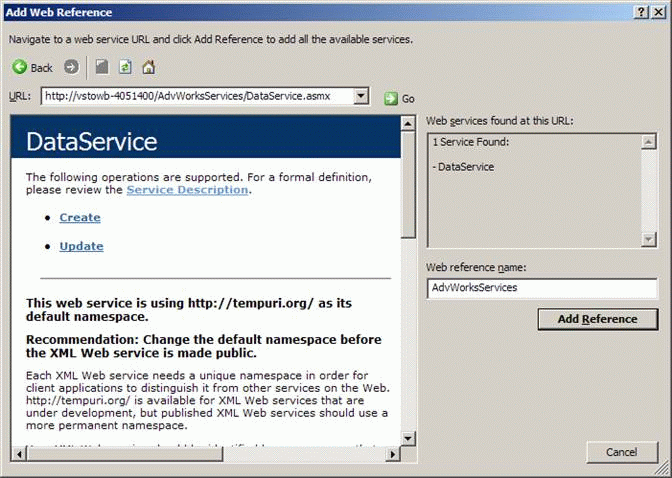
Figure 65. Providing a Web reference name
-
Verify that the AdvWorksServicesWeb service appears in Solution Explorerunder Web References, as shown in Figure 66.
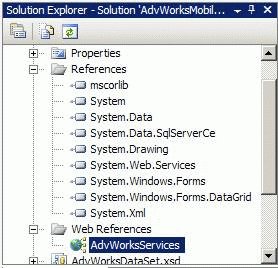
Figure 66. Verifying the new Web reference is in Solution Explorer
-
In Solution Explorer, double-click VendorList.csto open the form designer.
-
Click Menuabove the right soft key to reveal the commands.
-
Click the gray Type Heretext below the Synccommand to turn it dark blue, so you can replace the default text, as shown in Figure 67.
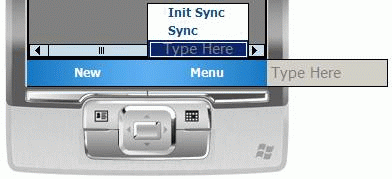
Figure 67. Replacing the default text
-
Type Sync with WS, and then press ENTER. This command will be used to synchronize your data with a Web service.
-
Verify that the menu editor now looks like Figure 68.
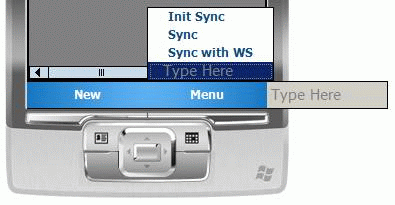
Figure 68. The Sync with WS command is added to the menu
-
Right-click the Sync with WS command, and then click Properties.
-
Change the (Name)property to menuSyncWS.
-
Double-click the Sync with WScommand to create a click event handler. The Code view opens.
-
In the menuSyncWS_Clickevent handler, add the following code.
Copy Code
	AdvWorksServices.DataService advWorksDataService =
		new AdvWorksMobile.AdvWorksServices.DataService();

	DataTable addedRows =
		advWorksDataSet.Vendor.GetChanges(DataRowState.Added);
	if (addedRows.Rows.Count > 0)
	{
		AdvWorksServices.AdvWorksDataSet.VendorDataTable
			addedRowsForService =
			new AdvWorksServices.AdvWorksDataSet.VendorDataTable();
		addedRowsForService.Merge(addedRows);
		advWorksDataService.Create(addedRowsForService);
}

	DataTable modifiedRows =
		advWorksDataSet.Vendor.GetChanges(DataRowState.Modified);
	if (modifiedRows.Rows.Count > 0)
	{
		AdvWorksServices.AdvWorksDataSet.VendorDataTable
			modifiedRowsForService =
			new AdvWorksServices.AdvWorksDataSet.VendorDataTable();
		modifiedRowsForService.Merge(modifiedRows);
		advWorksDataService.Update(modifiedRowsForService);
}

	this.SaveData();
This code begins by creating an instance of the AdvWorksMobile.AdvWorksServices.DataServiceWeb service proxy class that was generated when you referenced the Web service.
Next, the code creates a DataTable that contains any newly added rows from the advWorksDataSetVendor DataTable by calling the GetChangesmethod with the DataRowState.Addedenumeration value. If any new rows exist, they’re merged into an AdvWorksServices.AdvWorksDataSet.VendorDataTable DataTableand passed to the Web service’s Createmethod.
The code then similarly retrieves any modified records using the DataRowState.Modifiedenumeration value, and then passes them to the Web service’s Updatemethod.
Finally, the code saves the additions and modifications to the SQL Mobile database file by using the SaveDatamethod that you created.
Before you can test the application, you need to be sure the emulator can connect to the network in such a way that it can call the Web service.
-
If the emulator is not already running, follow the steps in the "To establish connectivity between the emulator and the desktop computer" procedure in Exercise 2.
-
On the emulator, click the Connectivityicon at the top of the screen. The Connectivityballoon appears. Figure 69 shows the Connectivityballoon pointing to the Connectivityicon.
Figure 69. The Connectivity balloon points to the Connectivity icon
-
Click Settings, and then click the Connectionsicon.
-
Click the Advancedtab, and then click the Select Networksbutton.
-
Be sure that My ISPis selected in both drop-down lists, and then click OK.
-
Click OK, and then click the close button at the top right of the Settingsscreen.
You are now ready to test the new application feature.
-
In Visual Studio, click Debug| Start Debugging.
-
In the Deploy AdvWorksMobiledialog box that appears, be sure Windows Mobile 5.0 Pocket PC Emulatoris selected, and then click Deploy.
Note:If you skipped Exercise 2, you will need to be sure the emulator is connected and cradled as described in the "To establish connectivity between the emulator and the desktop computer" procedure. -
Use the application’s user interface to edit and create new data in the SQL Mobile database as you did in the "To test application features" procedure in Exercise 2.
Note:If you skipped Exercise 2, you will need to use ActiveSync’s Explore button to locate \Program Files\AdvWorksMobile\Vendors.sdfon the emulator, and then rename it to AdvWorksMobile.sdf. After doing so, click OKto close the application on the emulator, and then restart this procedure at Step 1. -
Click Menu| Sync with WSto synchronize your local changes with the back-end data store via the Web service.
-
Because the back-end database in this exercise is the same SQL Server AdventureWorks database that you have been using, use the same SQL Server Management Studio techniques that you used in the "To test application features" procedure in Exercise 2 to verify that the data changes you made on the device are now present on the server.
Conclusion
In this exercise, you modified your application to synchronize its SQL Mobile data with any back-end data store using a Web service.
Conclusion
In this lab, you performed the following exercises:
- Creating and using a SQL Mobile database in a Windows Mobile
5.0 application
- Synchronizing data between a SQL Server 2005 and SQL Mobile
database
- Synchronizing data between any back-end database and SQL Mobile
database using a Web service
In this lab, you learned how to use SQL Mobile to synchronize data between a Windows Mobile–based device and a SQL Server 2005 back-end database using merge replication. You set up and configured SQL Server 2005, IIS, and a .NET Compact Framework application. You also learned how to synchronize SQL Mobile data with any back-end data store using a Web service. These techniques have prepared you to easily build a mobile application that keeps mission-critical data in synchronization with a back-end database.
Terminating an Application That Is Running on a Device or Emulator
This appendix describes how to terminate an application that is running on a device or emulator. This is useful for cases where an application has been started without having the debugger attached and the application needs to be terminated so a new copy of the application can be deployed. You will terminate the application by using the Remote Process Viewer remote tool in Visual Studio.
Before you can terminate a process, you need to know the name of the executable file. In most cases, this is the same name as the Visual Studio project. If you are uncertain about the name of the executable file, you can find it in the project's properties.
-
In Visual Studio, select Project| xxx Properties, where xxxrepresents the name of the current project.
-
In the Project Propertiesdialog box, note the value in the Assembly Namefield. This is the name that the executable file will be running on the device or emulator.
-
Close the Propertiesdialog box.
Now, you can terminate the process.
-
On the desktop computer, click Start| Microsoft Visual Studio 2005| Visual Studio Remote Tools| Remote Process Viewer.
-
When prompted by the Select a Windows CE Devicedialog box, select the emulator or device where the application is running, as shown in Figure 70, and then click OK.
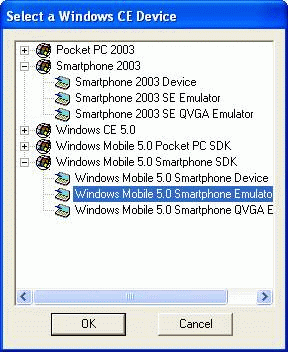
Figure 70. Select a Windows CE Device dialog box
-
After the connection to the emulator or device completes, select the application that you want to terminate in the top pane of the Remote Process Viewer, as shown in Figure 71.
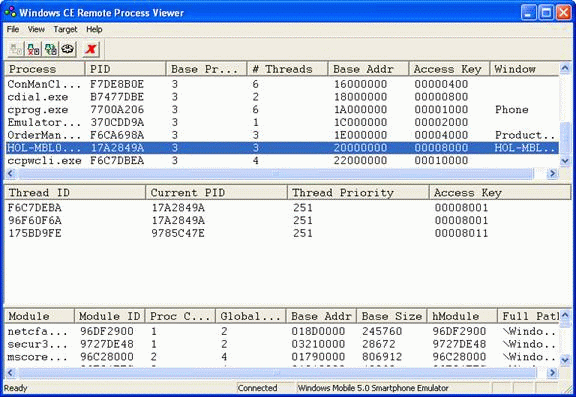
Figure 71. Selecting the application to terminate
You may need to widen the Processcolumn (the leftmost column) to fully view the process names.
-
In Windows CE Remote Process Viewer, click File| Terminate Processto terminate the process.
Note:Be certain that the correct process is selected before you click Terminate Process. Terminating the incorrect process may render the device or emulator unusable, requiring it to be reset before you can use it again. -
Verify that the process is terminated by selecting Target| Refresh. Scroll to the top pane of Windows CE Remote Process Viewer again. If the application name still appears, the process was not terminated, and you need to repeat these steps.
Conclusion
|
Note: |
|---|
| Most processes terminate in one try; however, depending on the state of the application, terminating a process occasionally takes two attempts. |
Setting Up Your Computer
Before you begin this HOL, you need to be sure the following procedures are completed.
-
On the desktop computer, click Start| Control Panel| Add or Remove Programs.
-
In the Add or Remove Programsdialog box, click Add/Remove Windows Components.
-
In the Windows Componentslist, select Internet Information Services (IIS)if it is not already selected, and then continue clicking Nextuntil the Windows Componentswizard is complete.
-
Close the Add or Remove Programsdialog box.
-
Be sure that to perform a hard reset on the emulator if you have used the emulator for a previous HOL.
Conclusion
|
Note: |
|---|
| If you used an emulator in a previous HOL, you should do a hard reset on the emulator before starting this HOL. (On the emulator, click File| Reset| Hard.) |
|
Note: |
|---|
| If you receive an error during deployment that indicates that the process or file is in use, this means that the program is still running on the emulator and must be closed before a new copy can be deployed and run. This error may appear anytime in the HOL that you deploy the emulator. See Appendix A in this HOL for instructions for exiting a running application. |