 Important: Important: |
|---|
| This is retired content. This content is outdated and is no longer being maintained. It is provided as a courtesy for individuals who are still using these technologies. This content may contain URLs that were valid when originally published, but now link to sites or pages that no longer exist. |
Christian Forsberg,
September 2007
 Summary
Learn how to use secure communication in applications that are developed for devices running Windows Mobile 6 Professional or Windows Mobile 6 Standard. After a general discussion about security and the enabling technologies, a sample application and code examples, written in C#, demonstrate practical uses for these technologies including a server XML Web service and client applications for devices running Windows Mobile Professional and Windows Mobile Standard. (16 printed pages)
Download
 Applies To
Windows Mobile 6 Professional
Windows Mobile 6 Standard
Windows Mobile 6 Classic
Microsoft Visual Studio® .NET 2005
Microsoft .NET Compact Framework version 2.0
Device Certificate Installation
Device Certificate Verification
SSL with the .NET Compact Framework
 Introduction
Security, in general, is highly important in any IT solution. The importance of security is especially true for systems that include mobile devices because they often connect by means of public networks (such as General Packet Radio Services [GPRS] and hot spots) outside the safer environment that an intranet provides by using firewalls, spam filters, and so on.
Security can roughly be divided into the following categories:
- Authentication and authorization
- Availability and device management
- Confidentiality and integrity
Authentication means knowing who (users) wants access and
providing proof that users really are who they claim to be. Users
are usually identified with user names, and passwords are most
often the proof. Authorization occurs when authentication is done.
Authorization defines what the identified users are allowed to
access. This information normally resides in an enterprise
directory (such as Active Directory®) and usually involves making
the users belong to user groups (roles) that in turn are assigned
rights to applications and other system resources. For more
information, please see the article
Availability means getting to the information whenever you need it and involves things like server uptime, fail-over clusters, virus protection, and service level agreements (SLAs). Device management means installing and updating applications and data; backing up the data and user settings; restoring a lost device with applications, data, and personal preferences intact; and so on.
Confidentiality and integrity go hand-in-hand because most technologies are implemented to cover both. Confidentiality focuses on preventing data from being available to a user who doesn't have the proper access rights (for example, encryption). Integrity is more about preventing data from being tampered with (for example, check sums). Confidentiality and integrity are also closely related to the authentication because they are often dependent on each other.
When talking about confidentiality, Secure Sockets Layer (SSL) is probably the most important technology; therefore, this article examines this technology in detail.
 SSL
SSL
Netscape developed SSL in 1994 as a result of the growing
concern about security on the Internet. SSL was later converted to
a standard called Transport Layer Security (TLS). Devices running
Windows Mobile Professional and Windows Mobile Standard support
The primary use of the technology was (and still is) to secure the communication between a browser and a Web server (by using HTTP), which also is the focus of this article, but this primary use has been combined with many other technologies for email messages (SMTP), file transfers (FTP), newsgroups (NNTP), and so on. Today, SSL is an accepted standard that is endorsed by the major credit card companies (such as Visa, MasterCard, and American Express) and many other leading financial institutions.
The following is a high-level description about how SSL works:
- A client (normally a browser) requests a secure page (the URL
begins with https://).
- The Web server sends its public key, with its certificate, to
the client.
- The client checks that a trusted party (a Certification
Authority [CA]) issued the certificate, that the certificate is
still valid, and that the certificate is related to the site
contacted.
- The client uses the public key to generate an encryption key,
and sends the encryption key to the server with the URL required
(in an encrypted format).
- The Web server decrypts the encryption key by using its private
key, and then uses the key to decrypt the browser's request. The
Web server sends back the requested data, which is encrypted with
the key.
- The client decrypts the data by using the encryption key, and
uses the information (typically, the client displays the
information through a browser).
Encryption that uses a private and public key pair ensures that the data that one key encrypted can only be decrypted by the other key. The keys have similar formats, and they are based on prime numbers.
A mathematical example can explain how the two different keys can be used. Assume that the public key is five (5), the private key is a fifth (1/5 or 0.2), and the algorithm for encryption was multiplication. If person A wanted to send person B the message three (3), the encrypted message that uses the public key would be 15 (5 x 3). When person B received the message, person B could decrypt it with the private key (15 x 0.2) to get the message three (3).
The key length ensures the difficulty to decrypt the messages. Initially, only 40-bit (5-byte) keys were used, but such keys offer 1,099,511,627,776 possible combinations, which—for a computer—is not really that many. It takes a normal desktop computer a couple of weeks to find a 40-bit key, and it takes military intelligence microseconds. A 128-bit key offers exactly 340,282,366,920,938,463,463,374,607,431,768,211,456 different combinations, and it is generally considered to be secure for at least a century ahead (because that's at least how long a military intelligence computer would need to decrypt it).
It is necessary to keep one key secret (the private key) and to distribute the other key (the public key) to anyone who needs to send you an encrypted message. This secrecy ensures that anybody can send you an encrypted message that only your computer or device will be able to decrypt. It also works in the reverse—others can certify that a message comes from you because you have encrypted it with your private key, and only the associated public key will decrypt the message correctly.
As already mentioned, a remote host proves its trustworthiness by obtaining a certificate from a CA. The CA can, in turn, have certification from a higher authority and so on, creating a chain of trust. To determine whether a certificate is trustworthy, an application must determine the identity of the root CA and then determine if the root CA is trustworthy.
SSL for devices running Windows Mobile Professional and Windows Mobile Standard uses trusted CAs. When an application attempts to create a secure connection, SSL extracts the root certificate from the certification chain and checks it against the CA database in the device. It delivers the server certificate to the application through a certificate validation callback function, which also delivers the results of the comparison against the CA database.
A certificate is data that represent a user's identity.
Certificates that are used with SSL are based on the X.509 standard
(
The following resources are secure links to valid CA
authorities:
 SSL Setup for Servers
To use SSL with a Web server, you need to install a server certificate. This article focuses on using Internet Information Services (IIS) version 6.0, but most Web servers can be set up to use SSL. For any business scenarios that involve SSL, the normal approach is to buy a certificate from one of the CAs listed in the previous section of this article. However, for development and testing purposes, it can be practical to create and use a test certificate.
The traditional way to create a test certificate is to use the
MakeCert tool that comes with the .NET Framework. You can find
instructions about how to use this tool in the MSDN® Library,
However, an easier tool to use is the SelfSSL tool, which is
included in the
After opening a command prompt window, if you need help about using this tool, you can type the following command.
selfssl /?
Help about the tool appears, as shown in Figure 1.
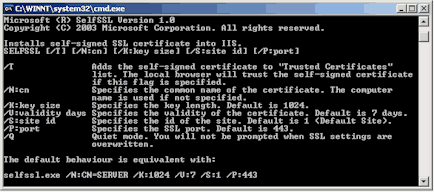
Figure 1. SelfSSL command help
To install a self-signed SLL certificate into IIS on your desktop computer, run the following command.
selfssl /T
When the tool prompts you to replace the settings for site 1 (usually the Default Site), if you answer yes, the tool installs the certificate. The /Tparameter ensures that Microsoft Internet Explorer® trusts the certificate (that is, you will see a confirmation message appear when you browse to a secure virtual directory).
The next step is to enable SSL on the virtual directory.
To enable SSL on the virtual directory
- Start
IIS Manager.
- On the virtual directory, right-click and choose
Properties.
- On the
Directory Securitytab, in the Secure communications group,
click the
Edit...button.
- Select the
Require secure channeland
Require 128-bit encryptioncheck boxes. Click
OK.
- On the
Propertiesdialog box, click
OKto save the settings. You can now browse the virtual
directory by prefixing the URL with https://.
If you'd like to remove the test certificate, follow these steps.
To remove the test certificate
- Start
IIS Manager.
- On the
Default Web Site, right-click and choose
Properties.
- On the
Directory Securitytab, click the
Server Certificatebutton. The Web Server Certificate Wizard
starts.
- In the Web Server Certificate Wizard, click
Next.
- On the second page of the Server Certificate Wizard, select
Remove the current certificate, and then follow the
instructions.
 Device Certificate
Installation
To install the server certificate on the device, you need a certificate file (.cer). If you purchased the certificate from a CA, this file was distributed to you, and you can skip to the actual install on the device.
If you used the SelfSSL tool to create and install a test certificate on the server (as described in the previous section), you need to export the certificate to a file. The easiest way of exporting the certificate is to use Internet Explorer.
To export a certificate to a file
- Open an instance of Internet Explorer.
- On the
Toolsmenu, click
Internet Options.
- Click the
Contenttab, and then click the
Certificatesbutton.
- Click the
Trusted Root Certification Authoritiestab, and then select
the certificate in the list (named after the server).
- Click
Export. The Certificate Export Wizard opens.
- In the Certificate Export Wizard, click the
Nextbutton on the first three pages. (The first page starts
the wizard, the second page confirms that no private key should be
exported, and the third page confirms that the file should be in
the
DER encoded binary X.509format.)
- On the File to Export page, select a file name, and then click
Next.
- Click
Finishto confirm the creation of the file.
To use the certificate file, you need to install it on a device running Windows Mobile Professional.
To install the certificate to a device
- Copy the certificate file to the device.
- In
File Explorer, select the file. The device installs the
certificate by using an application named
certinst.exe, which is located in the
\Windowsfolder on the device. The device shows a
confirmation message before the installation is completed.
After the certificate installs, you should ensure the install was successful.
To ensure that the certificate was installed successfully
- Tap
Start, tap
Settings, tap
System, and then tap
Certificates.
- On the
Roottab, verify that the certificate is in the list.
You can use a similar approach on devices running Windows Mobile Standard, and when you start the certificate file, you need to confirm to install the certificate before the installation completes.
To ensure that a device running Windows Mobile Standard installed a certificate
- Choose
Start, choose
Settings, choose
Security, and then choose
Certificates.
- Select the
Rootoption, and verify that the certificate is in the list.
 Device Certificate
Verification
Sometimes it is not practical or even desirable to install certificates on the device. One such scenario is during development when the certificates might change over time. Not installing certificates on each testing device clearly saves time and effort. Another scenario would be if you want to use your own certificate for an internal application.
Even if a certificate is not installed on the device, it is still possible to use SSL with any Web server that has a certificate installed. In the browser on the device, you will be asked to confirm the access despite any problems with the certificate.
Figure 2 shows the security message being displayed on a device running Windows Mobile Professional.
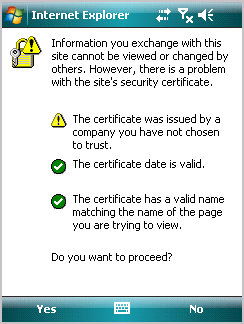
Figure 2. Security message in an Internet browser on a device running Windows Mobile Professional
On a device running Windows Mobile Standard, the same security message is shown in Figure 3.
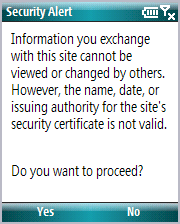
Figure 3. Security message in an Internet browser on a device running Windows Mobile Standard
For information about how to handle certificates with the .NET Compact Framework, see the SSL with the .NET Compact Framework section in this article.
 SSL with SQL Server
Compact
You can enable secure communication by using SSL when
synchronizing data between Microsoft SQL Server™ 2005 on a server
(or a desktop computer) and SQL Server Compact on the device. To
make the communication secure, you need to install the certificate
on the server and on the device, and the virtual directory for the
SQL Server Compact server components (usually named ssce or sqlce)
need to have SSL enabled (for more information, see the SSL Setup
for Servers section). Also, the virtual directory should have Basic
Authentication enabled. Even if Basic Authentication means that the
password is sent over the network in clear text (
When all is set up on the server and device, you can use the following code to synchronize data between SQL Server 2005 and SQL Server Compact using SSL.
 Copy Code Copy Code
|
|
|---|---|
string localDatabase = @"\Northwind.sdf";
string localConnectionString = "Data Source=" + localDatabase;
string remoteUrl = "https://server/sqlce/sqlcesa30.dll";
string remoteConnectionString = @"Provider=sqloledb;" +
	"Data Source=(local);Initial Catalog=Northwind;" +
	"Integrated Security=SSPI;";

if(File.Exists(localDatabase))
	File.Delete(localDatabase);

using(SqlCeEngine engine = new SqlCeEngine(localConnectionString))
	engine.CreateDatabase();

using(SqlCeRemoteDataAccess rda = new SqlCeRemoteDataAccess())
{
	rda.InternetUrl = remoteUrl;
	rda.LocalConnectionString = localConnectionString;
	rda.InternetLogin = userNameTextBox.Text;
	rda.InternetPassword = passwordTextBox.Text;
	string table = "Customers";
	rda.Pull(table, "SELECT * FROM " + table,
remoteConnectionString,
		RdaTrackOption.TrackingOffWithIndexes, "ErrorTable");
	MessageBox.Show("Database created!");
}
|
|
This code creates a SQL Server Compact database ( Northwind.sdf) in the root folder on the device and uses remote data access (RDA) to download the Customerstable from the sample Northwind database. The URL to the virtual directory with the SQL Server Compact server components begins with https:// to indicate that SSL is to be used. The user name and password is set on the RDA instance before the actual request, using the Pullmethod, is made.
 SSL with the .NET Compact
Framework
The .NET Compact Framework has built-in support for SSL. This support includes the use of sockets, Web (HTTP) requests, and XML Web service calls. You simply have to change the URL to begin with https:// instead of http:// to enable SSL.
As already discussed (in the Device Certificate Verification section), it is sometimes desirable not to install the certificate on the device. You also saw that the browser will allow you to confirm the use of a certificate with a problem. However, in a .NET Compact Framework application you will not automatically get this option to confirm the use of a certificate with a problem.
A solution is provided by Jan Tielens in his
 Copy Code Copy Code
|
|
|---|---|
public class TrustAllCertificatePolicy : ICertificatePolicy
{
	public TrustAllCertificatePolicy()
	{
}

	public bool CheckValidationResult(ServicePoint sp,
		X509Certificate cert, WebRequest req, int problem)
	{
		return true;
}
}
|
|
To use this class, you should run the following code once per application session (each time the application is started; the TrustAllCertificatePolicy instance will be used each time an SSL connection is made), and before you make any Web requests (preferably on application startup).
 Copy Code Copy Code
|
|
|---|---|
System.Net.ServicePointManager.CertificatePolicy = new TrustAllCertificatePolicy(); |
|
When the ServicePointManagerclass calls the interface method, the CheckValidationResultmethod always returns trueand thereby allows any certificate. The fact that the device does not trust the certificate (the operating system does not find the issuer in the CA database) does not affect the encryption of the traffic. As soon as the certificate is accepted, the device and the server use SSL for all communication between the client and the server.
This solution is equivalent to answering yes to any security messages that would normally appear in a browser. A simple solution (the TrustAllCertificatePolicyclass) might be sufficient in many cases where the application predefines the server and the application cannot use SSL with any other site. However, if the application allows the user to change the URL (for example, for an XML Web service), a need may exist to actually allow the user to confirm that communication should continue even if a trusted CA has not issued the certificate. The next paragraph and code example describe how to meet this need.
A closer look at the problemparameter in the CheckValidationResultmethod in the TrustAllCertificatePolicyclass reveals that it holds a native error code ( CERT_E_UNTRUSTEDROOT) when the certificate is not trusted. Therefore, you can create a somewhat modified class by using the following code.
 Copy Code Copy Code
|
|
|---|---|
public class QueryTrustCertificatePolicy :
System.Net.ICertificatePolicy
{
	private const uint CERT_E_UNTRUSTEDROOT = 0x800B0109;

	public QueryTrustCertificatePolicy()
	{
}

	public bool CheckValidationResult(ServicePoint sp,
		X509Certificate cert, WebRequest req, int problem)
	{
		bool returnValue = problem == 0;

		if((uint)problem == CERT_E_UNTRUSTEDROOT)
		{
			if(MessageBox.Show("The security cetificate is not from
a trusted" +
				" certification authority (" + cert.GetIssuerName()
+ ")."
				" Do you want to proceed?", "Security Alert",
				MessageBoxButtons.YesNo, MessageBoxIcon.Question,
				MessageBoxDefaultButton.Button2) ==
DialogResult.Yes)
				returnValue = true;
	}
		return returnValue;
}
}
|
|
If you make the following change to the code on application startup, this class allows the user to select whether or not to trust an untrusted certificate (that is, one the device doesn't trust).
 Copy Code Copy Code
|
|
|---|---|
System.Net.ServicePointManager.CertificatePolicy = new QueryTrustCertificatePolicy(); |
|
In the CheckValidationResultmethod, the problem parameter is checked to see if the device trusted the certificate. If the device trusted the certificate, the method returns true, and if the application did not trust the certificate, the user is shown a confirmation message to choose whether or not to trust the certificate, as shown in Figure 4.
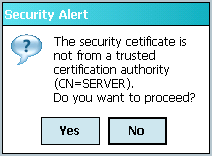
Figure 4. Security message on a device running Windows Mobile Professional
Figure 5 shows the same security message on a device running Windows Mobile Standard.
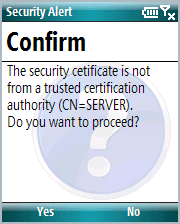
Figure 5. Security message on a device running Windows Mobile Standard
The security message appears each time the application makes a Web request by using an HttpWebRequestinstance, but when the application uses an XML Web service and the user has accepted the certificate the first time, the notification does not appear again because the Web session is kept alive. In a typical real-world scenario with an application that connects to an XML Web service and the user is requested to accept the certificate, this confirmation only needs to be done once per session (each time the user runs the application).
 Calling a Secure XML Web
Service
To test calling secure XML Web services from the device, you can create an ASP.NET Web service with the following code.
 Copy Code Copy Code
|
|
|---|---|
[WebMethod]
public DataSet GetData()
{
	DataSet ds = new DataSet();
	using(SqlConnection cn = new
SqlConnection(this.connectionString))
	{
		cn.Open();
		SqlDataAdapter da = new SqlDataAdapter("SELECT * FROM
Customers", cn);
		da.Fill(ds);
}
	return ds;
}
|
|
The code simply connects to the sample Northwind database and retrieves the full CUSTOMERS table as a DataSetobject that is returned to the client. A cool detail is that when the test certificate is installed and trusted by the browser, Visual Studio can work with the project by using SSL.
In the device project, the code to register the custom certificate policy is added during application startup (for example, in the constructor or Loadevent of the first form loaded), as shown in the following code.
 Copy Code Copy Code
|
|
|---|---|
System.Net.ServicePointManager.CertificatePolicy = new QueryTrustCertificatePolicy(); |
|
After you create a Web reference ( WebServices), the following code calls the secure XML Web service.
 Copy Code Copy Code
|
|
|---|---|
try
{
	WebServices.Service secureWebService = new
WebServices.Service();
	secureWebService.Url = "https://server/securews/secure.asmx";
	DataSet ds = secureWebService.GetData();
	MessageBox.Show("Data received with " +
		ds.Tables[0].Rows.Count.ToString() + " rows!", this.Text);
}
catch
{
	MessageBox.Show("Could not get data from server!", this.Text);
}
|
|
After the code creates the Web reference instance secureWebService, the URL is set. Note how https:// indicates the use of SSL. During the call to the GetDatamethod to the XML Web service, the application calls the custom certificate policy class QueryTrustCertificatePolicy. If the user chooses to accept the use of the certificate (by selecting Yesin Figure 4 or 5), the call completes, and when the code returns the result, the number of rows in the CUSTOMERS table in the DataSetobject appears. If the user selects not to trust the certificate (by selecting Noin Figure 4 or 5), the code raises an exception and handles it.
When the
 SSL with HTTP Compression
An interesting question would be to see how SSL works with compression. The purpose is to find out if encryption affects the compression ratios in a significant way. Table 1 summarizes some further analysis of the communication between the client (device) and the server with different combinations of encryption and compression.
Table 1. Compression gain with and without encryption
| Payload size | Raw (KB) | Compressed (KB) | Gain (percent) | Compressed and encrypted (KB) | Gain (percent) |
|---|---|---|---|---|---|
|
Medium |
36,761 |
8,603 |
77 |
9,264 |
75 |
|
Large |
463,310 |
45,309 |
90 |
46,054 |
90 |
For medium payloads, the results show a slight loss in compression gain due to the marginal increase in size enforced by the encryption. For larger payloads, the difference is about 1 percent, which roughly translates to insignificant. No testing was done on smaller payloads because the savings in terms of bandwidth (and cost) per call are most likely marginal. Therefore, the answer to the question, how does SSL work with compression, is that the added security (encryption) does not significantly affect the compression gains.
In this article's
Both SSL and HTTP compression is a native part of IIS 6.0. Although you may need to do some configuration, there is no need for any other (third-party) products on the server side to make use of SSL and HTTP compression. After you set up the basic server (the SSL certificate is in place and compression is enabled), you need to make minimal changes to enable SSL and HTTP compression for a new application. After you have the server certificate in place, you only need to select two check boxes (as the SSL Setup for Servers section describes) to enable SSL for a specific virtual directory in the Web server. When you enable compression, it is normally available to all virtual directories (even though it can be enabled only for specific virtual directories as well), and it is always the client that makes the requests to compress content (for more information, see the following code example).
The
 Copy Code Copy Code
|
|
|---|---|
protected override WebRequest GetWebRequest(Uri uri)
{
	WebRequest request = base.GetWebRequest(uri);
	request.Headers.Add("Accept-Encoding", "gzip, deflate");
	return request;
}

protected override WebResponse GetWebResponse(WebRequest request)
{
	HttpWebResponseDecompressed response =
		new HttpWebResponseDecompressed(request);
	return response;
}
|
|
The GetWebRequestmethod adds the required HTTP header to tell the Web server that compressed responses are welcome. The order of suggested compression formats indicates the preference (in this case, gzip is the preferred format). The GetWebResponsemethod is responsible for decompressing the response from the server. The decompression is handled by the HttpWebResponseDecompressedclass, as shown in the following code.
 Copy Code Copy Code
|
|
|---|---|
internal class HttpWebResponseDecompressed : WebResponse
{
	private HttpWebResponse response;

	public HttpWebResponseDecompressed(WebRequest request)
	{
		response = (HttpWebResponse)request.GetResponse();
}
	public override void Close()
	{
		response.Close();
}
	public override Stream GetResponseStream()
	{
		Stream compressedStream = null;
		if(response.ContentEncoding == "gzip")
		{
			compressedStream =
				new GZipInputStream(response.GetResponseStream());
	}
		else if(response.ContentEncoding == "deflate")
		{
			compressedStream = new
ZipInputStream(response.GetResponseStream());
	}
		if(compressedStream != null)
		{
			// Decompress
			MemoryStream decompressedStream = new MemoryStream();
			int size = 2048;
			byte[] buffer = new byte[2048];
			while(true)
			{
				size = compressedStream.Read(buffer, 0, size);
				if(size > 0)
					decompressedStream.Write(buffer, 0, size);
				else
					break;
		}
			decompressedStream.Seek(0, SeekOrigin.Begin);
			return decompressedStream;
	}
		else
			return response.GetResponseStream();
}
	public override long ContentLength
	{
		get { return response.ContentLength; }
}
	public override string ContentType
	{
		get { return response.ContentType; }
}
	public override System.Net.WebHeaderCollection Headers
	{
		get { return response.Headers; }
}
	public override System.Uri ResponseUri
	{
		get { return response.ResponseUri; }
}
}
|
|
Depending on the compression, available in the
ContentEncodingattribute, that the server returns (
gzipor
deflate), the decompression is done accordingly. The
excellent
For more details about how to set up and implement HTTP
compression in the .NET Compact Framework, please see the article
 SSL with SQL Server 2005
When connecting between a device and a SQL Server database on the server, you may want to use a secure connection to protect transferred data. For example, the user identity and password may be sent as clear text in the database connection string. If SSL is enabled on the SQL Server, it is not possible to connect to a SQL Server database from the device using the managed provider for SQL Server (which is available in the "System.Data.SqlClient" namespace).
For more information, see the
 Web Service Extensions
Because SSL works on the network level, many protocols (such as HTTP and FTP) can use it to secure network communication. SSL is a well-known standard, and it can be as long as the server platform and Web server support it. This fact makes SSL a good choice in many scenarios.
An alternative to SSL for securing XML Web services
communication is to use standards such as
 Conclusion
With more sensitive information being sent unprotected over public networks than any enterprise wants, the need to protect that information is obvious. By using standard technology such as SSL and clearly affordable efforts, your mobile solutions can encrypt most communication in a secure way. The current minor limitations in the tools can easily be overcome without compromising the security of the data transferred. Also, the results from using secure communication in combination with compression show that there are not many reasons why the communication in your enterprise applications should not be both secure (encrypted) and fast (compressed), and thereby also more cost efficient.


