


 Important: Important: |
|---|
| This is retired content. This content is outdated and is no longer being maintained. It is provided as a courtesy for individuals who are still using these technologies. This content may contain URLs that were valid when originally published, but now link to sites or pages that no longer exist. |
Simon Hart,
February 2009
 Summary
This article provides a step-by-step approach to creating an extensible, generic managed Configuration Service Provider (CSP) API with a managed virtual private network (VPN) CSP. We show how to add a VPN to an existing network connection by using the API programmatically on Windows Mobile operating systems, version 5 and later. You will see how easy it is to create and add new CSPs to the API, which makes working with CSPs for mobile developers a lot easier.
Applies To
Windows Mobile 5
Windows Mobile 6
.NET Compact Framework 2.0
.NET Compact Framework 3.5
Introduction
This article assumes the reader has some device application
development experience and knows what a CSP is. If this isn't the
case, you can learn more about CSPs
CSPs on Windows Mobile 5 and later offer no rich API, managed or unmanaged, that developers can tap into easily. Instead, developers must construct large XML files using tools such as System.Xml, which often require large amounts of code. This approach is error prone and tedious, since the XML needs to conform to the CSP XML schema.
Once the XML is created, it needs to be provisioned to the device by using the following call:
Microsoft.WindowsMobile.Configuration.ConfigurationManager.ProcessConfiguration()
Note:Assembly Microsoft.WindowsMobile is only available on
Windows Mobile 5 and later. For earlier devices, use P/Invoke
A rich, managed API can encapsulate the complex business concerns and abstract them away from the consumer, thereby simplifying the whole design and promoting a highly cohesive and loosely coupled framework. If the Windows Mobile CSP implementation ever changes, it will have little effect (if any) on the consumer code.
This article demonstrates step by step just one approach to achieving this goal.
Creating a Network Connection
Programmatically
This article is closely related to a previous article I wrote
and published on my web site
So this article was born and takes it to the next level. If you
want to run the following code example, you'll need to create a
network connection as specified in my
Creating Our Managed CSP
API
We will talk about each step sequentially. First we will create the API, then the VPN CSP. After this we will call the API from client code to show how it works.
1. CSP Actions
First, we will start by creating an interface that contains common actions for a CSP named IConfigurationServiceProviderActions:
 Copy Code Copy Code
|
|
|---|---|
public interface IConfigurationServiceProviderActions string SerializeToXml(); void Provision(); } |
|
Now we need to implement the implementer, ConfigurationServiceProviderActions. This class is common to which each CSP will derive to reduce boilerplate code throughout our CSPs.
|
Copy Code
|
|
|---|---|
   public class ConfigurationServiceProviderActions :
IConfigurationServiceProviderActions
	{
		#region Methods
		/// <summary>
		/// Provisions this CSP to the device.
		/// </summary>
		public void Provision()
		{
			var xmlDoc = new XmlDocument();
			xmlDoc.LoadXml(SerializeToXml());
			ConfigurationManager.ProcessConfiguration(xmlDoc,
true);
	}

		/// <summary>
		/// Serializes this CSP to XML.
		/// </summary>
		/// <returns></returns>
		public string SerializeToXml()
		{
			StringWriter sw = null;
			StringBuilder sb = null;
			try
			{
				sb = new StringBuilder();
				sw = new StringWriter(sb,
CultureInfo.CurrentCulture);
				var serializer =
					new XmlSerializer(GetType());
				var ns = new XmlSerializerNamespaces();
				ns.Add("", "");
				serializer.Serialize(sw, this, ns);
		}
			finally
			{
				if (sw != null)
					sw.Close();
		}
			return sb.ToString();
	}
		#endregion

}
|
|
2. Building the CSP Boilerplate Code
Next, we will create the main IConfigurationServiceProviderinterface:
|
Copy Code
|
|
|---|---|
public interface IConfigurationServiceProvider<T> :
IConfigurationServiceProviderActions
{
	ConfigurationServiceProviderBody<T> Body { get; set; }
}
|
|
As you can see, this interface also implements the IConfigurationServiceProviderActionsinterface that we created earlier. We do this for good practice reasons. It enables us to have access to the SerializeToXMLand Provisionmethods (and any other methods we may want to implement for future versions of the API) when working with the interface.
Now we need to implement the implementer, ConfigurationServiceProvider:
|
Copy Code
|
|
|---|---|
[XmlRoot("wap-provisioningdoc")]
public class ConfigurationServiceProvider<T> :
ConfigurationServiceProviderActions,
IConfigurationServiceProvider<T>
{
	public ConfigurationServiceProvider(Csp csp)
	{
		Body = new ConfigurationServiceProviderBody<T>
		{
			CspType = csp
	};
}

	[XmlElement("characteristic")]
	public ConfigurationServiceProviderBody<T> Body
	{
		get;
		set;
}
}
|
|
The above class is the main class we work by way of the interface. As you can see, no code will change when you implement new CSPs.
3. Building the CSP Body
Next, we will define the IConfigurationServiceProviderBodyinterface class, which contains each “characteristic” block as well as the type of the CSP we want to use.
First, let’s look at the interface:
|
Copy Code
|
|
|---|---|
public interface IConfigurationServiceProviderBody<T>
{
	Collection<T> Items { get; }
	Csp CspType { get; set; }
}
|
|
The interface is named generically so that we can support many
types of CSPs. In this example, T will be of type
Vpn.
Now for the implementer for IConfigurationServiceProviderBody:
|
Copy Code
|
|
|---|---|
public class ConfigurationServiceProviderBody<T> :
IConfigurationServiceProviderBody<T>
{
	[XmlElement("characteristic")]
	public Collection<T> Items
	{
		get;
}


	[XmlAttribute("type")]
	public Csp CSPType
	{
		get;
		set;
}

}
|
|
As you can see, the CSPType property is the property we set in the ConfigurationServiceProviderclass to tell the API what CSP we are creating.
The above example is made up of fairly straightforward code.
You’ll notice the XML declarations appended to the properties; when
the model is serialized, we get the correct schema that the CSP
expects. Also note the use of automatic properties (if you're new
to C# 3.0, see my blog post on
4. Adding the CSP Enumerator
Next is the CSP enumerator, which is very simple and resembles the following:
|
Copy Code
|
|
|---|---|
public enum Csp
{
	CM_VPNEntries
}
|
|
Although we currently only have one CSP, this is the point in the code where we add new CSPs to extend the API.
5. Looking at the Characteristic Class
So far, we've looked at the boilerplate code that makes up this API, but we haven’t looked at the guts of the characteristic we are working with.
For reusability, we have created a class named Characteristic. This class defines the core characteristic. It contains a list of parameters that tell the CSP what properties to set with what values. It also contains the Name property which has a generic meaning for each CSP in most cases, though; it is simply the name of the entity that is currently being created.
The Characteristicclass is the most complex of all the classes, but fear not: the code doesn’t need to be written again and again. It is simply reused.
It looks like the following:
|
Copy Code
|
|
|---|---|
[XmlRoot("characteristic")]
public class Characteristic
{
	private readonly ParameterCollection parameters = null;

	public Characteristic()
	{
		parameters = new ParameterCollection();
}

	[XmlAttribute("type")]
	public string Name
	{
		get;
		set;
}

	[XmlElement("parm")]
	public ParameterCollection Parameters
	{
		get
		{
			return parameters;
	}
}
}
public class ParameterCollection : Collection<Parameter>
{
	public Parameter this[string name]
	{
		get
		{
			if (string.IsNullOrEmpty(name))
				throw new ArgumentNullException("name");

			var parameter = this.Where(p =>
p.Name.ToLower(CultureInfo.CurrentCulture) ==
name.ToLower(CultureInfo.CurrentCulture));

			if (parameter.Count() > 0)
				return parameter.ToList()[0];
			else
				throw new
ArgumentException(string.Format(CultureInfo.CurrentCulture,
"Parameter {0} is not valid as it wasn't found", name));
	}
}
}

public class Parameter
{
	[XmlAttribute("name")]
	public string Name
	{
		get;
		set;
}

	[XmlAttribute("value")]
	public string Value
	{
		get;
		set;
}
}
|
|
The Nameproperty is simply (in our VPN case) the name of the VPN. The Parameterscollection is a custom collection (class ParameterCollection) that defines all the parameters that we are interested in. We define a custom collection so we can select parameters by name; we can also call the default indexer to select by index. We use the LINQ to Objects technology to do the actual selecting, which is another example of how LINQ makes coding easier.
The Parameterclass contains the Nameand Valueproperties that correspond to a parmtype in the CSP. As in our VPN case, an example of this is the Username parm.
The last class is the Vpnclass. This class simply derives the Characteristicclass, and its constructor creates all the supported parameters:
|
Copy Code
|
|
|---|---|
public class Vpn : Characteristic
{
	public Vpn()
	{
		base.Parameters.Add(new Parameter()
			 { Name = "UserName", Value = "" });
		base.Parameters.Add(new Parameter()
			 { Name = "Password", Value = "" });
		base.Parameters.Add(new Parameter()
			 { Name = "SrcId", Value = "" });
		base.Parameters.Add(new Parameter()
			 { Name = "DestId", Value = "" });
		base.Parameters.Add(new Parameter()
			 { Name = "Phone", Value = "" });
		base.Parameters.Add(new Parameter()
			 { Name = "Domain", Value = "" });
		base.Parameters.Add(new Parameter()
			 { Name = "Type", Value = "1" });
		base.Parameters.Add(new Parameter()
			 { Name = "IPSecAuth", Value = "0" });
	}
}
|
|
Our VPNclass above creates the relevant parameter objects during construction. And as you will see the way to access them is done by way of the Parameterscollection. We could if we wanted to, make this class type safe. Since this class is essentially wrapping the Characteristicclass, you need to provide additional properties for each parameter. Something like the following would work:
|
Copy Code
|
|
|---|---|
public string UserName
{
	 get
	 {
		Return Parameters["UserName"].Value;
	 }
	 set
	 {
		Parameters["UserName"].Value = value;
	 }
}
|
|
6. Calling the API
The following code illustrates how we call this API:
|
Copy Code
|
|
|---|---|
IConfigurationServiceProvider<Vpn> vpn = new
ConfigurationServiceProvider<Vpn>(Csp.CM_VPNEntries);
var vpn1 = new Vpn
			 {
				 Name = "MyVPN1",
			 };
var vpn2 = new Vpn
			 {
				 Name = "MyVPN2"
			 };

vpn1.Parameters["username"].Value = "simon";
vpn1.Parameters["password"].Value = "password";
vpn1.Parameters["domain"].Value = "domain";
vpn1.Parameters["phone"].Value = "1234";

vpn2.Parameters["username"].Value = "simon2";
vpn2.Parameters["password"].Value = "password2";
vpn2.Parameters["domain"].Value = "domain2";
vpn2.Parameters["phone"].Value = "5678";

vpn1.Parameters["srcId"].Value ="{8b06c75c-d628-4b58-8fcd-43af276755fc}";
vpn1.Parameters["destId"].Value ="{8b06c75c-d628-4b58-8fcd-43af276755fc}";

vpn2.Parameters["srcId"].Value ="{8b06c75c-d628-4b58-8fcd-43af276755fc}";
vpn2.Parameters["destId"].Value ="{8b06c75c-d628-4b58-8fcd-43af276755fc}";

vpn.Body.Items = new Collection<Vpn> {vpn1, vpn2};
vpn.Provision();

  //Getting the XML:
string xml = vpn.SerializeToXml();
|
|
In the above client code, we have just added two VPN connections. One is named MyVPN1 and the other named MyVPN2 .
It just sets a couple of the parameters and attaches both VPN connections to our previously created network (that is, Acme Corp).
Notice here the use of another new C# 3.0 feature (see my blog
post:
Finally, we call the Provisionmethod that actually provisions the device with the VPN connections. So what does this look like in Windows Mobile after you run the code? Here’s a screen shot:
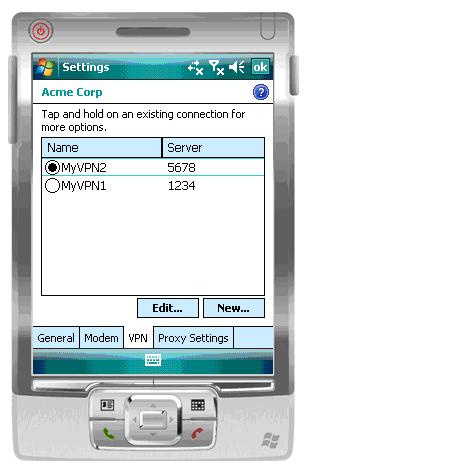
As you can see, we have created two VPN connections and added them to our “Acme Corp” network.
The sample code that you can download with this article contains a Windows project named “Client” which shows how to call the managed CSP API—a library named Microsoft.WindowsMobile.ConfigurationServiceProvider. The sample code contains the “old-fashioned” XML builder code to create the network and connection for you, so you can run through the managed CSP and add VPNs without the worry of creating a network. Ideally, of course, you would create a managed network and connection characteristic so you can use the managed API instead of raw XML, but I’ll leave you to do that.
Conclusion
We talked a little bit about what CSPs are in Windows Mobile and how you program them. We talked about the lack of richness with this model and that there is too much coupling between consumer code and the CSP model. That is, the CSPs do not encapsulate the schema, hence causing a coarsely grained model with consumer code. We also discussed the issues this lack of richness may cause. We then continued to walk through an example of creating a finely grained, feature-rich API to address these issues.
The API is fairly simple apart from the Characteristicclass and its children; extending it is easy. All you have to do is create an item in the CSP enumerator and add a new derived Characteristictype—that’s it!
The code can be downloaded from the MSDN Code Gallery
Author Bio
Simon Hart is working for Microsoft Gold Partner Edenbrook as a consultant, delivering enterprise mobility solutions and anything in-between. Simon writes regularly over at http://www.simonrhart.com and can be seen most days within the mobility community newsgroups.