 Important: Important: |
| This is retired content. This content is outdated and is no
longer being maintained. It is provided as a courtesy for
individuals who are still using these technologies. This content
may contain URLs that were valid when originally published, but now
link to sites or pages that no longer exist. |
Microsoft Corporation
May 2000
Summary:This step-by-step guide demonstrates how to make and
boot a Microsoft Windows CE operating system, how to create a
Windows CE component that you can add to an operating system to
customize it, and how to export an SDK. The guide also includes
information about building a Windows CE–based PC hardware
development platform (CEPC). (23 pages)
Contents
Introduction
Installing Platform Builder
3.0
Building and Customizing a
Platform
For More Information
Appendix: Building a CEPC
Introduction
Microsoft Windows CE Platform Builder 3.0 is a tool for building
customized Windows CE-based operating systems for embedded system
devices. Platform Builder contains the latest version of the
Windows CE operating system, a set of embedded development tools,
an integrated development environment (IDE), support for the
Microsoft run-time libraries, and sample code. The following table
shows the main features of Platform Builder.
| Feature |
Description |
| Windows CE operating system |
Eight configurations of the Windows CE operating
system ranging from a system with little more than a kernel to a
robust system complete with a rich graphical user interface (GUI)
and preloaded applications. |
| Integrated development environment |
An integrated, intuitive user interface (UI) that
includes wizards and toolbars for designing platforms and
components, a full set of resource editors and compilers, a kernel
debugger, connectivity and download support, integrated hardware
debugging support, add-in central processing unit (CPU)
configuration support, and the Windows CE remote tools. |
| Export software development kit tool |
A tool for creating and exporting a compressed,
self-extracting executable file containing a custom software
development kit (SDK) for your platform. Application developers can
import your SDK into Microsoft eMbedded Visual C++ 3.0 or Microsoft
eMbedded Visual Basic 3.0 and create applications for your
platform. |
| Run-time library support |
Optional support for the Microsoft run-time
libraries, including Microsoft Foundation Classes (MFC) for Windows
CE, Active Template Library (ATL) for Windows CE, and Microsoft
Visual Basic for Windows CE. |
| Component development tools |
A set of tools that enable you to build custom
components for your platform, including device drivers,
applications, dynamic-link libraries (DLLs), and static
libraries. |
This guide
also provides the hardware and software requirements for
Platform Builder, and explains how to install it.
Installing Platform
Builder 3.0
Platform Builder is distributed on multiple compact discs (CDs).
If you accept the default option of registering the environment
variables while you install Platform Builder, the Platform Builder
setup application—Setup.exe—defines the system environment variable
_WINCEROOT, which is required for the build process.
During installation, Setup.exe copies the Platform Builder files
to the directories you specify. One directory is for the IDE, and
one directory is for the operating system. As well, during setup
the program group Microsoft Windows CE Platform Builder 3.0 is
added.
Hardware and Software
The following are the hardware and software requirements and
recommendations for the system on which you wish to install
Platform Builder:
- A desktop computer with an x86-based microprocessor supported
by Windows 2000 or Windows NT 4.0 with Service Pack SP3 and later
(SP5 or SP6 recommended).
If you are using Windows NT, Microsoft Data Access Components
(MDAC) must be installed on your computer. If MDAC is not installed
on the computer, Setup.exe will install it for you.
If you are not using the worldwide English (WWE) edition of
Windows NT Workstation version 4.0, you can install a localized
version of Service Pack 5 (SP5) from this Microsoft Web site:
http://www.microsoft.com/ntserver.
- 64 megabytes (MB) of RAM
- 1.36 gigabytes (GB) of available hard disk space for a typical,
single microprocessor installation or 7.8 GB for installation of
the entire Platform Builder product
- A CD-ROM drive or DVD-ROM drive that is compatible with the
multimedia desktop computer specification
- A monitor with video graphics adapter (VGA) or higher
resolution; super VGA is recommended
- A Microsoft Mouse pointing device or compatible pointing device
- A bi-directional parallel port is required if you want to
download an operating system image and are not using an Ethernet
connection.
- A serial port or Ethernet network card for debugging support; a
local area network (LAN) hub is recommended.
If your system meets the requirements listed above, you are
ready to install Platform Builder.
To install Platform Builder
- Log on to the development workstation as a user with
administrator privileges. Use the same user credentials that will
be used when logging on to the development workstation to use
Platform Builder.
- Run Setup.exe from the root directory on the Platform Builder
disk 1 CD.
- When the
Welcomedialog box appears, follow the on-screen
instructions.
Note To reduce the installation
size of Platform Builder, you can deselect the microprocessors you
do not need in the
CPU Selectiondialog box and deselect options in the
Custom Optionsdialog box. To use the procedures outlined in
this paper, you will need to install the x86
microprocessor.
To access the
Custom Optionsdialog box, choose the
Optionsbutton in the
CPU Selectiondialog box.
Building and Customizing a
Platform
Platform Builder is a tool for developing custom Windows
CE-based operating systems for embedded system devices. The
development process involves building a basic platform, customizing
the platform, and downloading the operating system image to a
target device.
To build a basic platform, you configure the platform, make an
operating system image, transfer the platform to a target device
and debug the platform. To customize the platform, you can develop
your own OEM adoption layer (OAL), device drivers, boot loader, and
components, localize and profile the platform, and export a
software development kit (SDK).
A platform consists of core Windows CE components from a Windows
CE configuration, as well as an OAL and device drivers from a
selected board support package. The OAL is a layer between the
Windows CE kernel and the firmware of the target device. The boot
loader is used to download code from the development workstation to
a target device, and to monitor and debug the target device.
A hardware development platform is a type of target device that
simulates a variety of embedded system devices. The hardware
development platform is used to develop, test, and certify the
quality of the platform. Platform Builder supports two hardware
development platforms: the Hitachi D9000, known as ODO, and the
PC-based hardware development platform, known as CEPC. See the
Appendix for information about building a CEPC.
This sections demonstrates the following tasks using Platform
Builder:
- Build a basic platform
- Transfer and boot the OS.
- Use kernel debugger
- Customize a platform by creating and building a user component.
- Export a software development kit (SDK).
The tutorial assumes that when you installed Platform Builder
you selected the x86 microprocessor, accepted the default option of
registering the environment variables, and installed Platform
Builder in the default directory provided by Setup.exe. This
tutorial also assumes that you are using the CEPC, with the
recommended configuration, for your hardware development platform,
an Ethernet connection for downloading and debugging the OS image,
and Windows NT Workstation version 4.0 OS.
Note Once you have opened the
Platform Builder application, allow it to remain running on the
development workstation during the tutorial.
For more information about the recommended configuration for a
CEPC, see "Assembling a CEPC" in the Appendix.
Building a Basic Platform
To build a basic platform, you configure the platform using the
Platform Wizard and make an OS image based on the platform. In this
tutorial, you create a platform that includes core Windows CE
components from the Maxall configuration, review the platform
settings in order to verify that the kernel debugger is enabled,
and then use the Platform Builder IDE to make the OS image.
The kernel debugger provides several options for debugging code
in the Microsoft Windows CE kernel as well as Windows CE–based
applications. The kernel is the main module of the OS. The kernel
provides system services for managing threads, memory, and
resources.
To create a platform
- On the development workstation, click
Microsoft Windows CE Platform Builderin the program group
Microsoft Windows CE Platform Builder 3.0to open the
Platform Builder application.
- Click
Newon the
Filemenu. The
Newdialog box appears. Type a name for your platform in the
Platform nametext box. For this tutorial, type
MyPlatform(see figure 1).

Figure 1. The New dialog box
- You can type a new path for the platform in the
Locationtext box.
- Select one or more microprocessors that your platform will
support in the
Processorsbox. The
Processorsbox lists only the microprocessors you installed.
For this tutorial, select the x86 microprocessor.
- Click
OK.
The WCE Platform - Step 1 of 2dialog box appears.
- Select a board support package from the list. For this
tutorial, select
CEPCto add the preconfigured CEPC board support package to
your platform. The list only includes the board support packages
that support the microprocessors you selected. The list of support
microprocessors is defined in the component (.cec) file for each
board support package. If no board support package supports any of
the selected microprocessors, only the
No BSPand
My BSPoptions are displayed.
- Click
Next. The
WCE Platform - Step 2 of 2dialog box appears.
- Select one of the configuration options. For this tutorial,
select
Maximum OS (Maxall)in order to build the most robust Windows
CE configuration.
- Click
Finish. The
New Platform Informationdialog box appears. The dialog box
displays information about your configuration including the
language setting for the platform. By default, the Platform Wizard
uses the language setting established for the development
workstation.
- Click
OKto close the
New Platform Informationdialog box and complete the creation
of the platform. The
ComponentViewwindow displays the platform components.
Note The platform you have
created is included in a workspace. This workspace needs to remain
open throughout the tutorial.
The next step is to create an operating system image with the
kernel debugger enabled, as described in this next procedure.
To make an operating system image with the kernel
debugger enabled
- When you create a platform, both a debug configuration and a
release configuration are automatically created. Therefore, in the
Platform Builder application, confirm that the
Win32 (WCE x86) Debugconfiguration is selected in the
Select Active Configurationlist on the
Buildtoolbar.
- In the Component View window, right-click on the platform
you've just created and then choose
Settingson the context menu.
Or, click
Settingson the
Platformmenu. The
Platform Settingsdialog box appears (see figure 2).
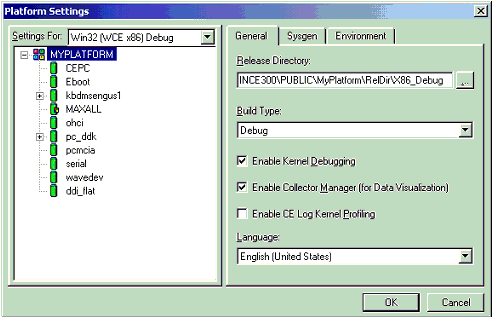
Figure 2. The Platform Settings dialog box
- Confirm that the
Win32 (WCE x86) Debugconfiguration is selected in the
Settings Fordrop-down list box.
When the debug configuration is selected, by default the
Enable
Kernel Debuggingcheck box is selected in the
Generaltab.
- Click
OKto close the
Platform Settingsdialog box.
- If your CEPC video card is supported by the Flat driver, which
is the default display driver when you create a platform, select
Build Platformfrom the
Buildmenu.
Otherwise, if your CEPC video card is not supported by the Flat
driver, select
ddi_flatin the
ComponentViewwindow and then click
Deleteon the
Editmenu. Next, click
Catalogon the
Viewmenu, right-click
ddi_vga8in the
Catalog, and choose
Add to Platform. The ddi_vga8 display driver is added to
your platform (see figure 3). Then, select
Build Platformfrom the
Buildmenu.
It takes five to ten minutes to complete the build. When the
build is complete, data appears in the build window.

Figure 3. The Platform Builder build window
Transferring and Booting an Operating System
Now that you have created a platform and made the operating
system image, you are ready to transfer and boot the operating
system image. In this tutorial, the operating system image is
transferred from the development workstation into system memory on
a CEPC. It is then booted using a boot loader application on a boot
floppy disk created for a CEPC; a CEPC does not require a hard
drive. Typically, a CEPC is connected to a development workstation
using an Ethernet or parallel connection, and an operating system
image is downloaded to the CEPC using the Ethernet connection. In
this tutorial, you use the Ethernet card for connection and
downloading.
Setting Up the CEPC
Before transferring and booting an operating system image on a
CEPC, you need to set up the CEPC. The first step is installing and
configuring the hardware. For more information about the hardware
configuration for a CEPC, see the appendix at the end of the paper
titled "Building a CEPC."
Once you have installed and configured the CEPC hardware, create
a boot disk and configure the interrupt request (IRQ) line, I/O
Base, and Internet Protocol (IP) settings. It is important that you
use the boot loader that is included with Platform Builder 3.0.
To create a boot floppy disk for a CEPC
- Run
Websetup.exe, located in the
Program Files\Windows CE Platform
Builder\3.0\CEPB\Utilitiesdirectory. By default, this
application installs Webimgnt.exe in C:\Winnt.
- Run Cepcboot.144, a disk image file that is located in the
Program Files\Windows CE Platform Builder\3.0\CEPB\Utilities
directory.
The
Web Image NTdialog box appears.
- Insert a floppy disk into the floppy drive on your development
workstation, and then choose either
Disk Aor
Disk Bto specify the floppy disk drive used to create the
book disk.
- Click
Cancelafter the boot disk has been created.
- Verify that the boot disk contains the correct files.
The following table lists the files that the boot disk
contains.
| Files |
Description |
| Eboot.bin |
This is a binary file (.bin). The file is an
Ethernet boot loader component. |
| Loadcepc.exe |
This is an executable file (.exe). The file loads
the boot loader image Eboot.bin. |
| Autoexec.bat, Config.sys, Himem.sys, and
Command.com |
Autoexec.bat is a batch application file (.bat).
All of these files are required MS-DOS files. |
| Readme.txt |
This file contains booting instructions. |
| Drvspace.bin |
This .bin file adjusts the settings in the
Drvspace.ini file to mount a drive. |
| Io.sys and Msdos.sys |
These are system files. |
| Sys.com |
This file is an MS-DOS application. |
| Vesatest.exe |
This is a DOS .exe file. It tests the VGA BIOS on
the video card to ensure that it is compatible with the Windows CE
3.0 default display driver. The Readme.txt file included on the
boot floppy disk provides additional information. |
The Autoexec.bat, Eboot.bin and Loadcepc.exe files are updated
in this release of Windows CE version 3.0. These files make it
possible to do the following:
- Easily enter and modify the IRQ, I/O base address, and static
Internet Protocol (IP) settings in Autoexec.bat.
- Use the Loadcepc.exe /L switch to pass additional parameters to
the FLAT display driver in order to set arbitrary resolutions. This
driver is the default display driver.
- Use the boot floppy disk more reliably with different types of
Dynamic Host Configuration Protocol (DHCP) servers.
- Support warm booting of a CEPC from the Windows CE Debug Shell
tool (Eshell.exe)
- Support improved Peripheral Component Interconnect (PCI) local
bus enumeration on the CEPC
- Use static IP addresses to boot a CEPC when a DHCP server is
not available to automatically provide IP addresses.
- Download an operating system image from Platform Builder
versions 2.11 and 2.12.
To configure the IRQ, I/O Base, and IP
settings
It is recommended that you read the Readme.txt file, located on
the boot floppy disk, for more information about editing the
Autoexec.bat file in order to configure the correct settings for
the debug Ethernet card. A debug Ethernet card is used for
debugging and downloading.
Set
NET_IRQto
5and
NET_IOBASEto
340in the Autoexec.bat file and configure the Ethernet
network card to use these settings. These are the settings for an
ISA-based Linksys Ethernet card, which is the suggested Ethernet
card for Ethernet debugging. (
Ethernet debuggingrefers to a method of connecting a
development workstation to a target device using a standard
Ethernet connection in order to debug the target device.)
If the IRQ and I/O Base settings listed in the Autoexec.bat do
not match the Ethernet card settings, you can either edit
Autoexec.bat or use the Ethernet card configuration program to
change the card's settings.
The following table provides recommended IRQ and I/O Base
settings for Autoexec.bat when an ISA-based Ethernet card is
used.
| Code example |
Description |
set NET_IRQ=5
set NET_IOBASE=340 set NET_IP=
|
Use these settings if you are using an ISA-based
debug Ethernet card, such as a Linksys Ether16 LAN card, model
number LNE2000, and a DHCP server. Because a DHCP server provides
IP addresses automatically in the network environment, the NET_IP
setting is left blank. |
set NET_IRQ=5
set NET_IOBASE=340 set NET_IP=
valid IP address
|
Use these settings if you are using an ISA-based
debug Ethernet card, such as a Linksys Ether16 LAN card, model
number LNE2000, without a DHCP server.
An example of a valid IP address is 151.128.1.10; however, use
an IP address that is valid for your network environment. Use the
subnet mask that applies to the development workstation, and obtain
an unused IP address from your network administrator. |
Transferring and Booting the Operating System
Image
Once you have created the boot disk, configure the connection
between the development workstation and the target device in order
to transfer and boot the operating system image. To transfer the
image, download the Windows CE binary image file, Nk.bin.
In the next procedure, you configure an Ethernet connection to
download and boot the operating system image.
To configure the Ethernet connection
- In the Platform Builder application, select
Configure Remote Serviceson the
Targetmenu. The
Configure Remote Servicesdialog box appears (see figure 4).

Figure 4. The Configure Remote Services dialog box
- Select
Ethernetin the
Download / Target Control (CESH) / Target Messages
(CETerm)and the
Debuggerdrop-down list boxes.
- Click the
Service Settingsbutton. The
Service Settingsdialog box appears. Review the settings. The
Start on Downloadcheck boxes for Target Messages (CETerm)
and
Target Control (CESH)are selected by default. Consequently,
Platform Builder automatically starts these services, as well as
kernel debugger if required, after the operating system image is
downloaded.
- Click
OKto close the
Service Settingsdialog box.
- Select the
Ethernettab.
- Insert the boot floppy disk into the CEPC floppy drive, and
then boot the CEPC. During the CEPC boot the Startup Menu dialog
box is displayed on the CEPC screen with a list of options. You do
not need to select an option.
When the CEPC is finished booting, the following message appears
on the CEPC screen:
Jumping to
address. The CEPC device name appears in the
New Devicesbox in the
Ethernettab in the
Configure Remote Servicesdialog box.
Note If the CEPC device name
does not appear in the
New Devicesbox, reboot the CEPC.
If after rebooting the CEPC the device name still does not
appear in the New Devices box, verify that you have correctly
configure the IRQ and I/O base address settings in the Autoexec.bat
file.
- Select your device name and then select the arrow button. The
device name appears in the
Current Devicebox (see figure 5).

Figure 5. The Configure Remote Services dialog box, Ethernet
tab
- Click
OKto close the
Configure Remote Servicesdialog box.
After you have configured the Ethernet connection, you can
download and boot the operating system image.
To download and boot the operating system
image
- Verify that the
MyPlatformplatform is displayed in the
ComponentViewwindow in the Platform Builder application.
- Click
Status Monitoron the
Targetmenu. The
Status Monitorwindow appears. This window keeps track of the
state of processes on your target device.
- Click
Download Imageon the
Targetmenu. The
Status Monitorwindow indicates that the Target Control
(CESH), Target Messages (CETerm), and debugger are stopped (see
figure 6).
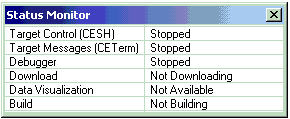
Figure 6. The Status Monitor window
- Click
OKin the message box when the following message is
displayed:
Reset target device to begin Download.
- Reboot the CEPC.
While the CEPC is rebooting, the following message appears at
the bottom of the Platform Builder application:
Waiting to receive a download message.
Once the CEPC has rebooted, two events occur during the process
of downloading and booting the OS image: First, a download progress
bar appears at the bottom of the Platform Builder application, and
the
Status Monitorwindow indicates that the download is in
progress. Second, when the download is completed, information is
displayed in the
Debugwindow. The
Status Monitorwindow indicates that the Target Control
(CESH), Target Messages (CETerm), and debugger are running.
Note Platform Builder is
automatically running these services because the
Target Messages (CETerm)and the
Target Control (CESH)services
were selected
in the
Service Settingsdialog box prior to downloading the
operating system image.
When the image has successfully booted, the Windows CE operating
system is displayed on the CEPC screen.
Using Kernel Debugger
Now that you have downloaded and booted the operating system
image, you can debug it.
Enable Kernel Debuggingand
Target Messages (CETerm)were selected before downloading (in
the procedure above), and thus the kernel debugger is available and
Platform Builder automatically starts it when the operating system
is booted. The
Debugtoolbar appears (see figure 7).
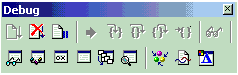
Figure 7. The Debug toolbar
The kernel debugger provides several options for debugging code
in the Microsoft Windows CE kernel as well as Windows CE–based
applications. The kernel is the main module of the operating
system. In Platform Builder 3.0 the debugger user interface
includes dockable processes, threads, modules, symbols, call stack
windows, and a new
Debug Zonesdialog box.
To stop kernel debugging
- In the Platform Builder application, click
Stop Debuggingon the
Debugmenu. This returns control to Platform Builder.
Customizing a Platform
There are several different options for customizing a platform,
including adding a board support package, creating an OEM
Adaptation Layer (OAL), using an add-in CPU configuration,
localizing a platform, creating a boot loader, and adding and
removing components.
The next procedure details how to create a user component using
the Project Wizard in Platform Builder and then build the
component. A
componentis a group of related functions that implements a
particular feature of the operating system. A user component is a
component that you create.
To create and build a user component
- In the Platform Builder application, click
Newon the
Filemenu.
- The
Newdialog box appears; select the
Projectstab and then select a type of user component to
create. For this procedure, select
WCE Application.
- Type the component name in the
Project Namebox. For this tutorial type
Hellosee figure 8).

Figure 8. The New dialog box, Projects tab
- If desired, change the location for your project files in the
Locationbox. By default, the files are located in a
subdirectory of the platform directory.
- Select the applicable microprocessors for your component in the
Processorsbox. The
Processorsbox lists the installed microprocessors. By
default, the processors you selected for the current platform are
selected. For this tutorial verify that the
Win32 (WCE x86)microprocessor is selected.
- Click
OK.
Or, if your platform is currently running on the CEPC, click
OKwhen the following message is displayed:
This command will stop all running services. These services
can only be restarted if the target device is reset.
The
WCE Application – Step 1 of 1dialog box appears, displaying
the options for the WCE application. The options provided vary
depending on type of component that is selected in the
Newdialog box.
- Select
A typical "Hello World!" application, and then click
Finish. The
New Project Informationdialog box appears and lists the
specifications of your new user component.
- Click
OKto close the dialog box and finish creating the user
component. The
ClassViewwindow displays the project classes.
- Click
Build Hello.exeon the
Buildmenu to build the user component.
The Hello.exe file is copied to the directory %_FLATRELEASEDIR%.
Exporting an SDK
Once you have customized your platform, and booted and debugged
the operating system, you may decide to provide support for the
development of additional applications. To allow developers to
write applications for your target platform, you can use Platform
Builder to create a software development kit (SDK). Once you create
the SDK, you can move or export your SDK to a computer.
An SDK is a set of library, header, and Help files that
developers use to write applications for a specific platform. To
create, debug, and run custom applications, other developers can
use your SDK in conjunction with Microsoft eMbedded Visual Tools
3.0, which includes Microsoft eMbedded Visual Basic 3.0 and
Microsoft eMbedded Visual C++ 3.0.
In this procedure, you create and export an SDK for eMBedded
Visual Basic 3.0.
To create and export an SDK for eMbedded Visual
Basic 3.0
- Create the components to include in the SDK.
- In the Platform Builder application, click
Export SDKon the
Platformmenu.
- Click
eMbedded Visual Basicon the
Export SDKmenu.
- Type the location of your license agreement in the
Software License Agreementtext box of the
Add Software License Agreementdialog box. Or click
Browseto browse for the location of your license agreement,
and then click
Next.
Platform Builder automatically includes a license agreement,
which is necessary to protect the intellectual property rights of
Microsoft components. You must also add your own license agreement.
Platform Builder attaches any additional license agreement to the
end of the Microsoft license agreement. Your license agreement must
be saved as a text file (.txt).
- Specify whether your platform supports GWE (graphics, window
manager, event manager), and whether the SDK supports Visual Basic
Forms and additional Microsoft ActiveX controls by checking the
boxes on the
Export Windows CE SDK - Select Configurationdialog box. As
well, specify the languages that your platform supports, and then
click
Next.
- Select the transport that applies to your platform by checking
the appropriate box on the
Export Windows CE SDK - Select Platform Manager
Optionsdialog box, and then click
Next.
You can add a custom transport by clicking
Addor view and change details about the selected transport
by clicking
Details.
- Specify a directory in which to place the completed SDK on the
Export Windows CE SDK - Installationdialog box, and then
click
Next.
- Click
Finishon the
Export Windows CE SDKdialog box to complete the export
process.
For More
Information
To access the online documentation for Platform
Builder
- Start Platform Builder.
- Select the
Contentstab on the
Helpmenu to view the documentation.
Microsoft Technical Support
You can find information about documentation and technical
information updates in the online documentation.
In addition, Microsoft offers technical support and services
ranging from self-help tools to direct assistance from a Microsoft
technical engineer.
To view technical support in online Help
- Install the documentation and then select Technical Support
from the Platform Builder Help menu.
A Help page entitled Getting Help from Microsoft Technical
Support is displayed. This page contains links to a variety of
technical support topics.
If you receive an error message instructing you to install MSDN,
ignore it and install the documentation instead.
To view technical support information on the
Web
- Navigate to the Microsoft Personal Support Center Web page at
http://support.microsoft.com/support.
- Click the
Phone Numberslink in the left frame of the Web page.
- Select
Windows CE Platform Builderfrom the
Select a Microsoft Productlist, and then click the
Gobutton.
- The support page for the Platform Builder opens.
Appendix: Building a
CEPC
This section recommends specific hardware components and
configurations for building and configuring a CEPC. You can use
other basic input/output systems (BIOS), motherboards, and
configurations to build a CEPC. If you use different hardware, you
must set up the BIOS and hardware configuration to match the
Windows CE operating system. For this reason, Microsoft suggests
that you use the recommended CEPC hardware components and
configurations.
Hardware for a PC-Based Platform
A microprocessor, a display card, and other peripherals are
required to build a CEPC. CEPC components are off-the-shelf
products. The following table lists the required CEPC hardware.
| Product |
Description |
| Motherboard |
Asus P5A Super Socket7 |
| Microprocessor |
AMD K5/K6-2 or Pentium P5 microprocessor |
| Case |
Enlight ATX 250W |
| Memory |
Minimum of 32 MB |
| Video card |
ATI Expert128 (uses ATI Rage128 chipset) |
| Debug Ethernet card for Ethernet downloading and
Ethernet debugging. |
Linksys Ether16 ISA LAN card, Model LNE 2000, or
you can use any ISA-based NE2000 compatible network adapter. |
| Other |
A floppy disk, heat sink, and fan |
An Ethernet connection is recommended because it is easier to
set up and use, and is faster and more reliable than a serial or
parallel port connection. However, you may choose to use a parallel
port connection that would require an add-on parallel port card.
For more information about using the parallel port for downloading
and debugging, see the online documentation.
The hardware described in the preceding table is sufficient to
boot a Windows CE operating system image on a CEPC. However, based
on the type of development or testing that you do, you can use
additional hardware. The following table lists the optional CEPC
hardware.
| Product |
Description |
| Product Ethernet card (for general data access,
such as Web browsing and synchronizing with a host computer) |
Kingston EtherRX PCI Ethernet Adapter, model
KNE30T, or any PCI-based NE2000 compatible network adapter. |
| PC card controller |
SimpleStation PC Card socket adapter, from Simple
Technology Inc., or any Intel 82365 chipset-based controller can be
used. |
| Universal serial bus (USB) controller |
An Open Host Controller Interface (OHCI) controller
is built into the Asus P5A motherboard, or, any
add-in UHCI PCI card.
|
| Fast infrared (FIR) controller |
ActiSys FastIR card model ACT-IR2000B or Temic Fast
IR card model TFDU6100E/TFDS6500E. |
| Audio card |
Sound Blaster AWE64 Plug and Play card |
Motherboard and Card Configuration
Consult the motherboard documentation for information on
installing the motherboard, the jumper settings for the
microprocessor, system memory, and other system configurations. The
following table shows a recommended hardware configuration for a
CEPC based on the Asus P5A motherboard.
| Slot number |
Card/Adapter |
Interrupt (IRQ) |
I/O base |
Comments |
| AGP video slot |
ATI Expert 128 |
N/A |
None |
Required only if a PCI-based display card is not
used in slot 1. |
| PCI slot 1 |
ATI Expert 128 |
N/A |
None |
Required. See comments for AGP video slot. |
| PCI slot 2 |
Kingston KNE 30T Ethernet card for product
Ethernet. |
0 |
0* |
Required |
| PCI slot 5 or ISA slot 1 |
SimpleStation ISA adapter from Simple Technology
Inc. |
11 |
0x3E0 |
Optional |
| ISA slot 2 |
Linksys LNE2000 Ethernet card for Ethernet
debugging |
5 |
0x340 |
Optional |
| Built-in COM1 |
|
4 |
0x3f8 |
Defaults to debug serial port |
| Built-in COM2 |
COM1 |
3 |
0x2f8 |
|
| Built-in LPT1 |
LPT1 |
7 |
0x278 |
Set to ECP mode |
| Built-in USB |
|
15 |
|
OHCI controller |
| Built-in audio |
|
|
220-22f |
|
| Built-in keyboard and mouse |
|
1 |
|
|
*For a PCI-based network card, the NE2000
Ethernet driver in Windows CE automatically chooses an appropriate
interrupt and I/O base address that can be used with the card.
BIOS Settings
This section provides the BIOS settings that you must set on the
Award Modular BIOS version 1.20, which is built into the Asus P5A
motherboard. Your settings may differ if the BIOS version on your
computer is different.
In general, the only changes you need to make in the BIOS are in
the
PnP and PCI Setupmenu. You can choose the default settings
for most of the other menus.
Standard CMOS Setup Menu
Choose the default CMOS settings in the BIOS.
Features Setup Menu
Choose the following settings on the
Features Setupmenu in the BIOS. The settings listed in the
following table are the default settings.
| Option |
Setting |
| Boot virus detection |
Disabled |
| PCI/VGA palette snoop |
Disabled |
| CPU internal cache |
Enabled |
| Video ROM BIOS shadow |
Enabled |
| External cache |
Enabled |
| C8000–CBFFF shadow |
Disabled |
| Quick power on self test |
Enabled |
| CC000–CFFFF shadow |
Disabled |
| HDD sequence SCS/IDE first |
IDE |
| D0000–D3FFF shadow |
Disabled |
| Boot sequence |
A/C |
| D4000D7FFF shadow |
Disabled |
| Boot up floppy seek |
Enabled |
| D8000–DBFFF shadow |
Disabled |
| Floppy disk access control |
Read only |
| DC000–DFFFF shadow |
Disabled |
| IDE HDD block mode sectors |
Disabled |
| Boot up numlock status |
On |
| HDD S.M.A.R.T capability |
Disabled |
| Typematic rate setting |
Disabled |
| PS/2 mouse function control |
Enabled |
| Typematic rate (Chars/Sec) |
6 |
| OS/2 onboard memory |
Disabled |
| Typematic delay (Msec) |
250 |
| Security option |
Setup |
Chipset Features Setup
Choose the following settings on the
Chipset Features Setupmenu in the BIOS. These are typically
the default settings.
| Option |
Setting |
| SDRAM |
By SPD |
| Onboard serial port 1 |
3F8/IRQ4 |
| SDRAM CAS latency |
2T |
| Onboard serial port 2 |
2F8/IRQ3 |
| SDRAM RAS precharge time |
2T |
| Onboard parallel port |
378/IRQ7 |
| SDRAM RAS to CAS delay |
2T |
| Parallel port mode |
EPP |
| Enhanced page mode count |
Disabled |
| ECP DMA Select |
Disabled |
| Internal page detection |
Disabled |
| Onboard IR |
Disabled |
| SDRAM pipe function disabled |
IR Mode |
| IrDA SIR |
Disabled |
| SDRAM x111-211 mode |
Enabled |
| FIR DMA select |
1 |
| I/O recovery time |
Disabled |
| Onboard PCI IDE enable |
Disabled |
| Graphics aperture size |
64 MB |
| IDE ultra DMA mode |
Disabled |
| Frame buffer posted write |
Enabled |
| IDEO master PIO/DMA mode |
Automatic |
| Force PCI_66 GAT mode |
Disabled |
| IDO slave PIO/DMA mode |
Automatic |
| AGP bus turbo mode |
Enabled |
| IDE1 master PIO/DMA mode |
Automatic |
| Passive release |
Disabled |
| IDEO slave PIO/DMA mode |
Automatic |
| Delayed transaction |
Disabled |
| Memory hole at 15M-16M |
Disabled |
| DRAM |
64 bits wide, not 72 bits wide |
| Data integrity mode |
Disabled |
| Onboard FDC controller |
Enabled |
| Onboard FDC swap A and B |
No swap |
Power Management Setup Menu
Choose the default
Power Managementsettings in the BIOS.
PnP and PCI Setup Menu
Windows CE does not support Plug and Play; therefore, you must
ensure that no device conflicts occur due to the settings in this
section.
The following table shows the settings you must choose on the
PnP and PCI Setupmenu in the BIOS. You must change the
settings in bold type to the specified values. These settings
assume that you have a complete CEPC configuration that includes
all the required cards. For more information about the recommended
CEPC configuration, see "Hardware for a PC-Based Platform" and
"Motherboard and Card Configuration" earlier in this section.
If you are not using one of the cards referred to in the
recommended CEPC configuration for either a PCI or an ISA slot—for
example the PC Card socket adapter—you can ignore the settings for
that slot.
| Option |
Setting |
|
Plug and Play OS installed
|
No |
| DMA 1 used by ISA |
No/ICU |
| Slot 1 IRQ |
N/A |
| DMA 3 used by ISA |
No/ICU |
|
Slot 2 IRQ
|
9
|
| DMA 5 used by ISA |
No/ICU |
|
Slot 3/audio IRQ
|
NA |
|
Slot 4/5 IRQ
|
NA |
| ISA MEM block BASE |
No/ICU |
| PCI latency timer |
0 PCI clock |
| SYMBIOS Small Computer System Interface (SCSI)
BIOS |
Disabled |
| IRQ 3 used by ISA |
No/ICU |
| USB function |
Enabled |
| IRQ 4 used by ISA |
No/ICU |
|
USB IRQ
|
15
|
|
IRQ 5 used by ISA
|
Yes
|
| VGA BIOS sequence |
PCI/AGP |
| IRQ 7 used by ISA |
No/ICU |
| IRQ 9 used by ISA |
No/ICU |
| IRQ 10 used by ISA |
No/ICU |
|
IRQ 11 used by ISA
|
Yes
|
| IRQ 12 used by ISA |
No/ICU |
| IRQ 14 used by ISA |
No/ICU |
| IRQ 15 used by ISA |
No/ICU |
© 2000 Microsoft Corporation. All rights reserved.
The information contained in this document represents the
current view of Microsoft Corporation on the issues discussed as of
the date of publication. Because Microsoft must respond to changing
market conditions, it should not be interpreted to be a commitment
on the part of Microsoft, and Microsoft cannot guarantee the
accuracy of any information presented after the date of
publication.
This white paper is for informational purposes only. MICROSOFT
MAKES NO WARRANTIES, EXPRESS OR IMPLIED, IN THIS DOCUMENT.
Microsoft, Windows, and Windows NT are either registered
trademarks or trademarks of Microsoft Corporation in the United
States and/or other countries.
Other product and company names mentioned herein may be the
trademarks of their respective owners.
Microsoft Corporation, One Microsoft Way, Redmond, WA 98052-6399
USA
05/00