The Input Panel writing pad accomplishes exactly the same thing as the on-screen keyboard, entering text when a standard keyboard is not available, but it uses your handwriting as the source for the text. The system for handwriting recognition used on your tablet is the culmination of years of research and is quite arguably the best in the business, but it will make mistakes. The key to satisfaction with the Input Panel writing pad is understanding how to minimize those mistakes, correct them easily where they occur, and use alternative means of text input where the writing pad doesn’t meet your needs.
To switch to the writing pad for text input, tap the Writing Pad tab on the bottom of Input Panel. To test out the writing pad, you will need somewhere for the text to go. The best choice is a word processor, such as Microsoft Word, or a text editor such as Notepad.
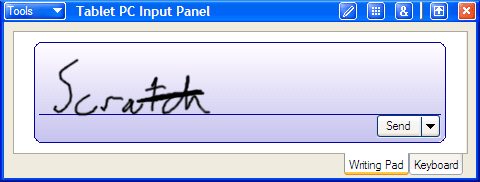
Figure 2-5 shows an Input Panel writing example and the resulting text. As promised in the sidebar, “My Handwriting: I promise honesty,” the text shown in Notepad is the actual text as recognized by the tablet.
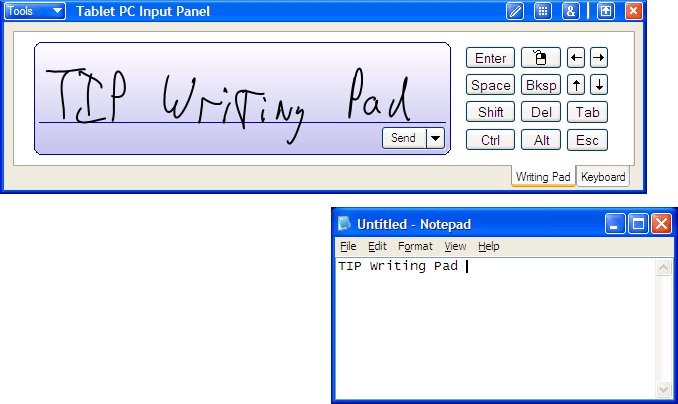
Take a close look at the word “Writing” as I have written it in Figure 2-5. My “t” has an extra line where I dragged my pen up to cross it rather than lifting the pen and my “g” looks more like a “y” because I did not close it off. Also, my “d” in “Pad” resembles a cursive “l” or perhaps an “el.” The tablet correctly interpreted what I wrote, despite these shortcomings, because it doesn’t simply interpret single letters, it looks at the individual letters and the whole word. Even though my “g” looks like a “y,” the recognition system correctly understood “Writing” because “Writiny” is not a word. The system of identifying both letters and entire words can work for or against you depending on how you write. Table 2-1 provides some general rules, examples of how the errors might look on the screen, and the results on handwriting recognition. Some of the items in the table may seem especially dramatic, but the truth is that most took two or three attempts to get an error at all.
|
Writing Pad Input |
Resulting Text |
Notes |
|
TABLE+ Tablet |
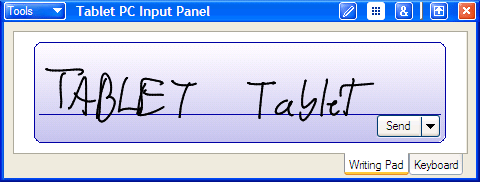
Upper and lowercase work better than all capitals. |
|
Tablet Fillet |
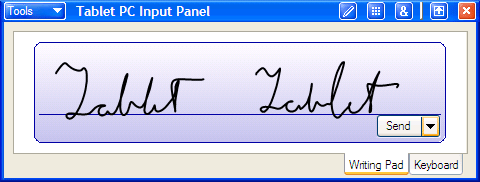
Cursive works better than printing if your cursive is fairly neat and even. |
|
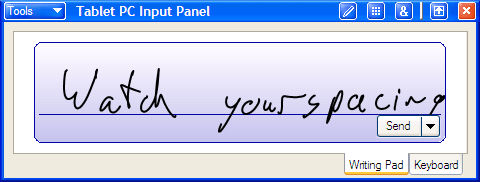
Watch yours pacing |
Leave space between words. |
|
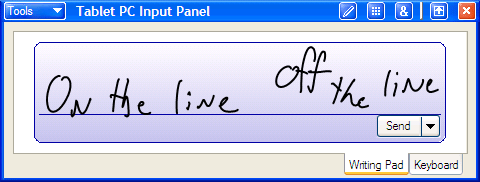
On the line forth.live |
Write on the line. |
|
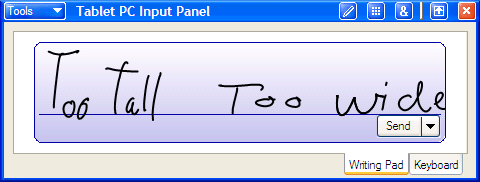
Total/ t.our,’de |
Use a normal height to width ratio, particularly when printing |
When you first try out the writing pad, you’ll probably find yourself waiting at the end of each line for the text to disappear from the pad and appear in your document. This is not because the handwriting recognizer is slow. In fact, the recognizer has the word interpreted in a fraction of a second. The speed at which the words disappear off the pad is determined by the Input Panel options. These options are described later in this chapter in “Setting Input Panel Options.” If you find yourself waiting for Input Panel to empty, tap the Send button sitting just below the writing line and your wait will be over.
Even though it’s called “Send,” this Send button has nothing to do with e-mail; it just sends what it reads to the current program. Don’t tap Enter on Input Panel instead of Send. That will send the text and send an Enter command. If you were writing a filename in a Save dialog box when this happened, the file would save before you could see and correct the filename.
By default, a few keyboard keys appear beside the writing pad. This is the quick keys pad; it’s helpful for putting returns and tabs into a document along with the writing pad text. The quick keys pad also provides arrow, Backspace, Delete, and Space keys for making simple corrections. To correct text, either tap next to the mistake to place the cursor and use the Backspace or Delete keys or select the mistake with the pen and rewrite it using the writing pad or the Input Panel keyboard. Normally the handwriting recognition looks for whole words; however, when you enter letters one at a time on the writing pad to correct text, the system knows you are correcting the word and won’t try to make new words. It’s even “smart” enough that if you add a suffix to a word, such as adding “ing” to “fly,” it usually understands you are adding to a word rather than inserting a new one.
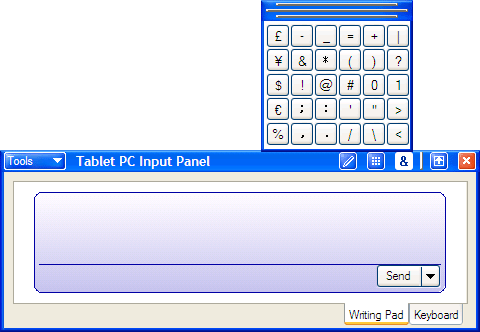
Entering symbols such as _ and + in the writing pad can be very difficult. These symbols usually appear as E and t. The numbers 1 and 0 are also a challenge as they usually come out as the letters l and O. Tapping the Symbols Pad

If you want more space on the writing pad, you can also add the quick keys pad to the Input Panel title bar as a button and remove the quick keys pad from the main Input Panel window. See “Setting Input Panel Options” later in this chapter for more information.
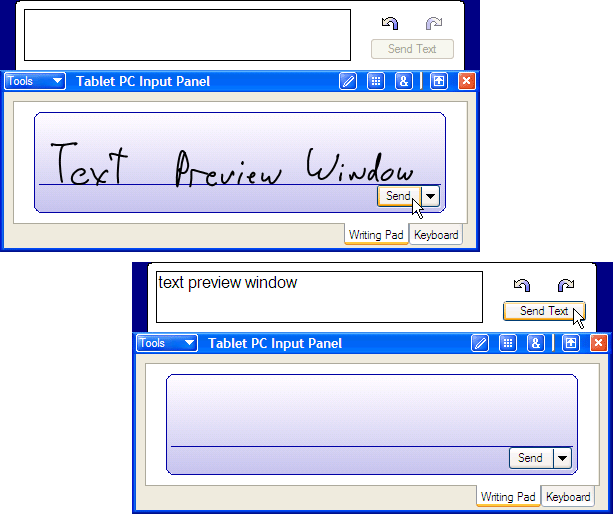
The text preview pane lets you view and edit text after it’s converted from handwriting but before it’s inserted into a document. To view the text preview pane, tap the Tools menu on Input Panel and select Text Preview. The text preview pane will appear above Input Panel. Now when you write on the writing pad, the interpreted text appears in the text preview pane rather than in a Windows application. To send the text from the text preview pane into an application, tap once in the application where you want the text to go and then tap the Send Text button in the text preview pane. Figure 2-7 shows this process.
If text appears in the text preview pane but the Send Text button is grayed out, you probably haven’t placed the cursor telling Input Panel where you want the text to go.
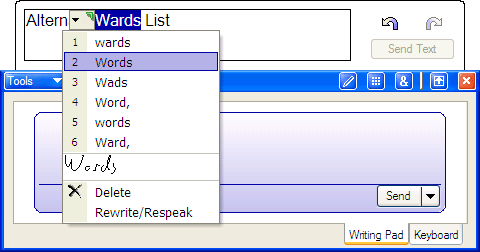
While the text is in the text preview pane, you have an additional tool for text correction. The handwriting recognition system inserts its best guess for your word in the text preview pane. It also keeps on file up to ten more words that are strong alternate possibilities. Single-tap or double-tap any word in the text preview pane, and a small green carat appears on the upper left of the word. Tap the carat, and a list of alternate words appears. In Figure 2-8, the text “Alternate Words List” was recognized as “Alternate Wards List,” but the correct word was on the list of alternates. Words capitalized incorrectly is one of the most common handwriting recognition problems in Input Panel. You’ll notice that the first alternate in the list will always be the same word, but with opposite capitalization. The alternate words list functions like most spelling checkers. Select the correct word from the list, and it replaces the original. A small version of the original ink also appears in case you can’t remember what you wrote. Even when the words chosen by the system seem way off, the correct words may still be on the alternates list. I had “tomorrow evening” come up as “terrarium every” once, but the correct word was available for both of them.
You may select many words at once or parts of a word to correct. Occasionally this allows you to correct two words at once but usually not, and the original ink does not appear with groups of words. Options to delete or rewrite the word also appear, but these are a bit superfluous. If you want to rewrite a word in the text preview pane, select it by double-tapping and write a new word on the writing pad. The new word will replace the old one. The text preview pane can hold many paragraphs’ worth of text, and you can drag and drop to rearrange words.
With many applications, once the text leaves Input Panel the alternates list is lost. Some applications, however, such as Word 2002 (with the Microsoft Office XP Pack for Tablet PC installed), let you access the alternate words list even after the text is inserted into the document. If the application you are using has this type of pen integration, then the text preview pane serves little purpose.
The writing pad will not learn your handwriting, but it can learn your vocabulary. Because recognizing the whole word is a major component of handwriting recognition, adding words to your dictionary is critical. At first you may be adding dozens of words a day, especially if your work involves technical or industry-specific terms. Stick with it. As you use your tablet, the frequency with which you add words will decline rapidly, and the tablet’s ability to understand your writing will astound you.
Adding a word to the dictionary is a two-step process. First you must correct the word as it appears on screen. Once it’s correct, you can add it to the dictionary. Figure 2-9 shows how the word Hayabusa, the Japanese word for Peregrine, was interpreted as Hayabuga. Presumably my “s” looked more like a “g.” It’s useful to note that the recognition system chose to use the letters as it saw them rather than making the letters into a dictionary word, such as Hamburger. This means there were no dictionary words close enough to the string of letters I wrote. Notice as well that the Add To Dictionary option appears for Hayabuga, in case it is a new word the tablet should learn. Once you correct the text, you can add it to the dictionary. In the future, the recognition system will substitute the real word Hayabusa, even when an “s” looks like a “g”, because there is a real word that is very close.

The option to add words to the dictionary can be a bit confusing. It only appears when you select a single word that is not already in the dictionary, yet sometimes it doesn’t appear when you think it should. In Figure 2-10, the word “Jabberwocky” was interpreted as “Jabberw oh y” You can see the recognition system understood my letters fairly well, only mistaking a “ck” for an “h”, but stumbled organizing them into words. Tapping the green carat shows a list of alternates, but no Add To Dictionary option appears because more than one word is selected. Because none of the alternates is close, we need to fix the word manually.
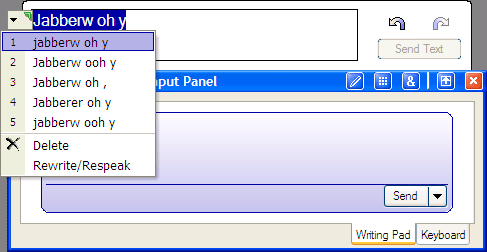
You could tap the “oh” and hope “ock” is on the alternates list, and then use Backspace on the quick keys pad to take out the spaces. A faster way is to select the “oh” and the spaces on both sides and then write “ock” on the writing pad to replace it, as shown in Figure 2-11.

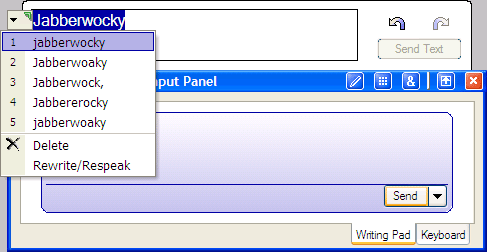
Now that you have the single correct word, you can select it to add it to the dictionary. If you try this, however, you will not see an Add To Dictionary option, as shown in Figure 2-12. The reason is that both “Jabberwocky” and “jabberwocky” are already in the dictionary, as evidenced by the lowercase version in the alternate list. Jabberwocky didn’t appear before now because the system thought the text was more than one word.
In addition to dictionary words, it’s helpful to add strings of text you often use to the tablet dictionary, such as Web and e-mail addresses that you use frequently, abbreviations and slang that appear in your e-mail messages, and unusual names and places. Don’t worry about overloading the dictionary.
It’s very tempting to add passwords to your dictionary so that you can write them quickly rather than tapping them out with a keyboard. Unfortunately, this is a security risk, as anyone with some technical savvy could open your dictionary and see all your passwords. Unless you don’t care who might get at your password-protected data, don’t save your passwords in the dictionary.
The text preview pane also keeps a list of all the text you viewed in the window. If you want to enter the same text several times in a document, you can scroll back through a list of text strings you wrote using the arrow buttons (Recall Preview Text and Recall Next Text) on the right of the text preview pane, find the text you want, and tap Send Text. This applies only to text you wrote with the text preview pane open. Any text you wrote while text preview was closed is not saved.
Here are a few more tips to help you get the most out of the writing pad:
-
Because the ratio of height to width of letters is important, adjust the height of the Input Panel window so that you can write comfortably while still having your capital letters use about 7/8 of the writing area.
-
If the handwriting recognizer keeps interpreting single words as many small words or individual letters, your letters are too far apart. Either make them closer together or use cursive handwriting.
-
The longer the writing pad area relative to its height, the more words you can fit in before you run out of space.
-
The smaller you write, the closer together your letters should be. It’s even okay if they occasionally overlap. This is especially important if you reconfigure your writing pad to show two lines instead of one line.
-
If you use the writing pad to input full sentences on a regular basis, try decreasing the time before text automatically inserts or try a two-line writing pad. Either option allows you to write continuously without waiting for ink to disappear. See “Setting Input Panel Options” later in the chapter for more information on a two-line writing pad.
-
To input long sections of text to older programs, fill the text preview pane with an entire message and then correct it all at once.
-
If the system keeps misunderstanding a word, spell it out one letter at a time and then add it to the dictionary.
-
For better results when correcting single letters, use cursive to create lowercase letters and print for uppercase. The one exception is capital I.
-
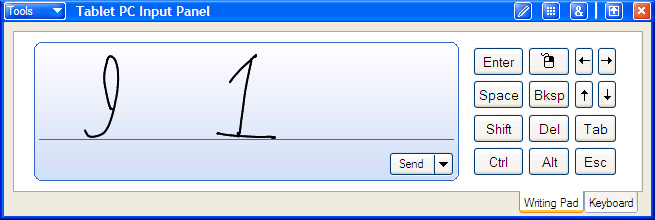
Use a cursive for capital I and draw the upper hook and lower horizontal of a 1 (one) to distinguish them from l (el).
-
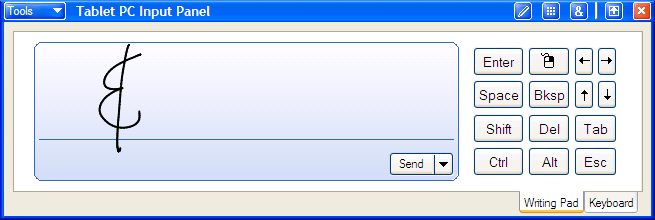
To create an ampersand (&), you can write the common abbreviation of “E” with a vertical line through it.
-
Write the http:// prefix for Web addresses.
-
The writing pad often adds a space on the end of each word. This can cause a problem with some filenames, login names, and passwords. If you’re having trouble with something that appears to be correct, try pressing Backspace to remove the last character after text appears. Capitalization errors can cause similar problems.
There are four gestures that provide keystroke shortcuts while you are using the writing pad. These gestures are pen movements that will not be transformed into text. Instead, Input Panel will behave as if you tapped a button on the quick keys pad. Gestures work only on a blank writing pad, so you must wait until it is free of ink. You may use the gestures to control the cursor in a document or in the text preview pane. Gestures are sent immediately, so the ink will not stay in the Input Panel window for a moment before disappearing. If it does stay for a moment, then the gesture was misinterpreted as text.
The key to executing a good gesture is to do it fast and with authority. Timid gestures just don’t work as well. Table 2-2 shows both a generic version of the gesture and an example of what this might look like on the writing pad. Notice how the Space and Backspace gestures use most of the pad area. This is not required, but it seems to give more consistent results.
If you have text selected in the text preview pane or in a document and you make a gesture, the selected text will be deleted.
|
To get this keystroke |
Draw this gesture |
Example |
|
Backspace |

|
|
|
Space |

|
|
|
Enter |

|
|
|
Tab |

|
|
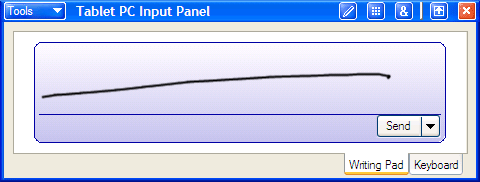
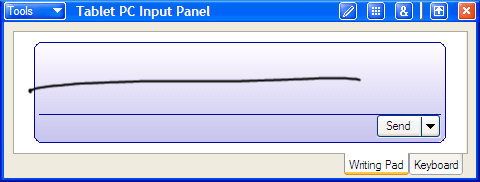
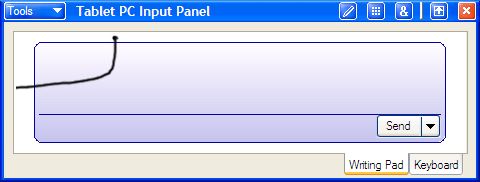
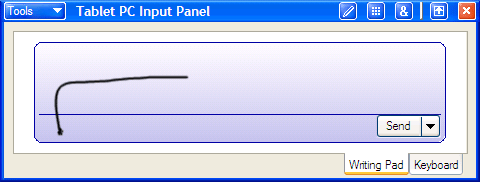
In contrast to the keystroke gestures, the scratch-out gesture requires that you have ink on the writing pad. Scratch-out allows you to erase ink you just wrote before it leaves the writing pad. A scratch-out must be at least 2.5 lines, shaped like a flat Z, that intersect the ink you want to erase. Scratch-out works more consistently if you don’t try to cover the ink you want to erase with the scratch-out mark. Instead, go back and forth over the same line in a very horizontal motion. Whatever ink intersects that line should disappear. Both examples in Table 2-3 can result in a scratch-out, but the upper one will produce more reliable results.
|
Scratch Out Gesture |
|
|

|
|
|
|
Better Scratch Out |
|
|
|
|
|
|
Worse Scratch Out |
|
|
|
|
|
Open a blank document in your favorite e-mail program, and try writing a quick letter to a friend using Input Panel. Use the pen to tap your way through creating a new message and entering his or her e-mail address. Use the Input Panel keyboard to tap in your e-mail address in the CC box. Write a sentence using the writing pad with text preview off, and correct it in the message. Next write a sentence with text preview on, and make your corrections in the text preview pane. Try mixtures of the different input methods and see which system works best for you and in what contexts.