You might want to use your tablet for a while before you change the default pen options, but taking a little time to customize your tablet and pen settings is well worth the effort. Not only will you get better results while using your pen, you will have a better idea how the tablet interprets and responds to your pen inputs. You will probably need to come back a few times to get your settings just right.
“The default [pen] settings are good for the novice user. We expect people to want to change the settings after a month.” –Anoo Padte, Tablet PC Team |
Open the Tablet And Pen Settings control panel from the Printers And Other Hardware group or by selecting Properties from Change Tablet And Pen Settings in the notification area. The control panel opens with the Settings tab selected as shown in Figure 1-10. The Settings tab has a calibration tool to calibrate the accuracy of your pen. The calibration tool is a bit limited in that it samples only four points on the screen, but it’s still the best way to make the cursor move where you want it to using the pen. To begin the calibration process, tap the Calibrate button. Calibrate the screen for both landscape and portrait orientations. When you calibrate, keep your head in the same position it is in when you use your tablet. The whole point of calibration is to adjust for your personal perspective between pen and screen. Use your tablet for a while to see how well the pen directs the cursor, allowing for a bit of lag time between them. If the cursor isn’t following the pen well over the entire screen, try holding your pen more upright. If the cursor seems to be following the pen fine over most of the screen, but has a problem area, try adjusting the calibration again. The Settings tab also controls the “handedness” of your tablet, but that should have been set when you went through the Welcome To Tablet Computing tutorial. The handedness determines both the way the tablet interprets certain characters in Input Panel and on which side of the cursor menus appear.
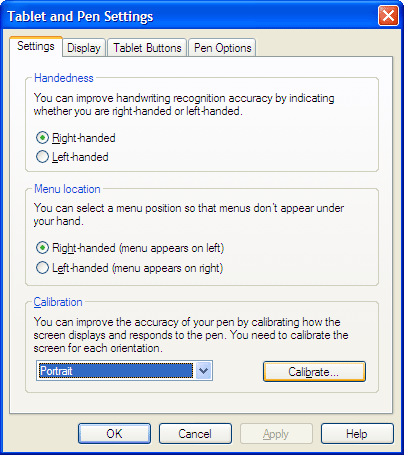
During calibration, if you accidentally tap the screen somewhere other than the target, you can end up with a cursor that’s difficult to control. Tap Cancel to end the calibration without saving the changes, and then calibrate the pen again. If you noticed too late and now can’t control the pen, use the touch pad if available or hook up an external USB mouse to control the cursor and launch the calibration again.
We already looked at the display settings in Figure 1-2. The Display tab also lets you set the screen brightness for when the tablet is plugged in and when it is operating on batteries. While it is true that the screen brightness affects battery life, in practice you must manually adjust your screen brightness on a tablet as you move from office to conference room to outdoors to adjust for different lighting, so the setting here is fairly irrelevant.
The Tablet Buttons tab, shown in Figure 1-11, lets you configure your hardware buttons to perform many different actions or to enter common keyboard commands. The default settings for these buttons are probably fine for most users, but you might wish to customize them for your own needs. Figure 1-11 shows a custom set I used for writing this book. Two of the buttons are set to quickly take screen shots for this book and another is set to turn the screen off manually. Having one-button control of the screen allowed me to turn it off and save power during interviews with the Tablet PC team without looking down. Notice that the hardware buttons on this tablet included a function button, similar to a Shift key, that allowed defining two actions for each hardware button.
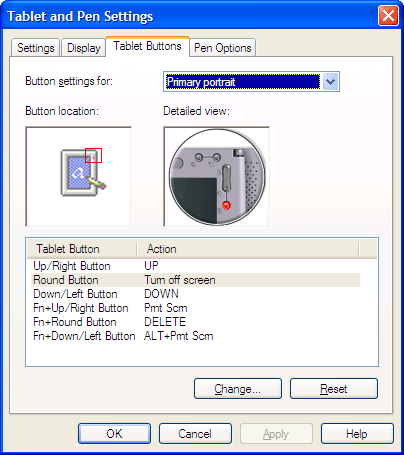
Pressing the function hardware button twice displays the Change Tablet And Pen Settings menu, providing quick access to Change Screen Orientation, Turn Off Screen, and Turn Speaker On Or Off. If your tablet has only a few hardware buttons, this shortcut frees the remaining hardware buttons to use for other commands that are very handy, such as Delete.
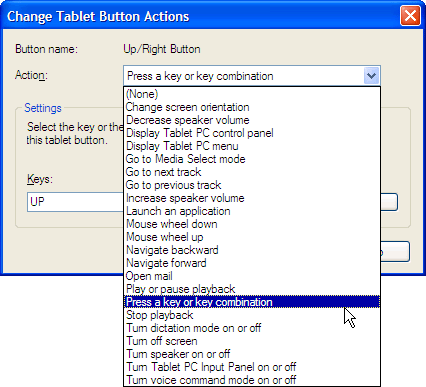
By default, hardware buttons are the same for all screen orientations, but they can be set for different functions depending on the screen orientation. Customizing the buttons for common commands such as Up, Down, and Enter is useful when in tablet mode, but these are not needed if your keyboard is available, as it often is in primary landscape mode. You can change the functions of these buttons so that when you are in landscape mode, they launch often-used programs or let you easily perform common actions, such as skipping to the next track on your music CD. To create a custom hardware button set for a particular orientation, first select the orientation you want from the drop-down list in the top half of the Tablet Buttons tab of the Tablet And Pen Settings control panel. Next select the hardware button you want to change and tap Change. Select the command you want for that hardware button from the drop-down list as shown in Figure 1-12, and tap OK. To set a hardware button so that it will enter a keyboard command, such as Delete, choose Press A Key Or Key Combination and enter the key combination using the on-screen keyboard. You might also select any application on your computer so that it launches with the touch of a hardware button. Usually icons on the Quick Launch bar are a better option for easily opening programs.
The Pen Options tab allows you to customize the pen behavior to match your expectations and is helpful if you aren’t getting a good right-tap. First-time tablet users are often frustrated when they accidentally press the pen button and get shortcut menus where they don’t expect them. You can disable the pen button by unchecking the Use Pen Button To Right-Click check box shown in Figure 1-13.
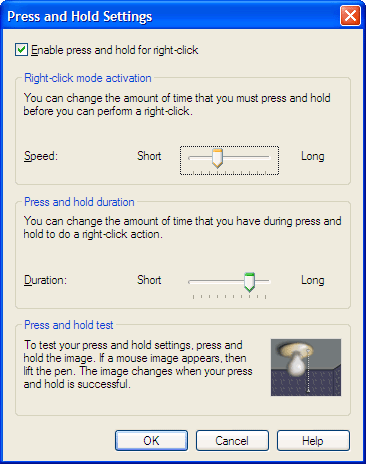
You will still be able to right-click by using the pen to press and hold, but you will no longer be able to right-drag. Unless you use right-drag often, this is a helpful change for many people. By default, the wait for a shortcut menu when you press and hold is annoyingly long and, because you must lift your pen to see the menu, it sometimes disappears before you can find and tap your selection. To adjust these properties, select the Press And Hold pen action and tap the Settings button. Adjust the sliders so that the right-click mode activation is shorter and the press and hold duration is longer as shown in Figure 1-14. You can test your settings on the light bulb animation but trying the new settings in the programs you use most is more telling. If you like the pen button and want to disable press and hold, uncheck the Enable Press And Hold For Right-Click check box in the Press And Hold Settings dialog box.
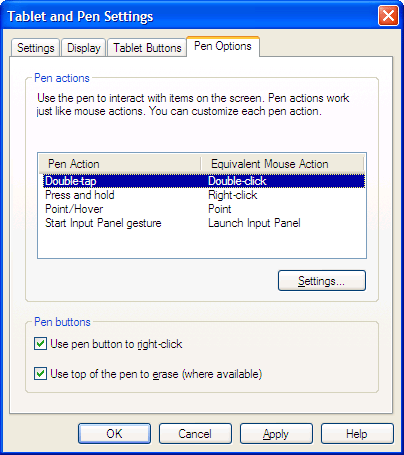
Some pens with pen buttons have a combination button that acts as a right-click if pushed one way and an eraser if pressed a different way. Use Top Of The Pen To Erase is enabled and disabled on the Pen Options tab and can be enabled independently of the pen button for right-tap.
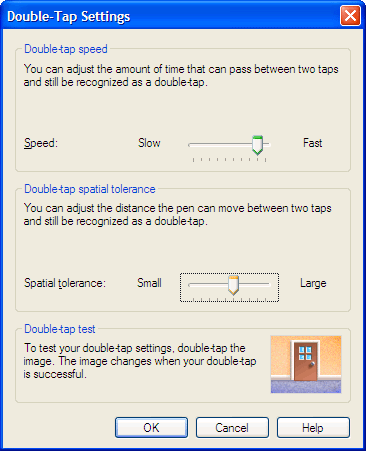
The Pen Options tab also allows you to adjust your double-tap speed and spatial tolerance for double-tapping and point and hover used to get ToolTips to appear. The Double-Tap Settings dialog box is shown in Figure 1-15. Spatial tolerance determines how much your pen can move around in a confined area and still register as staying in one place. If you have the hands of a surgeon, then you can use a small spatial tolerance because your hand will tap twice in almost exactly the same spot. If you have had one too many cups of coffee, then you will need a large spatial tolerance. The only disadvantage to a large spatial tolerance is that you might double-tap when you didn’t mean to. If you are having problems with your double-tap, the most likely cause is that your second tap wasn’t firm enough for the pen to sense. Think “woodpecker,” and try double-tapping again. If that isn’t the issue, you can increase your double-tap spatial tolerance and play with the double-tap speed. Test effects of different settings on the animated door until you can make it open and close with 100% accuracy. If your ToolTip menus keep disappearing before you can read them, increasing the spatial tolerance should correct the problem.
Sometimes the best way to really understand a system is to experiment with its extremes. Try setting your press and hold, double-tap, and spatial tolerance settings to one extreme and seeing how it affects your pen. Now go back and try the other extreme. This should give you a better feel for what each control actually does and allow you to fine tune them to your needs.
There are a few situations in which press and hold for right-tap is a problem. The most common conflict occurs when dragging a scroll bar to scroll through a document. If you press and hold on the scroll bar but wait too long to start scrolling, you will get a shortcut menu. Another conflict occurs with some programs using floating tool palettes, such as Adobe Photoshop, where you must press and hold to change or select items on the palette. If your tablet’s press and hold is active, you might not be able to use the tool palette fully. If you are having conflicts, try increasing the delay for press and hold or turning it off. You might also notice that on-screen buttons, such as the New, Open, and Save buttons near the menus in Word, do not appear to press down on your tablet. This is because the animation for button pressing is incompatible with press and hold. If you disable press and hold, the on-screen button animation will work again. The button-animation conflict is strictly a matter of visual preference; the buttons will still work even if they are not animated.