Perhaps more than any other computer, tablets are very personalized machines. Throughout the book, I’ll offer suggestions for getting the most out of specific applications, but here are a few global suggestions that may help you use your tablet more effectively. All of these items are matters of personal choice. Try them out and keep the ones that work best for you.
Ideally, you will be able to keep the text and icons on your tablet at the standard size to make the most of the limited screen space inherent in a portable computer. If you are having trouble seeing the icons and on-screen buttons on your tablet, however, you can adjust the dots per inch, or DPI, setting and increase the size of most of your icons and on-screen text. First close any programs you have running, and switch your tablet to a landscape screen orientation. Open the Display control panel, and tap the Settings tab. Tap the Advanced button to see the General settings shown in Figure 1-7. Change the DPI setting from 96 DPI to 120 DPI, and tap OK. You will have to restart your tablet to apply the new settings. The increase in size is only 20%, but it can make a big difference. The downside is that the screen will seem a bit more crowded, but it should still be usable.

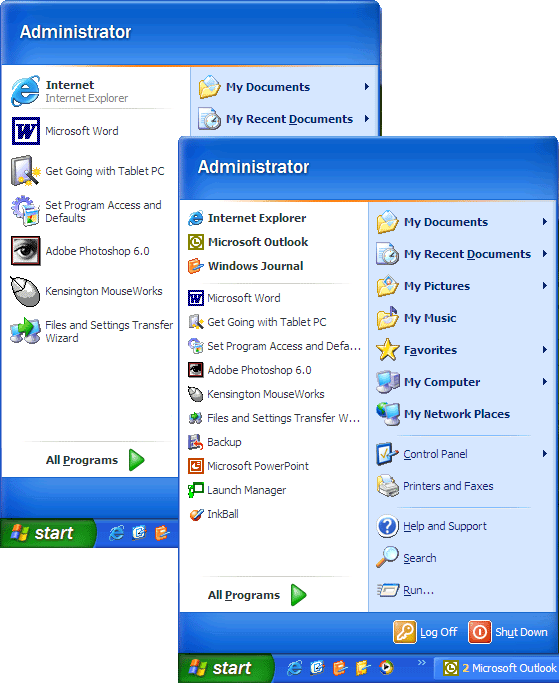
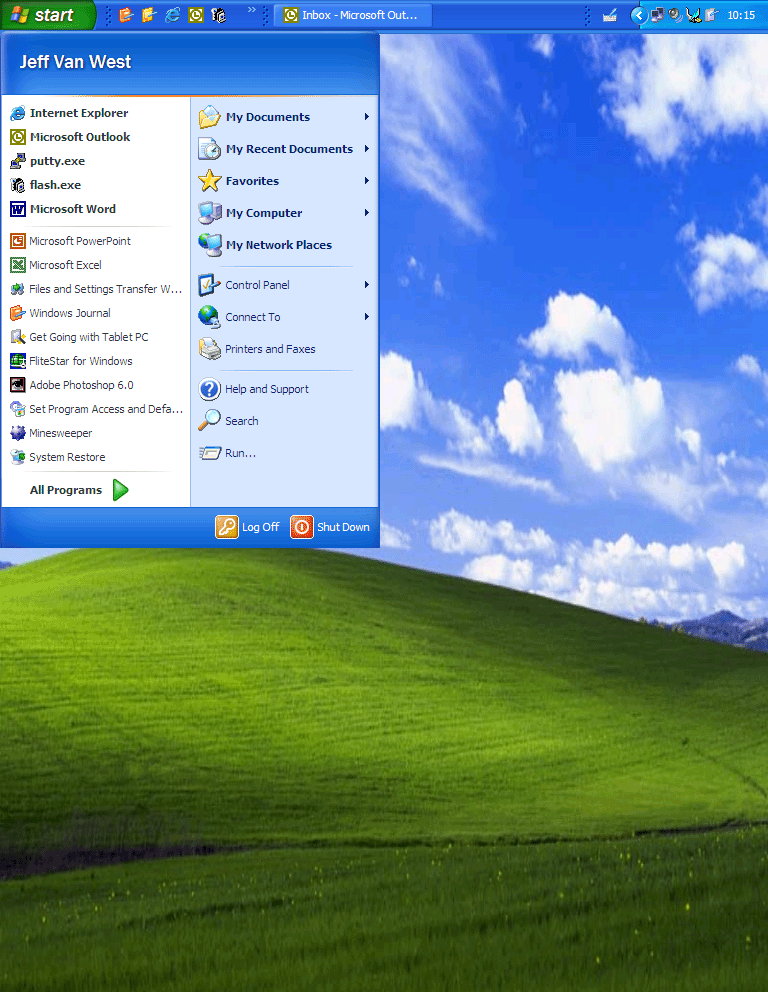
Navigating hierarchical menus such as the Start menu with a pen is a bit slower than navigating with a mouse, since you must lift the pen after each tap to see the next submenu. Customizing the Start menu using the Taskbar And Start Menu control panel can help by putting the most common items only two taps away. The control panel also provides some advanced options for adding recently used documents and favorites to the Start menu. Open the Taskbar And Start Menu control panel by right-tapping on the taskbar and selecting Properties or by using Control Panel. Tap the Start Menu tab, and tap Customize. The dialog box shown in Figure 1-8 appears with three basic options.
When using the Start menu, tap to open each submenu rather than hovering and waiting for the menu to expand on its own.

- Large icons vs. Small icons
Switching to small icons lets you put more items in the Start menu without it taking over the entire screen. The text titles do not change size, so readability does not change.
- Number of Programs on Start menu
Windows XP keeps track of your most recently used programs and keeps them on the first level of the Start menu for quick access. By increasing the number of programs in this list, you can save time drilling down through several menus.
- Show Internet and E-mail on Start
menu
Checking these items permanently places, or pins, your chosen Web browser and e-mail in the Start menu for easy access. Pinned items appear above the list of recently used items.
Permanently adding, or pinning, items to the Start menu is a new feature in Windows XP. The idea is similar to the recently used items list, except pinned items will always be there. Pinned items are automatically excluded from the recently used list, so if you pin Word to the Start menu it will not appear in the list of recent programs. To pin a program to your Start menu, find the program anywhere on your computer—on the desktop, in the All Programs menu, or in Windows Explorer—and drag the icon to the Start menu. It will automatically appear in the pinned items list. Alternatively, you can right-tap that icon and select Pin To Start Menu from the shortcut menu.
If you prefer to use the Classic-style Start menu, select Classic Start Menu on the Start Menu tab of the Tablet And Pen Settings control panel. The new Windows XP Start menu features such as pinning, however, will no longer be available.
While you should definitely set up your tablet in the way that is most comfortable to you, there are a few things you might want to do a bit differently because of the differences between pen input and a conventional mouse and to conserve space. To adjust any of these settings, right-tap anywhere in the taskbar and select Properties from the shortcut menu or open the Start Menu And Taskbar control panel.
- Put Items on the Quick Launch bar
Many people use the Quick Launch bar icons as a way to launch Internet Explorer and their e‐mail program and not much else. On a tablet, the Quick Launch bar allows for super-easy one-tap launching of your favorite programs. This is one less tap than the pinned items, but the icons are small and can be hard to see, especially in bright light or outdoors.
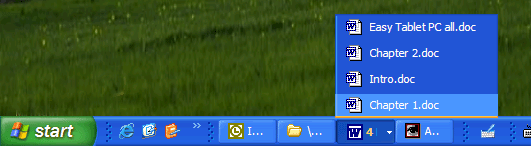
- Group Similar Items
Windows XP allows you to group multiple windows belonging to one program. This feature is invaluable on the tablet, where the taskbar is usually restricted in size.
- Turn off autohide
The autohide feature makes the taskbar disappear when not in use and reappear when you bring the cursor all the way to the edge of the screen. On many tablets, it’s difficult to get the cursor far enough to the edge to unhide the taskbar reliably. The result is more frustration than it’s worth. This is too bad, because screen real estate is very tight on the tablet, and a good way to autohide would help.
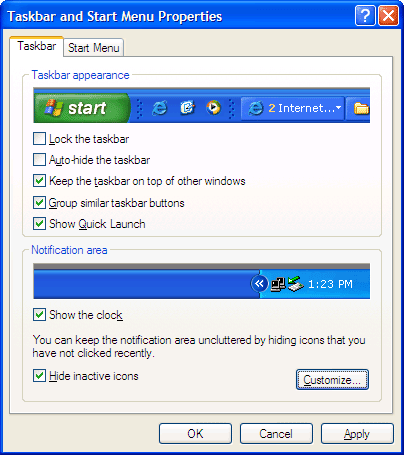
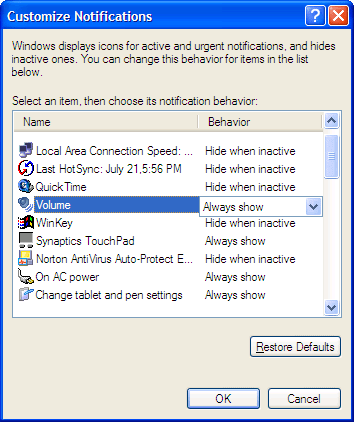
- Customize show/hide of notification area
icons
Many people also ignore these small icons that usually sit in the lower right of the screen. Most of them you don’t need to see on a regular basis, so you should set them to hide when inactive. Some of them you might want available all the time. For example, quick access to volume control can prevent embarrassment in a meeting when a reminder pops up while your boss is speaking. On the Taskbar tab of the Taskbar And Start Menu control panel, make sure the Hide Inactive Icons check box is checked and tap Customize to adjust these options.
Most people know that tapping (clicking) a running program in the taskbar will maximize it, but many people don’t know that tapping the taskbar icon a second time will minimize it. This feature provides a very handy way to switch back and forth between two running programs on the tablet. Windows XP also offers the handy option of closing a group of windows at once when you right-tap on a running program in the taskbar.
This idea is a bit more radical, but I think it is well worth trying. Consider moving the taskbar to the top or side of the screen, instead of to the bottom, as shown in Figure 1-9. For right-handed pen users, reaching down to the bottom left of the screen for the taskbar Start button is somewhat awkward and when the Start menu pops up, you must lift your hand to see the menu items and then tap again. If you are drilling down through several folders, then you must do this several times. For left-handed users, the menu is visible, but the motion is even more awkward. Moving the taskbar to the top or side of the screen puts the Start button close to your resting hand and keeps the menus in view. While it might take a little getting used to, it’s one of the most useful configuration changes you can make when using your tablet.
To move the taskbar, you must first ensure it is not locked. Right-tap in an area that does not contain any icons, and look at the shortcut menu. If there is a check next to Lock The Taskbar, select Lock The Taskbar and tap. The check will disappear. If the taskbar is already unlocked, tap anywhere outside the shortcut menu and it will close. Next tap an area that does not contain any icons, and drag the taskbar to the top or side of the screen. If you try the side, use the same side as your dominant hand. Nothing happens until the cursor gets close to the side of the screen, and then the taskbar will jump to the new position.
If you try the side position, the taskbar will be fairly wide. To make it narrower, hover your pen near the border between the taskbar and the rest of the desktop and adjust the position until you see a double-headed arrow. Drag the border of the taskbar towards the edge of the screen until it is the width you want. The word Start will disappear off the Start button, but the menu will still work. Horizontal space on the tablet is precious, so if you use a side taskbar, you want to make it as narrow as is comfortable. Losing horizontal space is the biggest drawback of the side taskbar, but the length of it allows you to see many Quick Launch bar icons for easy program launching and many open documents all at once. Having the taskbar on the top keeps the full screen width available for your applications and is a little easier to get used to. Try each setting for a few days and see how well they work for you.
One other potential drawback is that when you switch to landscape view, as will happen when you work in laptop mode or when connected to an external monitor and keyboard, the taskbar will still be on the top or side. You can either move it back to the bottom of the screen when you switch to landscape mode or keep it in the new position and see what you think. I like the side taskbar in landscape mode because the documents I work on are longer than they are wide, and I have lots of unused real estate on the sides of my monitor anyway. Having the taskbar on the side gives you maximum vertical space while giving full access to all the taskbar features—and without the need for auto hide.