|
|
Once a configuration has been opened, the first step is to add one or more objects to be exported.
To add a new object to the current configuration, use one of the following options to display the Object Properties dialog:
Select Edit->New Object... from the menu.
Click the New Object toolbar button.
Right click on an existing object and select New...
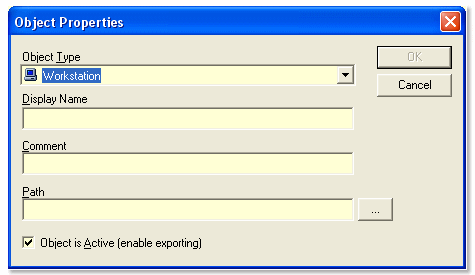
Complete the elements for an object's properties as follows:
Object Type - Select the type of object.
Display Name - Enter in a meaningful name for the object. This does not have to be exactly the same as the 'real' object's name.
Comment - Enter in an optional comment.
Path - Enter in a path to the object using the following guidelines:
Workstation/Server - Enter in either the Netbios path, DNS name, or tcp/ip address.
Printer - Enter in the
full name of the printer including the server name. For
example:
\\printservername\HP LaserJet
Windows NT domain - Enter in the name of the domain.
Windows 2000/2003 domain
- Enter in the LDAP path to the domain. For example:
LDAP://SYSTEMTOOLS.COM
Active Directory Object
(Container, OU, user, group, etc.) - Enter in the LDAP
path to the Active Directory object. For example:
LDAP://SYSTEMTOOLS.COM/CN=Users,DC=SYSTEMTOOLS,DC=COM
|
|
Object is Active - Enable this setting to activate the object. If not checked, the object will be inactive and skipped during any export. Inactive objects are displayed with a grayed-out icon image and are not 'checked' in the object list (left window). If an Object Grouping object is inactive, all of the objects in the grouping will be skipped during any export.
Use an Object Grouping to create a group under which other objects can be placed. To add new objects to an object grouping, select the object grouping prior to adding the new object or drag and drop any objects onto an existing Object Grouping.