|
|
< Day Day Up > |
|
SMS 2.0 included a program called Crystal Reports that allowed you to run predefined reports against the SMS site database, as well as to create new reports. Aside from being a snap-in for the SMS Administrator Console, it wasn't really integrated as a feature of the product. However, SMS 2003 contains a fully integrated reporting tool called the Report Viewer that's accessible through the SMS Administrator Console and that uses your Web browser as a report viewer. Another companion feature for reporting is the dashboard. Dashboards are sets of reports that display in grid fashion in a single window.
SMS 2003 provides well over 100 predefined reports in the following categories:
Hardware
Software
Software distribution
Software updates
Network
Operating system
SMS sites
Status messages
You can view the list of available reports in two ways. You can view them through the Report Viewer, which in my opinion is the friendlier way because it lists the reports by category, or you can view them through the SMS Administrator's Console, which is basically just a long list of reports.
To view the list of available reports through the Report Viewer, follow these steps:
In the SMS Administrator Console, navigate to the Reporting node.
Right-click the Reporting node and select Run from the All Tasks context menu.
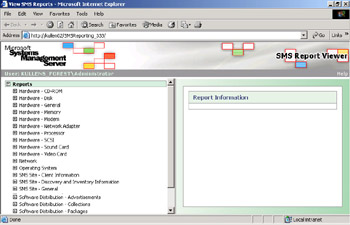
On the Run menu click the name of the reporting point that you want to use. The Report Viewer will be displayed, as shown in Figure 16.17.
Select a report category from the list to see the reports contained within that category.
To view the list of available reports through the SMS Administrator Console, follow these steps:
In the SMS Administrator Console, navigate to the Reporting node.
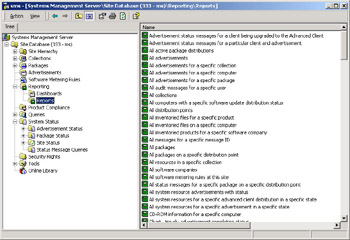
Click Reports. The list of reports is displayed in the right pane of the console, as shown in Figure 16.18.
You can create your own custom reports either from scratch or by copying and modifying an existing report. The principal element of an SMS 2003 report is a SQL statement that defines the data to be gathered and how the results should be displayed. If you're going to create or modify reports effectively, you'll need to have a good working knowledge of SQL. Unfortunately, a discussion of SQL statements and syntax is beyond the scope of this book. Chapter 11 of the Microsoft Systems Management Server 2003 Operations Guide, available from the Microsoft SMS Web site (http://www.microsoft.com/smserver) and Microsoft TechNet, provides several examples of the use of SQL statements in reports.
| More Info |
For more reading on SQL statements and syntax, consult Inside Microsoft SQL Server 2000 (Microsoft Press, 2000). |
Like queries, you can use report prompts to make a report more flexible. Reports can also include links to additional sources of data to make them more effective, such as other reports, the Computer Details and Status Message Details pages of the Report Viewer, and a URL that points to any file supported by HTTP.
You can also make reports created outside of SMS 2003 available for viewing. These are called supplemental reports, and although they're primarily Active Server Pages (ASP), they can be any file that can be displayed using Microsoft Internet Explorer 5.0 or later.
| Note |
SMS 2003 uses the reporting point site system to enable reporting at a site. Chapter 3, 'Configuring Site Server Properties and Site Systems,' discusses how to define and configure SMS site systems. Reports are run against the database of the site in which they were created. However, because of the way SMS propagates data from child sites to parent sites, you might want to set up reporting points based on where the data resides and on the reporting needs of the administrators at each site. For example, site administrators might want to be able to run reports against the data in their respective site's databases, but company managers might want more generic reports that run against the collected data at the central site. |
As stated earlier, creating or modifying a report requires a good working knowledge of SQL, and that's beyond the scope of this book. However, here are some common elements necessary for every report for you to keep in mind:
Every new report requires a category. You can choose an existing category or create a new category.
Report names must be unique within each category.
SMS assigns each report a unique ID.
You can configure each report to refresh results automatically according to an interval. You can also configure some reports to display their data as a chart.
| Note |
To display data as a chart, you must have a licensed copy of Microsoft Office 2000 Web Components, Microsoft Office XP Web Components, or Microsoft Office 2003 Web Components installed on the reporting point. You can install the Microsoft Office Web Components from the Microsoft Office installation CD. |
To create or modify a report, complete the following steps:
In the SMS Administrator Console, navigate to the Reporting node.
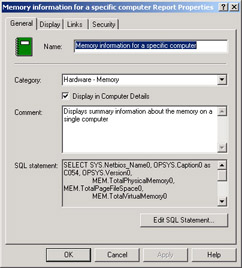
Right-click Reports and select New, then Report, from the context menu to create a new report. Right-click a specific report and select Properties to modify an existing report. For ease of discussion, Figure 16.19 shows the properties of an existing report.
In the General tab, enter the name of the report, select a category, and enter a descriptive comment. Select the Display In Computer Details option if you want the report to be accessible through the Computer Details page of the Report Viewer.
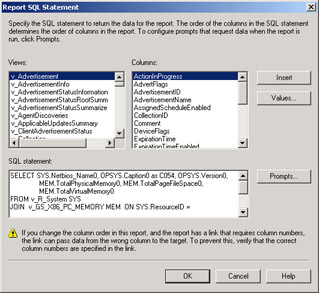
Click Edit SQL Statement to display the Report SQL Statement dialog box, as shown in Figure 16.20. The Views and Columns lists display the available SQL views and columns from the SMS database that you can select to insert into your SQL statement. Select a view or column and click Insert to add it to your SQL statement. Select a column entry and click Values to see the values associated with that column entry. Enter or modify the SQL statement for this report in the SQL Statement text box. Click Prompts to view, add, or modify any prompts included as part of the report.
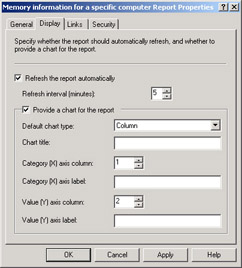
In the Display tab, shown in Figure 16.21, you can specify whether the report results should refresh automatically, the desired refresh interval, and whether you want to display a chart for the report.
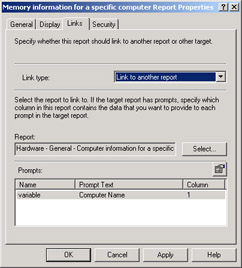
In the Links tab, specify whether you want this report to link to another target (another report, the Computer Details page or Status Messages page in the Report Viewer, or a URL) and the appropriate target information. The target information will change based on your choice of link type and is fairly self-explanatory. In the example shown in Figure 16.22, we're linking to another report. You select the target report by clicking Select, selecting the report you want from the list, and clicking OK. The selected report is displayed in the Report text box. The Prompts list box displays any prompts associated with the target report and the column in this report that contains the data for each prompt. Click the Properties button (the icon just above the Prompts list box) to specify the appropriate column.
If you modify an existing report, there's really no easy way to return the report to its former state. You probably wouldn't want to directly modify the preexisting reports anyway. The better practice is to make a copy of a report that you want to modify and work with the copy instead of the original.
To make a copy of an existing report, complete the following steps:
In the SMS Administrator Console, navigate to Reports under the Reporting node.
Right-click the report you want to copy and select Clone from the All Tasks context menu.
Enter a name for the new report when prompted and click OK.
SMS 2003 gives you the ability to import into your SMS database report objects that were created in another SMS site and to export report objects from your site. You can export all your reports or a specific report. Report objects are exported to a Managed Object Format (MOF) file, which is a text-based file. Only report object definitions are exported. This means that when you import the report at another site, the report runs against the other site's database and returns results based on the data contained in that site's database. The exported report doesn't contain any information from the source site's database.
If you export a report that includes links, only links to URLs are preserved. Links to other objects, such as other reports, must be manually reconfigured. When you import reports from another SMS site, it's recommended that you use a text editor to review the MOF file entries for any report names that might duplicate reports you already have in your site. If you import a report that has the same name in the same category as an existing report in your site, you'll overwrite the existing report with the imported report, so be careful.
To export a report, follow these steps:
In the SMS Administrator Console, navigate to Reports under the Reporting node.
Right-click Reports to export all report objects or the specific report you want to export and select Export Objects from the All Tasks context menu.
Complete the wizard and click Finish.
To import a report, follow these steps:
Each report and dashboard that you create has a unique URL associated with it that contains the report ID and the variable names you used to run the report. You can use this URL to schedule a report or dashboard to run at a specified interval. You can see what the URL is by running a report using the Report Viewer and then copying the URL that displays in the Address box of your Web browser, as shown in Figure 16.23. If you're using a prompted report, you must provide all the prompt information in order to run the report. Thereafter, the scheduled report will always run using the same prompt values that you provided.
Schedule the report to run using the Scheduled Tasks feature of your operating system. For example, on a Windows XP computer, follow these steps:
Start Scheduled Tasks from Control Panel.
Double-click Add Scheduled Task and click Next.
Select Internet Explorer from the Application list and click Next. If it's not listed in the Application list, click Browse, navigate to it, and then click Open.
Enter a task name, select a time interval, and then click Next.
If prompted, select the time and day you want the task to run and click Next.
Enter a user name and password that has permissions to run the report and click Next.
Select the Open Advanced Properties For This Task When I Click Finish option and click Finish.
In the Properties dialog box, insert a space after the entry in the Run text box and enter or paste the URL for the report.
Click OK to save the new scheduled report.
| Tip |
You can use the report URL in several ways to facilitate the viewing of specific reports. For example, you could send the URL as a link in an e-mail or add it to a manager's Web browser as a favorite. The important thing to remember is that whoever launches the link must have at least Read permission for the report. |
After all that, running a report is easy. To run a report, complete the following steps:
In the SMS Administrator Console, navigate to the Reporting node.
Right-click the Reporting node and select Run from the All Tasks context menu.
On the Run menu, click the name of the reporting point that you want to use. The Report Viewer is displayed, as shown previously in Figure 16.17.
Select a report category from the list to see the reports contained within that category.
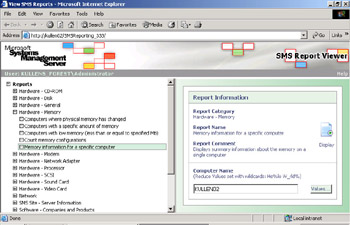
Select a report to run. In the Report Information section of the Report Viewer, enter any required information. In Figure 16.24, the selected report requires that you specify the computer name. You can enter the name or click the Values button to display a list of computer names in the database. Click Display when you're finished to display the report results in your Web browser.
Figure
16.24: The Report Information section of Report
Viewer.
| Note |
Although it looks like you can use wild cards, the wild cards you enter are used only to reduce the number of values displayed when you click Values. You can't use wild cards to alter the results of the report. |
You could also run a specific report by selecting that report directly in the SMS Administrator Console, right-clicking, and choosing Run from the All Tasks context menu, and then proceeding in much the same way as outlined above.
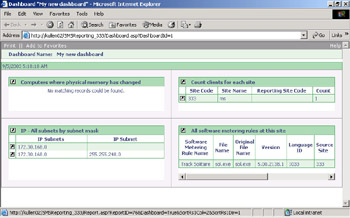
A dashboard is a set of reports that you can display in a grid format to facilitate the quick review of one or more specific or related reports. Dashboards can display any report except those that require prompted values. You can view available dashboards through the SMS Administrator Console or Report Viewer in much the same way as you view reports. SMS 2003 creates a unique ID and URL for each dashboard, so you can schedule them, send them out as links, or set them up as a Web browser favorite much the same as you do for reports. However, SMS 2003 doesn't provide any default or predefined dashboards, so you'll have to set them up first.
To create a new dashboard, complete the following steps:
In the SMS Administrator Console, navigate to the Reporting node and expand it.
Right-click Dashboards, select New from the context menu, and then select Dashboard to display the Dashboard Properties dialog box shown in Figure 16.25.
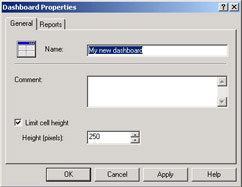
In the General tab, enter a name for the dashboard and a descriptive comment. Select the Limit Cell Height option (possibly for larger reports) and enter the maximum height in pixels you want for the report.
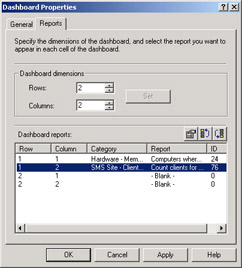
In the Reports tab, shown in Figure 16.26, enter the number of rows and columns to display in the dashboard and click Set. For example, if you want to display four reports, you might select 2 rows and 2 columns, or 4 rows and 1 column, or 1 row and 4 columns.
In the Dashboard Reports section, identify the report that you want to display in each cell of the dashboard. Click the Properties icon (the first of the three icons immediately above the Dashboard Reports section) to display the list of available reports that you can select.
When you have selected all the reports, click OK.
To run a dashboard from the SMS Administrator Console, follow these steps:
In the SMS Administrator Console, navigate to the Reporting node and expand it.
Select Dashboards and select the dashboard you want to run from the list of dashboards.
Right-click the dashboard and select Run from the All Tasks context menu. Then select the appropriate reporting point. The dashboard appears in your Web browser similar to that shown in Figure 16.27.
To run a dashboard from the Report Viewer, complete the following steps:
In the SMS Administrator Console, navigate to the Reporting node.
Right-click Reporting, select Run from the All Tasks context menu, and then select the appropriate reporting point to display the Report Viewer.
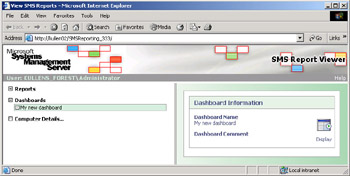
Select and expand Dashboards to see the list of available dashboards, as shown in Figure 16.28.
Select the dashboard you want to run and click Display.
|
|
< Day Day Up > |
|