Configuring an Exchange Monitor
To configure an instance of the Exchange Monitor:
Important: You must activate WhatsUp Gold Premium Edition before configuring an Exchange Monitor.
- Go to the Active Monitor Library:
- In the WhatsUp Gold web interface, select
Go > Configure > Active Monitor
Library.
- or -
- From the main menu bar of the WhatsUp Gold
console, select Configure >
Active Monitor Library. The
Active Monitor Library appears.
Tip: The Active Monitor Library is the starting point for creating any Active Monitor in WhatsUp Gold. This dialog shows all of the Active Monitors in your database.
- In the WhatsUp Gold web interface, select
Go > Configure > Active Monitor
Library.
- Add an Exchange monitor:
- Click New. The Select Active Monitor Type dialog opens.
- Select Exchange
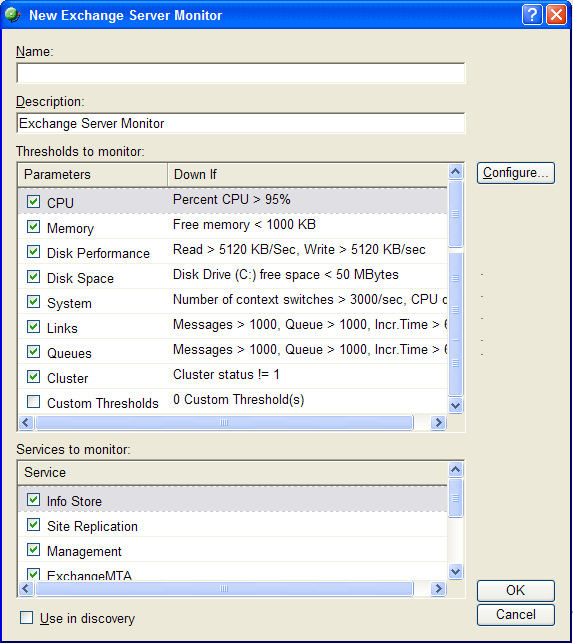
Monitor from the list. The New Exchange Monitor Server
dialog opens.

- In the Name box, enter the name you want to use to
identify this instance of the Exchange monitor. For example, if you
are configuring a monitor to check disk space, you might enter
ExchangeDisk. - In the Description box, enter any text information to further describe the monitor.
- Select the thresholds to add to the monitor (see Thresholds table).
- Select the services to monitor (see Services table).
- Click OK to save the monitor in the Active Monitor Library.
- Add the monitor to your Exchange Server
device.
- In your device list, find the device that represents the Exchange server. Right-click the device, then select Properties. Select Active Monitors.
- Click Add. The Active Monitor wizard opens.
Select the monitor, and continue with the wizard to configure any actions for the monitor.
For more information on setting up an action, see Configuring an Action.
If you select Use in discovery, WhatsUp Gold adds the monitor to the Active Monitors list. From that list, you can select to scan for that service on all applications found during discovery.