Configuring user accounts
User accounts granted the Manage User right can create new user accounts on WhatsUp Gold. New user accounts are created and edited on the WhatsUp Gold web interface via the Manage Users dialog. You can access the Manage Users dialog at Go > Configure > Manage Users. Beginning in v11, the Enable Group Access rights function was moved to the Manage Users dialog. For more information, see About Group Access Rights in the application Help.

To create a new or edit a WhatsUp Gold user account:
- On the WhatsUp Gold web interface, open the Manage Users dialog at Go > Configure > Manage Users.
- On the Manage Users dialog, click
New. The Add User dialog
appears.
- Or -
On the Manage Users dialog, select a user account and then click Edit. The Edit User dialog appears.
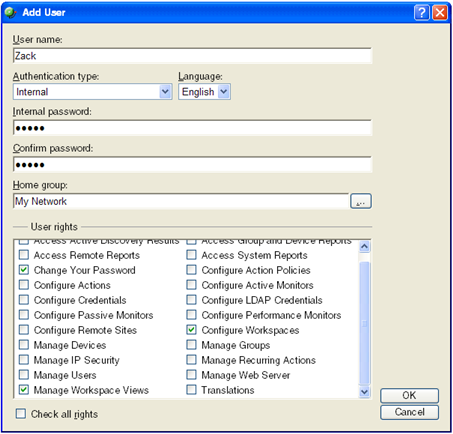
- On the Add/Edit User dialog, enter the
appropriate information in the following fields:
- User Name. Enter the name of the user.
- Authentication
Type. Select the method of authenticating the user.
- Internal. Use WhatsUp Gold's internal user database.
- LDAP. Use an external LDAP database.
- Language. Select the language to display for the user.
- Internal Password. Enter the user's password (only if Authentication Type is set to Internal).
- Confirm Password. Enter the user's password again.
- Home Group. Select the device group that the user will see when they log into the WhatsUp Gold web interface. If they have the correct group access rights, they will be able to navigate out of this group.
- User
Rights. Select which options to give the user access to.
Important: If you are using the WhatsUp Gold Distributed Edition, from the Central Site, make sure that you select the option Access Remote Reports for each user that you want to provide access to the Remote Site reports. Also, make sure that you select the option Configure Remote Sites if you want a user to be able to access and change options in the Configure Remote Sites dialog (Go > Configure > Configure Remote Sites). This dialog provides a list of all of the Remote Sites that have connected to the Central Site. You can view and edit two important settings in this dialog:
- Accept remote site connection. Allows users, with rights, the ability to select or deselect (from the Central Site) the option to accept connections from Remote Sites.
This option is checked by default. The primary reason to uncheck the option is if you need to disable the Central Site from accepting any connections from this Remote Site. For example, this option could be helpful if one of the Remote Sites connected to the Central Site has an unusual amount of activity and is using too much bandwidth between sites. You can easily, temporarily, disable a single Central Site from accepting remote site connections until you determine what the problem is.
- Local device. Allows users, with rights, the ability to select a local device to associate the Remote Site with. Click the Browse (...) button to select a device. This device is often the computer that is running the WhatsUp software on a Remote Site. Associating a local device allows you to view the device status from the Remote Site, keeping you informed about the connection status with the Remote Site. It also provides easy access to the Network Tools for the local device you selected.
- Check all rights. Select this option to select all the user rights listed.
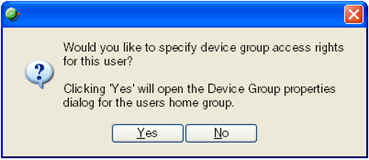
- Click OK to save changes.
- If you have enabled Group Access Rights, you
will be prompted if you would like to specify Group Access Rights
for the new user account. Answer accordingly.
To delete an existing user account:
- On the WhatsUp Gold web interface, open the Manage Users dialog at Go > Configure > Manage Users.
- On the Manage Users dialog, select a user account and then click Delete.