The Unmanaged device discovery (UDD) tool provides a way for you to find devices on your network that haven't submitted an inventory scan to the LANDesk core database. Additionally, Extended device discovery (XDD) uses an agent installed on managed devices to find other devices sending network ARP broadcasts, as well as wireless access point (WAP) devices.
Read this chapter to learn about:
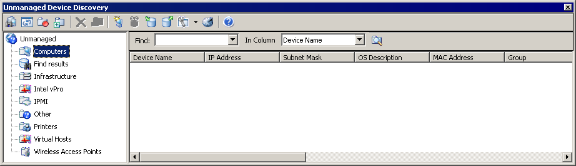
Unmanaged device discovery (UDD) provides many ways to scan for and detect unmanaged devices on your network.
Here are the basic UDD scanning methods:
To automate unmanaged device discovery, you can schedule UDD scans to occur periodically. For example, you could divide your network into thirds and schedule a ping sweep for one third each night.
If you schedule a discovery, the core server does the discovering. Unscheduled discoveries happen from the console that starts them.
The UDD tool also supports extended device discovery (XDD) scanning. XDD relies on a device agent (deployed via an agent configuration) that listens for ARP broadcasts and WAP signals on your LANDesk network. The XDD agent on a configured device then checks to see if the broadcasting device has the standard LANDesk agent installed. If the standard LANDesk agent doesn't respond, an ARP discovered device displays in the Computers group with reported information in the item list view, and a WAP device displays in the Wireless Access Points group with reported information in the list view.
Extended device discovery is ideal in situations involving firewalls that prevent devices from responding to the normal ping-based UDD discovery methods.
NOTE: Use extended
device discovery to discover firewalled devices
Be aware that the normal unmanaged device discovery methods usually
can't discover devices that use a firewall, such as the Windows
firewall that is built into Windows XP. The firewall typically
prevents the device from responding to the discovery methods that
unmanaged device discovery uses. Extended device discovery helps
solve this problem by using network ARP traffic to discover
devices.
It's easy to discover unmanaged devices with the basic UDD scan methods.
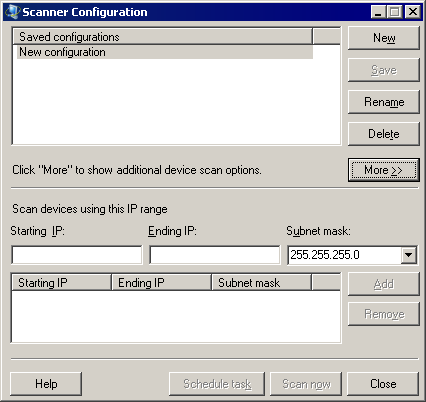
The Windows NT domain discovery option won't work unless you configure the scheduler service to log in to the domain with a domain administrator account.
Extended device discovery (XDD) works outside the normal scan-based UDD discovery methods. The XDD agent can be configured and deployed to managed devices to use the ARP and/or WAP discovery methods. This section describes both discovery methods.
Managed devices configured with the XDD discovery agent for ARP discovery listen for ARP (Address Resolution Protocol) broadcasts and maintain a cache (both in memory and in a file on the local drive) of devices that make them. Networked devices use ARP to associate a TCP/IP address with a specific device network hardware MAC address. This communication happens at a very low level and doesn't rely on devices responding to pings or agent communication on specific network ports. Even heavily firewalled devices rely on ARP. Because of this, extended device discovery can help you find devices that normal discovery scans won't find.
When a new ARP broadcast is recognized by a device configured with the extended device discovery agent, the agents that heard the ARP broadcast wait two minutes for the detected device to boot and then each agent waits a random amount of time. The agent with the shortest random wait time pings the new device first, checking for LANDesk agents, and then the agent sends a UDP broadcast to the subnet to let the other agents know that it took care of the ping for that new discovered device. If you have multiple extended device discovery agents installed, this prevents devices from generating excess traffic by all pinging at the same time.
The ARP tables stored by the extended device discovery agent timeout after 48 hours by default. This means that every network device will be pinged once per timeout period. Even devices that generate a lot of ARP traffic are only pinged once per timeout period.
Devices with LANDesk agents on them are assumed to be managed and aren't reported to the core server. Devices without LANDesk agents are reported to the core server as unmanaged devices. These devices appear in the Unmanaged device discovery window's Computers list. ARP-discovered devices show True in the ARP Discovered column. For ARP discovered unmanaged devices, XDD reports back the following information in the list view columns:
You can also configure managed devices to listen for wireless access point (WAP) devices on your network, and add any discovered WAP devices to the Wireless Access Points group in the Unmanaged device discovery tool.
For discovered WAP devices, XDD reports back the following information in the list view columns:
NOTE: Reporting
the MAC address
XDD uses the wireless detection API on devices running Windows
Vista to obtain the device MAC address and display it in the list
view. However, this capability is not supported on devices running
Windows XP/SP2.
You can use the Agent configuration tool to configure some of your managed devices with the extended device discovery (XDD) agent so they can act as discovering devices that listen for ARP and WAP signals on the network.
You don't have to deploy extended device discovery to every managed device, though you can if you want to. Deploying the XDD agent to several devices on each subnet should give enough coverage.
You can configure various extended device discovery settings for devices with the extended device discovery agent. This agent periodically synchronizes its settings with the core server.
We don't recommend that you install extended device discovery on notebook computers, since they may connect to other networks that you don't want to monitor, such as hotel or airport networks. To help prevent discovery of devices that aren't on your network, the core server ignores IP addresses where the first and second IP address octets are plus or minus 10 from that of the core server. For example, if your core server's IP address is 192.168.20.17, extended device discovery on the core server will ignore addresses above 203.179.0.0 and addresses below 181.157.0.0.
You can disable this feature by adding the following DWORD registry key to the core server and setting its value to 0:
You can set the Filter value to 1 to enable filtering again.
You can adjust the first and second octet monitoring ranges by adding the following DWORD registry keys to the core server and setting their values to the numeric range that you want monitored (the default is 10 for the first and second octets):
FilterThreshold1 contains the range for the first octet and FilterThreshold2 contains the range for the second octet.
Unmanaged devices found through extended device discovery's ARP discovery method appear in the Unmanaged device discovery window's Computers list. WAP Devices found through extended device discovery's WAP discovery method appear in the Unmanaged device discovery window's Wireless Access Points list.
From these lists you can perform the normal UDD options, such as moving them to other groups. Right-click a device to access its shortcut menu and use the available options.
You can also import and export extended device discovery exceptions. An exception is a device on the network that isn't manageable or that the administrator knows about but doesn't want extended device discovery to report on.
These exceptions are in a text CSV file format that consists of comma-separated IP and MAC addresses, in that order, one pair per line. The exceptions export includes all exceptions stored in the database. The exceptions import replaces all exceptions stored in the database with the exceptions you include in the import file.
UDD stores devices found through extended device discovery in the core server's database. If you have a lot of unmanaged devices on your network, this data can grow very quickly. By default, this data is kept for 24 hours. You can customize how long devices found through extended device discovery stay in the database. After the number of days you specify, devices that haven't been rediscovered within that period will be deleted.
There are several XDD reports in the Reports window (Tools > Reporting / Monitoring, click Reporting > Management Suite > Unmanaged Devices) that you can view.
Extended device discovery reports include:
When UDD or XDD finds an unmanaged device for the first time, it tries to identify the device type so it can add the device to one of the following groups:
These groups help keep the UDD list organized so you can more easily find the devices you're interested in. You can sort the device lists by any column heading when you click on a heading.
NOTE: Moving
devices to different groups
UDD may not categorize devices correctly and place them in the
appropriate device groups in every instance. If this happens, you
can easily drag misidentified devices to the correct group.
UDD tries to discover and report basic information about each device, including the following data that appears in the item list view in the right-hand pane of the tool window:
Depending on the device, UDD may not have information for all columns. When UDD finds a device for the first time, it looks in the core database to see if that device's IP address and name are already in the database. If there's a match, UDD ignores the device. If there isn't a match, UDD adds the device to the unmanaged device table. Devices in the unmanaged table don't use a LANDesk license. A device is considered managed once it sends an inventory scan to the core database. You can't drag devices from UDD into the main console network view. Once unmanaged devices submit an inventory scan, they'll be removed from UDD and added to the network view automatically.
You can create custom groups to further categorize unmanaged devices. If you move a device to another group, UDD will leave that device in that group if UDD detects the device again later. By keeping the main Computers group organized and by moving devices you know you won't be managing with LANDesk into subgroups or other categories, you can easily see new devices in the Computers group. If you delete a group that contains devices, UDD moves the devices to the Other group.
You can quickly find devices matching search criteria you specify by using the Find toolbar field. You can search for information in a particular column, or in all columns. Search results appear in the Find results category. For example, use Find to group unmanaged computers that have CBA by searching for "Y" in the Standard LANDesk agent field.
You can also create an alert when UDD finds unmanaged devices. In Alerting (Tools > Configuration > Alerting, click Core alert ruleset) the alert name to configure is Unmanaged Device discovery - unmanaged device found.
In some environments, an nmap mapping on an IP address that isn't in use will return a response on specific ports, confusing nmap. The ports that do or don't respond vary in different environments. If nmap isn't returning accurate OS version results, or as a best practice, nmap should be tuned to the customer environment.
After you've discovered unmanaged devices using the scan and discovery methods described above, you can deploy LANDesk agents to those devices using one of the following methods:
For more information on deploying devices, see the LANDesk User Community at http://community.landesk.com.
When organizing devices for agent deployment, you may find it easier to sort the unmanaged device list by the standard LANDesk agent to group for standard LANDesk agent device deployments and to sort by domain for scheduled task deployments.
NOTE: When
deploying to Windows devices
The Windows default setting forces network logins that use a local
account to log in using the guest account instead. If you aren't
using a domain-level administrative account and are using a local
account for the scheduler service, scheduled tasks will fail
because the scheduler service won't be able to authenticate.
Should you ever reset your core database and need to restore device data, you can use UDD to discover all devices on the network. You can then use the discovery results as the target for the "Restore client records" scheduled task.
If the devices have the standard LANDesk agent on them, this task has the devices send a full inventory scan to the core database that each device is locally configured for. The result of this task is that those devices that have already been configured will be rescanned backed into the database and the devices will still be pointing to their correct managing core server. The task will fail on devices that haven't been managed by a core server.
The server encountered an internal error or misconfiguration and was unable to complete your request.
Please contact the server administrator at webmaster@systemmanager.forsenergy.ru to inform them of the time this error occurred, and the actions you performed just before this error.
More information about this error may be available in the server error log.
Additionally, a 500 Internal Server Error error was encountered while trying to use an ErrorDocument to handle the request.