This chapter explains how to use LANDesk Management Suite to distribute software and files to devices throughout your network.
Read this chapter to learn about:
Software distribution lets you deploy software and file packages to devices running the following operating systems:
Devices receiving the software distribution packages must have the following LANDesk agents installed:
Software distribution features include:
If you don't have an existing package that you want to deploy, you can use Management Suite package-building technology to create a standalone executable program for the required software installation. Once you have a package, store it on a Web or network server called a "delivery server." Through the console, you can schedule distribution using the Scheduled tasks window. The core server communicates the package's location (URL or UNC path to the device), and the device then copies only the files or the portions of the files it needs from the delivery server.
For example, if you're reinstalling a software program because some of its files were corrupted or missing, the system copies only the damaged or missing files, not the entire program. This technology also works well over WAN links. You can store the package on multiple servers, and then schedule devices to use the server appropriate to their needs (that is, location proximity, bandwidth availability, and so on).
Software distribution will also resume interrupted package downloads. For example, if a mobile device was in the process of downloading a large package and that device disconnects from the network, once the device reconnects the download resumes right where it left off.
In Management Suite, software distribution consists of these main steps:
Separating distribution tasks into two parts, distribution packages and delivery methods, simplifies the distribution process. Now you can create delivery method templates that are independent of a particular package. For example, you could create a default Targeted Multicast delivery method template, and whenever you have a package you want to multicast, you can deliver the package using that template without having to reconfigure the distribution package or the delivery method.
If you have different people in your organization that create packages and distribute packages, these changes help simplify job roles and task divisions. Package creators can now work independently from package deliverers.
Software distribution supports these package types:
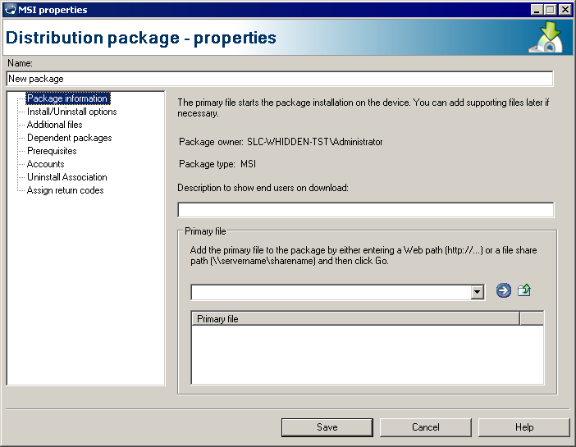
These are packages in the Windows Installer format. You must use a third-party tool to create MSI packages. These packages consist of a primary .msi file and can include supporting files and transforms. Transforms customize how MSI packages are installed. If your MSI package consists of multiple files, make sure you add all of them in the Distribution package dialog.
In order for an executable package to be used by software distribution, it must meet the following criteria:
As long as the executable meets these two criteria, any executable can be used for installing the package. You can include additional files for executable packages.
Batch file packages are based on a Windows/DOS batch file. You can include additional files for these distribution packages. The successful completion status of the batch file package is based on the value of the errorlevel system environment variable when the batch file has finished running.
NOTE: Using batch
files in tasks on Windows 95/98 devices
In Windows 95/98, when command.com launches a batch file that
contains a Windows executable, the batch file will launch the
executable and continue executing commands in the batch file
without waiting. The core will receive a result when the batch file
ends, not necessarily when the Windows executable ends. In this
case, the core won't know if the Windows executable ran correctly
and it will report a successful completion if the rest of the DOS
commands ran successfully.
If the batch file launches a DOS executable, the batch file will
then wait for the executable to finish before continuing on. For
DOS executables, the core will receive a result when all processes
have ended.
Any Macintosh file can be downloaded, though Management Suite won't download directories. Install packages (.pkg) can contain directories. They must be compressed. If the file downloaded has an extension of .sit, .zip, .tar, .gz, .sea, or .hqx, Management Suite will decompress the file before returning. (Users should make sure that Stuffit Expander has its "check for new versions" option disabled; otherwise a dialog may interrupt script execution.)
These are packages in Linux RPM format. These packages must be stored on a Web share for Linux RPM distribution to work.
LANDesk Application Virtualization uses Thinstall technology to virtualize an application, storing it in a single self-contained executable file with the application and the DLL/device driver dependencies. When run, virtualized applications run in an isolated environment without making changes to the Windows installation they are run on.
Virtualized applications run on locked-down devices without requiring additional privileges.
Virtualized applications generally consist of one or more executable files. Software distribution can be used to deploy virtualized application executable files to managed devices. Any of the software distribution delivery methods are used with virtualized application packages, including the Run command from the source. When deploying a run from source virtualized application package, managed devices use an application shortcut icon to run the virtualized application executable file over the network.
Windows Script Host Packages (WSH) are Microsoft Software’s new alternative to batch files that are often used to automate similar tasks such as mapping drives, copying files, or modifying registry keys. The WSH files are most commonly used with Jscript (.js) and VBScript (.vbs). One major advantage of the Windows Script Host package over the .bat package is that they allow the user to combine multiple languages into a single file by using the language independent file extension (.wsf). These packages can often be created in Notepad, an HTML editor, Microsoft Visual C++, or Visual InterDev.
These are packages built with the legacy LANDesk Enhanced Package Builder (installed separately). Although the Enhanced Package Builder is no longer shipped with Management Suite, LANDesk Software continues to support the distribution of files created with it. They are executable files that have properties that uniquely identify them as software distribution (SWD) packages.
Software distribution provides these delivery methods:
NOTE: LANDesk has included default delivery method configurations for each of these delivery method types. These default methods have default settings that should work well in most environments. If you want to modify one of these defaults, you may want to use copy and paste to create a duplicate delivery method that you can then rename, preserving the defaults for future reference.
The following components of software distribution run or reside on the core server:
The delivery server is the server that stores the software distribution packages. It can be either a Web server or a Windows file server. We recommend that for best results, the packages be URL-based. In general, properly configuring a URL is less work than configuring a UNC path.
HTTP package shares need to have the Internet Guest Account added with at least read privileges, since the packages will be accessed via anonymous HTTP.
UNC package shares need to have the Domain Computers group added with at least read privileges.
These steps explain how to create a virtual directory on a Web server and enable it for browsing. In general, virtual directories need to allow reading and directory browsing, and anonymous access to the virtual directory must be enabled. Execute must not be set or the share won't work correctly. You also may want to disable write permissions so devices can't change the directory's contents.
The size and number of packages you put in this directory is limited only by available disk space. Subdirectories can be created to logically group packages. Each subdirectory that's created must have the access permissions set, as described in the "To configure a Web server for software distribution" task above.
Once you copy the packages to a package share on a Web server, they're staged and ready to be copied to the target devices. When scheduled, the URL or UNC path of the package is passed to SDClient.exe (the device agent) as a command-line parameter. SDClient.exe manages the file transfer, starts the installation, and reports the status. Although the HTTP protocol is used for the file transfer, the status report is returned through the standard LANDesk agent.
The Web server communicates with the device to ensure that the package copies correctly. If the package transmission is interrupted during the download, the Web server can use the HTTP protocol to restart the download at the point where it stopped. The Web server doesn't check, however, to ensure that the package was installed correctly. That traffic is TCP-based, and it returns the status to the core server using the standard LANDesk agent.
Devices that don't have a browser must receive distribution packages from a UNC path on a Windows network server. This can be the same folder as the one you set up on your Web server. If you're using preferred servers, you can configure authentication credentials for your UNC package share there, without having to configure a null-session share.
If you aren't using preferred servers or preferred server credentials, you'll need to make your package share null-session, which allows users to access the share without having to provide alternate credentials. Use the SysShrs.exe utility to create a null-session share folder.
The size and number of packages you store on the network server is limited only by the available disk space.
When hosting packages on a Microsoft IIS Web server, there is some additional configuration you need to do:
IIS 6 handles virtual directories differently than IIS 5 (IIS 5 was the Windows 2000 Web server). On an IIS 6 server, if you select a directory and from its shortcut menu make it a Web share, the directory registers itself in IIS 6 as a Web application rather than a virtual directory. The problem is that as a Web application, when trying to select an executable file, the Web server attempts to run the file as a Web application rather than download the file to the user.
The solution is to go into IIS, change the shared directory from a Web application to a virtual directory, and turn off execute permissions.
When hosting files on an IIS 6 server, files without a registered MIME file type will result in an HTTP error 404, File Not Found. This will resulting in the multicast and/or installation of the file failing unless you register MIME file types.
A distribution package consists of the package file you want to distribute, any additional files needed by the package, and settings that describe the package components and behavior. You must create the package before you can create the distribution package definition for it.
These instructions explain how to create a software distribution package. For the package to execute correctly, the software distribution package must exist on either a network or Web server and the devices must have the software distribution agent installed.
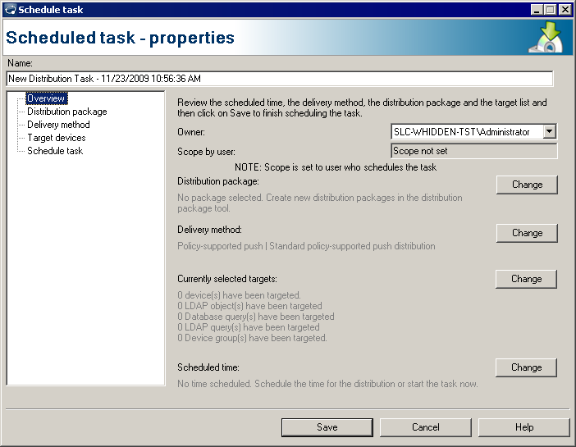
There are three main steps required to distribute a package to devices.
NOTE: LANDesk has included default delivery method configurations for each delivery method type. These default methods have default settings that should work well in most environments. If you want to modify one of these defaults, you may want to use copy and paste to create a duplicate delivery method that you can then rename, preserving the defaults for future reference.
View the task progress in the Scheduled tasks window.
In environments where there are many Management Suite users, it can get confusing knowing which distribution packages, delivery methods, and scheduled tasks each user is responsible for. To help with this problem, Management Suite makes the user that created the distribution package, delivery method, or scheduled task the default owner of that item. Only the owner and RBA Administrators/Software distribution configuration users can see these private items.
Private items appear under the My delivery methods, My packages, or My tasks trees. Administrative users can see items for all users under the All distribution packages, All delivery methods, and All tasks trees.
When users create a distribution item, the Description page has an Owner option. Users can select Public if they want all console users to see that item. Administrators can select a specific user in addition to Public.
For more information on using role-based administration with software distribution, see Software distribution.
Push, policy, and policy-supprted push software distribution tasks can include a preliminary package and a final package. When using multiple packages, the packages are installed in order one at a time. The previous package must return a successful task status on all targeted devices before the next package begins installing.
Preliminary and final packages are useful in cases where you want to run commands before and/or after the main package. For example, you could create a batch file package that executes commands to configure the targeted device for the main package. After the main package finishes installing, you could specify a final batch file package that does any post-configuration. Any package type can be a preliminary or final package, but the delivery method must be push. The policy-supported push delivery method doesn't support preliminary and final packages.
You can specify preliminary and final packages when you schedule a distribution task. The Scheduled task - properties dialog's Distribution package page has the Preliminary package and Final package options. Before you can click one of these options, you must go to the Delivery method page and select a push delivery method. To do this, click Push for the Delivery type and click the Delivery method that you want to use.
Software distribution has several methods for getting the file down to the device for installation. These include:
When a file needs to be downloaded, the device software distribution agent, SDClient, first checks the cache to determine if the file is located in the cache. The cache is defined as either C:\Program Files\LANDesk\LDClient\sdmcache or the path stored in the "Cache Directory" under the multicast registry key:
The structure of files in the cache will be identical to the structure of the files on the Web or network server. This allows multiple packages to have files with the same name and not cause problems.
If the file isn't in the cache, SDClient will typically attempt to download the file from a peer in the network. You can configure the delivery method to require a peer download.
If the file can't be obtained from a peer, SDClient will download the files directly from the UNC or URL source. You can configure the delivery method so that if the file is to be obtained from the source, only one device in the multicast domain will download the file from the source location. Under most circumstances when downloading from a UNC share, this requires the UNC share to be a NULL session share. If the file to be downloaded is URL-based, SDClient will download the file from the Web site.
In either case, SDClient will put the file in the multicast cache. After it is put in the multicast cache, SDClient processes the downloaded file.
When a file is downloaded into the cache it will remain in the cache for several days, but it is eventually deleted from the cache. The amount of time that the file will remain in the cache is controlled by the delivery method used when deploying the package.
Because many package files are obtained from peers in the network, the files are verified prior to installation. The integrity of the files are verified by comparing the MD5 hash of the file to the MD5 hash generated at the core server.
When a distribution package is first scheduled, Management Suite downloads the files and calculates the hash values associated with the primary file and any additional files used by the distribution package. If the hash stored with the package doesn't match the hash value SDClient computed on the target device, the download isn't considered valid.
If you make any changes to the package outside of Management Suite, such as updating the package contents, you need to reset the hash, or any scheduled tasks using the updated package will fail.
Software distribution normally downloads package files to the local device's cache and then installs the package from the cache. This may not work well if a package or application expects installation files to be in a specific folder structure, such as with the Microsoft Office installer, or if the application installation doesn't use all source files for every installation.
For cases like these, you can instead have the local software distribution agent run the file directly from the source, whether that's a preferred server or the source specified in the package. When you enable run from source, software distribution won't download package files to the local cache, nor will it run the package from a peer.
When using run from source with packages stored on Web shares,
the primary file must be an MSI file or SWD package. With UNC
shares, the primary file can be any file type.
Distributed file systems (DFS) use several servers to provide files that are available from a single file share. Software distribution's default method of bandwidth detection in a DFS scenario ends up using the root server to calculate bandwidth, which may not be the actual server that provides the file. Software distribution now provides an optional way of calculating bandwidth. With this new method, bandwidth detection retrieves a small portion of the actual file being distributed. This way, software distribution calculates bandwidth from the server providing the file.
This alternate bandwidth detection method isn't enabled by default. You can enable this option from the ntstacfg.in# file in the core server's ldlogon folder. Once you update this file, the changes become part of new or updated agent configurations. You must redeploy your agent configuration to devices for the change to take effect.
Look for this section in ntstacfg.in# and make the necessary changes.
; The following registry values control detecting
bandwidth by file download
; change the UseDownloadForBandwidth value to 1 to enable use of
file download for bandwidth detection
; the DownloadSize value should be entered as a Hex value between
400 and FFFF(1024 bytes to 65535 bytes).
REG1=HKEY_LOCAL_MACHINE,
SOFTWARE\LANDesk\ManagementSuite\WinClient\SoftwareDistribution\UseDownloadForBandwidth,
0, , REG_DWORD
REG2=HKEY_LOCAL_MACHINE,
SOFTWARE\LANDesk\ManagementSuite\WinClient\SoftwareDistribution\DownloadSize,
2000, , REG_DWORD
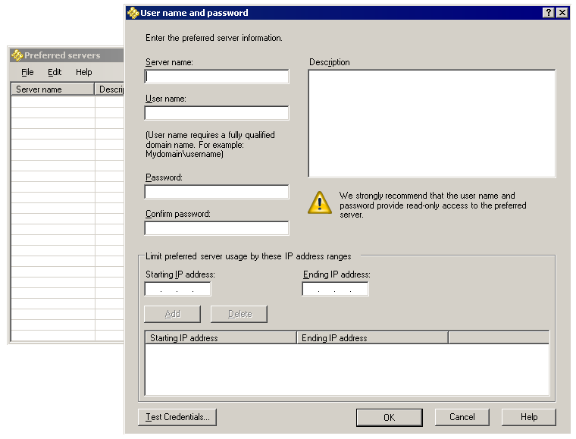
You can specify the preferred server that devices will check for software distribution packages. This can be important in low-speed WAN environments where you don't want devices downloading packages from off-site servers. When you specify preferred servers, you can also specify the credentials managed devices should use to authenticate with each preferred server. You can also specify the IP address ranges that preferred server will be available to.
When using preferred servers with a distribution job, only the server portion of the UNC or URL file/package path is replaced; the rest of the path must be the same as what was specified in the distribution task. If the file isn't on the preferred server, it will be downloaded from the location specified in the distribution package. The only distribution method that doesn't support preferred servers is Multicast (cache only).
The core server also uses preferred servers. The core server uses distribution package hashes to verify distribution packages in scheduled tasks. The core server will first try to generate these hashes from a preferred server. Using a local preferred server makes the hashing process much quicker. If the package isn't available on one of the preferred servers, the core server falls back to generating the package hash from the path specified in the distribution package. You generally won't want the core server pulling a large package over the WAN link for hashing, so hashing files on a server that's local to the core will be much faster and use less low-speed bandwidth.
Managed devices store the preferred server list locally in the preferredserver.dat file. To create this file, a device communicates with the core server and then makes a filtered list of preferred servers (based on IP address range limits, if any). The device then does a bandwidth check to each preferred server and saves the top three servers in the preferredserver.dat file. Note that the bandwidth check doesn't produce guaranteed reliable results. For example, a server that's close by may have a high load at the time the agent checks, so it may get bumped off even if normally it's the best candidate.
The distribution agent updates the preferredserver.dat file every 24 hours or when the IP address changes. Not every device has to go through this process. Devices share their preferred server lists with peers. This is the process managed devices go through to maintain a current preferred server list:
If none of these steps results in an available preferred server, the local agent uses the distribution path specified in the distribution job.
The easiest way to manage preferred servers is with the Server credentials dialog (Configure > Preferred server). If you want to configure a fallback list of preferred servers that will be used if there are no servers in the preferredserver.dat file, you can create the following registry key on managed devices, and set the value to the preferred package server name. You can specify multiple package servers by separating them with semicolons.
Here's a sample registry entry:
By default, the preferredserver.dat file contains three servers whose test results gave the highest bandwidth at the time of the bandwidth check, in order. You can change the number of servers stored in preferredserver.dat by updating this line in the ntstacfg.in# file in the core server's ldlogon folder. Valid numbers range from 0 to 7. Once you update this file, the changes become part of new or updated agent configurations. You must redeploy your agent configuration to devices for the change to take effect.
; Settings for the lddwnld/ldredirect files, the
DynamicPreferredServers is the
; maximum number of preferred servers that will be stored. Set this
to 0 to disable
; the dynamic preferred server functionality.
REG51=HKEY_LOCAL_MACHINE,
SOFTWARE\LANDesk\ManagementSuite\WinClient\SoftwareDistribution\DynamicPreferredServers,
3, , REG_DWORD
In order to prevent delays when the most preferred servers do not have a package, the redirection logic will start to prefer servers that have been actually providing files to the device. You can change the preferred server prioritization in preferredserver.dat by updating these lines in the ntstacfg.in# file in the core server's ldlogon folder:
; In order to prevent delays when the most
preferred servers do not have a package
; the redirection logic will start to prefer servers that have been
actually
; providing files to the client. The following registry options
control when a
; server is moved up the list. The ServerHistoryUseCount value
indicates the number
; of times a server must be used before it will be moved to the
start of the list,
; the ServerHistoryCacheTime value indicates how long it should be
remembered (in seconds).
REG52=HKEY_LOCAL_MACHINE,
SOFTWARE\LANDesk\ManagementSuite\WinClient\SoftwareDistribution\ServerHistoryUseCount,
3, , REG_DWORD
REG53=HKEY_LOCAL_MACHINE,
SOFTWARE\LANDesk\ManagementSuite\WinClient\SoftwareDistribution\ServerHistoryCacheTime,
3600, , REG_DWORD
When you add preferred servers (Configure > Preferred server), you also provide credentials that devices should use when accessing the preferred server. For security reasons, make sure these credentials provide read-only access. Devices obtain these credentials from the core and use them to authenticate with that preferred server. When using preferred servers added to the Server Credentials dialog, you no longer have to configure your package shares to be null-session shares, as was necessary with previous versions. As long as the credentials you provide for the preferred server work with the package share (Click Test credentials in the User name and password dialog), managed devices should be able to access the share.
Management Suite 8 and later versions support distribution byte-level checkpoint restart and dynamic bandwidth throttling. Checkpoint restart works with distribution jobs that SWD first copies to the device cache folder (by default, C:\Program Files\LANDesk\LDClient\SDMCACHE). When a bandwidth controlling option is selected, the files get copied to the device cache first, and checkpoint restart allows interrupted distributions to resume at the point where they left off.
Dynamic bandwidth throttling specifies that the network traffic a device creates has priority over distribution traffic. This option also forces a full download of the file into the device's cache, which also enables byte-level checkpoint restart, where downloads resume where they left off if interrupted. If you select this option and leave the Minimum available bandwidth percentage at 0, once the device initiates network traffic, the distribution cuts back to about one packet per second until the traffic stops. Increasing the minimum available bandwidth preserves approximately the amount of device bandwidth you specify for distribution if the distribution needs network bandwidth and there is contention for bandwidth on the device.
If you're reinstalling or repairing an SWD package or an MSI package, you may not want to use the dynamic bandwidth throttling option, because these package types normally only download the files they need. Using dynamic bandwidth throttling in this case would force a full download of the package when a repair might normally only require a small portion of the package.
Dynamic bandwidth throttling isn't available on Windows 95, Macintosh, or DOS devices. Windows 98 and Windows NT devices can use dynamic bandwidth throttling if they have Internet Explorer version 4 or later installed.
You can configure collective bandwidth throttling so that only one device from the multicast domain will download from the remote source. You can also configure the amount of bandwidth used when downloading from the source. This feature is available on all versions of Windows systems. Collective bandwidth throttling isn't available on Macintosh or DOS systems.
LANDesk Targeted Multicast technology makes it possible to distribute large packages to many users across the network with a minimum of network traffic. Targeted Multicast features require no additional hardware or software infrastructure, and require no router configurations to allow multicast packets. You get the extraordinary benefits of multicast technology with none of its traditional headaches.
Targeted Multicast is designed to work with your existing software distribution packages. When you use Targeted Multicast, you can easily distribute software, even in WAN environments with multiple hops and low connection speeds (56k). Targeted Multicast uses HTTP for delivery from a Web site to a subnet representative. Management Suite's inventory scanner provides all the subnet information to the Targeted Multicast service.
Targeted Multicast provides unique benefits that standard methods of "multicast" don't provide. Inventory-based targeting of devices enables you to send a package to a selected group of computers that fit specific criteria via a multicast. Targeted Multicast is also simplified because there's no need to configure routers to handle deliveries.
When compared to conventional software distribution methods, Targeted Multicast significantly reduces the time and bandwidth needed to deliver software packages. Instead of sending a package across the wire for each device, only one transfer is made for each subnet. Bandwidth savings increase as the number of devices on each subnet increases.
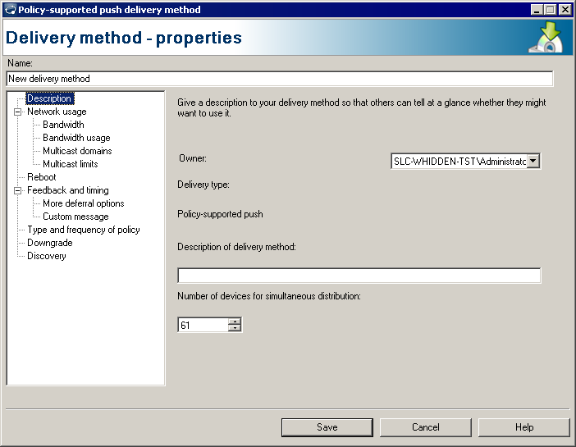
You can activate Targeted Multicast from the delivery method properties by checking the Use Multicast to deploy files option on the Network usage page of the Delivery methods properties. Multicast is available in policy supported push, push, and multicast (cache only) delivery methods. Underneath the Network usage page you will find several pages that allow the multicast to be configured.
When you start a distribution using Targeted Multicast, you'll see the Multicast software distribution window. This window contains detailed information about how the distribution is proceeding. For more information about what each field means, click the Help button on the Multicast software distribution window.
Both Windows and Macintosh OS 10.2 devices support Targeted Multicast. Additionally, you can multicast OS deployment images.
Peer download is a Targeted Multicast option that forces targeted devices to install a package from the devices' local cache or from a peer on the same subnet. This option conserves network bandwidth, but for the package installation to be successful, the package must be in the local cache or a peer's cache.
If you don't select the Peer Download option, the Targeted Multicast device agent will still attempt to conserve bandwidth by checking the following locations for package files in this order:
You have the option of copying one or more files to the local multicast cache folder using multicast. This option copies a file to the targeted devices' local cache. It doesn't install the file or do anything else with it. This option is useful for getting files to multicast domain representatives or a device in each multicast domain. You can do an initial deployment to domain representatives and then redo the deployment with the peer download option to ensure devices only download the package from a peer on their subnet.
Before using Targeted Multicast, you need to make sure the Targeted Multicast components are in place on the subnet you're distributing to. Targeted Multicast requires Management Suite 8 agents and a multicast domain representative.
Targeted Multicast will use the first computer that responds per subnet in the Multicast domain representatives group.
Only Windows computers can be multicast domain representatives. If you are using multicast to distribute packages to Macintosh computers, make sure there is at least one Windows computer in the multicast domain that can act as a domain representative for the Macintosh computers. If you only have a few Windows computers in a predominantly Macintosh environment, it's best to manually specify Windows domain representatives in the Multicast Domain Representatives group.
You can throttle multicasts by changing the bandwidth sliders in the Bandwidth usage page under the Network usage page on the Policy-supported Push, Push, and Multicast delivery method windows.
You can also customize Targeted Multicast options in the Configure Management Suite Services dialog box. To configure the Targeted Multicast service, click Configure > Services > Multicast tab. Click Help on that tab for more information.
LANDesk Management Suite performs most application installations and other tasks using full system privileges. Some application installations and other tasks need to be performed as the system's current user. Since the release of LANDesk Management Suite 8.7 SP2, the startasuser.exe application, makes it possible to run an application under the context of the currently logged-on user.
startasuser.exe will launch the supplied command line in the context of the user currently logged onto the system. startasuser.exe supports the following command line format:
startasuser.exe [///silent] [///timeout=x] [///?] command line...
If no user is logged onto the system when startasuser.exe launches, the application returns the standard Windows ERROR_NOT_LOGGED_ON (1245) error.
All of the command-line options for the startasuser.exe application are preceded with three forward slashes (///); this is done to prevent confusion with command line options of the launched application.
The command line options are outlined in more detail below.
This option results in the created process being started as hidden. This should prevent any windows of the application displaying.
This option controls the timeout (in seconds) for the launched application. If the launched application has not completed before the specified timeout has occurred, the startasuser.exe application will exit with the standard Windows error WAIT_TIMEOUT (258).
This option causes command line usage to be displayed to stdout. Because startasuser.exe is a Windows application, the help will not display in the command prompt by default. Use the following command line to display help from within a command prompt:
startasuser.exe ///? > more
After any startasuser.exe options, specify the full command line for the application to be run.
The following two examples show how to use the startasuser.exe application to launch an executable or install an MSI.
This package can now be used in a software distribution task and will result in the regedit application being launched in the context of the user currently logged on.
This package can now be used in a software distribution task and will install the MSI package using the currently logged on user.
Management Suite supports MSI installation with full status reporting and MSI package recognition. The MSI distribution package type is the Management Suite preferred method of software distribution. Understanding the MSI parameters will help you set up MSI packages and delivery methods.
When installing an MSI distribution package, Management Suite leverages the MSI API calls. MSI installations use two different types of command-line parameters:
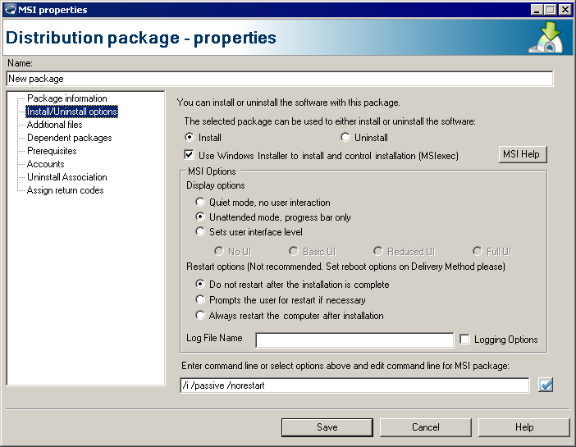
Option parameters are the switches that are used by the Microsoft installation tool, Msiexec.exe. For example, the /q switch is a common switch for Msiexec that silences an unattended installation.
In the Distribution package-properties dialog box, you can enter MSI option parameters in the Install/Uninstall options page's Command line field. Click the checkmark button next to the field to validate the command line. More information on Msiexec options can be found at: http://support.microsoft.com/?kbid=227091.
Property references, also known as public properties, are specific to the MSI file. The parameters are passed to the MSI installation APIs directly. They can be used in the Command line field of an MSI distribution package’s Install/Uninstall options.
The syntax of property references is PROPERTY=VALUE. A common property reference is the Transforms property. This is the property that calls up a .mst (transform) file. More information on property reference parameters can be found at: http://support.microsoft.com/?kbid=230781.
The information on an application’s public properties can be obtained from the software installation documentation, the application's official Web site, or by contacting the software vendor directly.
In Management Suite, running an MSI silently is automatically handled under the Install/Uninstall options for a delivery method. To run an MSI silently, go to the Install/Uninstall options page for the desired delivery method and click Quiet mode, no user interaction.
For many MSI’s, silencing the MSI also automates the installation. In such cases, all you need to do to automate an MSI installation is select Quiet mode, no user interaction in the delivery method.
Sometimes a property reference is required for the installation to complete. In such cases the MSI installer will prompt for a value. During an automated installation, no such prompt will occur. The MSI installation will fail with the standard MSI error 1603, Fatal error during install. Required public properties should be assigned a value in the distribution package’s Command line field.
Answer files for MSI’s are called transform files and end with a .mst extension. Not all MSI installations need a transform file; however, a transform file can be used if there are too many property references that need their values changed or assigned. If supported by the application, an answer file may be created to pass in all property reference parameters.
If a transform file is required but not provided during the installation, error 1603, Fatal error during install, will be the result. Often the software vendor will have the information needed or a tool to create a transform file for their specific MSI. For example, to deploy the volume license version of Microsoft Office 2003, a transform file should be used. Microsoft has a tool called the Custom Installation Wizard that installs as part of the Office 2003 Resource Kit. The Office 2003 Resource Kit can be downloaded from the following web site:
If the vendor doesn't have the needed information or such a tool, Microsoft provides a tool called Orca that can create a transform file. For additional assistance, refer to the Orca help file.
Management Suite handles MSI reboots using the Reboot page in the delivery method properties. LANDesk will automatically pass both the REBOOT=REALLYSUPPRESS and the /NORESTART parameters when Never reboot is selected in the delivery method.
The Always reboot option passes the /FORCESTART parameter.
Reboot only if needed allows the MSI to handle the reboot. If feedback is enabled, the user can be prompted to reboot. It is important to know that MSI's support custom actions. If a custom action initiates a reboot, Management Suite can't prevent this.
If a deployment involves an MSI, follow this checklist.
The Assign return codes dialog box is used to send status back to the core server based on whether or not a distribution task was successful. In the past, Management Suite only read 0 as a success and anything else would be treated as a failure. This would pose issues for administrators as the application may have installed without error, however, because the return code was sent back as a number other than 0, Management Suite would indicate failure.
Vendors maintain lists created by product developers of all possible return codes and the specific outcome that the codes indicate. Now Management Suite has added the ability for administrators to look up return code lists and build templates that can be associated with individual or multiple packages. Each return code can be designated by the administrator to indicate success or failure and send back a custom message indicating specific results of the installation. Management Suite now ships with a Windows installer process for Office 2003 and Office XP templates. For more information on the return codes included in this template go to: http://support.microsoft.com/kb/290158.
In addition to using this feature with third-party vendor applications, return code templates can also be created for proprietary applications written by internal developers. Management Suite provides a default template as well as the ability to create new custom templates, copy the default or custom templates, or make modifications to any templates through the Return code template manager. When templates are created, a specific template can be associated with a specific package on the Assign return codes dialog box through the Package return code mappings window. Modifications to templates can also be made from this location.
Users have the option to add all possible return codes indicating success or failure or only add additional return codes that indicate success. In the instance that only success codes are added, any return codes not referenced in the template are automatically mapped as failures.
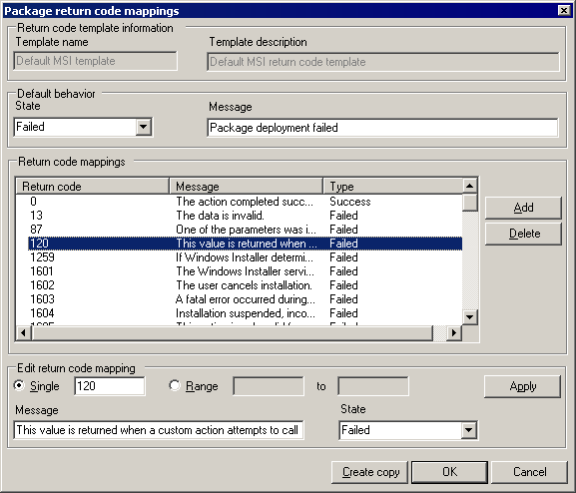
There are two default templates included with Management Suite:
One of these templates is automatically assigned to the distribution package based on its type. You can change the template mapping in a distribution package's properties.
Return code templates are stored in the core database, but you can export templates to an XML file and import them at other servers. If a distribution package is being synchronized through core synchronization, its assigned return code template is part of the synchronization data.
The Software Deployment Portal window is accessible through Desktop Manager on managed devices. The portal lists all software distribution package tasks that have been distributed using a policy based delivery method.
When you launch the portal, it prompts you to wait while it synchronizes with the policy server to refresh the application list. During this time the policy sync is running and downloading any new policies. The required policies aren't displayed on the Software Deployment Portal window and start installing automatically (unless deferred by the end-user). The other tasks are displayed in the Software Deployment Portal window.
The managed device includes a policy invoker service that examines policies that are downloaded. The policy tasks are stored in a small database when retrieved. The invoker service monitors this database and updates that status of policies as they move from one state to another. It also reads the status of policies to determine if an installation needs to take place. The invoker doesn't install packages. It calls the software distribution agent (sdclient.exe), which does the install.
In addition to the policy update that happens when a user opens the Software Deployment Portal, these agent configuration options also affect policy update intervals. An update occurs:
You can change these policy update settings on the agent configuration dialog's Software distribution > Policy Options page.
Once you've deployed the Linux agents, you can distribute software to your Linux devices. The initial Linux agent deployment uses an SSH connection. Once the agents are installed, the core server uses the standard LANDesk agent to communicate with the Linux server and transfer files. To distribute software to a Linux device, you must have Administrator rights.
You can only distribute RPMs to Linux devices. The Linux agents will automatically install each RPM you distribute. The RPM itself isn't stored on the server after installation. You can install and uninstall the RPM you specify using software distribution. You can only use push delivery methods with Linux software distribution. For Linux software distribution, the settings in the push delivery method are ignored, so it doesn't matter which push delivery method you select or what the settings in it are.
The distribution follows this process:
You can store Linux RPMs on HTTP shares. Linux software distribution doesn't support UNC file shares. For HTTP shares, make sure you've enabled directory browsing for that share. If you use an HTTP share on a Windows device other than the core, you need to configure IIS with the correct MIME type for RPM files. Otherwise, the default MIME type IIS uses will cause the RPM to fail to download the file.
Once you've hosted the files on your package share, create a new Linux distribution package in the Distribution packages window, associate it with the delivery method you want, and schedule the delivery.
When you click Save in a Linux package's Distribution package-properties dialog box, software distribution parses the primary RPM and any dependent RPMs you selected for dependencies those RPMs require. These dependencies then appear in the Missing libraries dialog box. Checking a dependency in this dialog box tells software distribution to not prompt you about it again. You can check dependencies you know are installed on managed devices. This dialog box is for your information only. If a dependency is missing on a target device and you didn't specifically include that dependency as a dependent package, the RPM probably won't install successfully.
Software distribution lets you distribute packages to a large number of devices at once. If there is a problem with the package, or the software being deployed conflicts with already existing software, you could cause problems for thousands of devices at once. When planning a deployment using software distribution, take care to not overwhelm the help desk.
Before deploying a new package, test it with some test systems. Ideally, these test systems should include all of the operating systems and applications that are used in your environment. Once the package is deployed, confirm that all of the systems and applications are still working as expected.
Once the package has been validated against test systems, do a limited deployment. Target a small number of devices in your environment. When deciding how many devices to target, the rule of thumb is not to target more devices than your help desk can handle. Once the package has been deployed to these devices, let the software sit for a couple of days to see if users encounter any problems.
After the initial deployment, you can begin rolling out the software to other devices in the enterprise. The speed at which these rollouts occur should be based on the variety of devices the enterprise has and the load your help desk can handle.
Here are some other problems you might encounter:
If the scheduled task indicates that the package can't be located, make sure that the package can be viewed from the device.
If the package is URL-based, you can check to make sure it is accessible by using a Web browser. Remember, if your DNS is set up to resolve the package, you'll need to verify that the package has been distributed to all of the Web servers.
If the package can be viewed from the device but still does not download properly, the problem may be that the URL or UNC based package share doesn't allow anonymous access. Check the permissions on the UNC or URL share and make sure it allows anonymous access. For UNC locations, make sure it has properly been configured as a null session share.
One of the most common problems that can occur is having PDS set up for bandwidth detection. In device setup, one of the common base agent options is to choose between PDS and ICMP for device bandwidth detection. When a device is configured to use PDS for bandwidth detection, it will only detect between RAS and non-RAS connections. So, if you configure a distribution to only work with high speed connection and the package installs on a computer with a WAN connection, check and make sure it is configured to use ICMP and not PDS.