Host Intrusion Prevention System, or HIPS, is an important tool
in the LANDesk
Security Suite and one of the components of Endpoint
Security.
HIPS gives you the ability to protect managed devices from known
and unknown internal malware attacks before they contaminate your
network. HIPS adds an extra layer of protection to your managed
devices by monitoring processes and files and using rules to
determine allowed actions and behaviors. In a sense, HIPS protects
systems from themselves.
HIPS stands for Host-based Intrusion Prevention System. HIPS
provides another layer of protection on top of antivirus,
anti-spyware, patch management and firewall configuration to
prevent malicious activity on your machine. HIPS continuously
monitors specified processes, files, applications, and registry
keys to prevent unauthorized behavior. You control which
applications run on devices and how they are allowed to
execute.
Because it is a rule-based system, instead of a definition-based
system, HIPS is more effective at protecting systems against
zero-day attacks (malicious exploitation of vulnerable code before
patches are available).
Unlike vulnerability detection and remediation, spyware
detection and removal, or antivirus scanning, HIPS protection does
not require ongoing file updates (patch files, definition/pattern
files, or signature database files).
HIPS protects servers and workstations by placing software
agents between applications and the operating system’s kernel.
Using predetermined rules based upon the typical behavior of
malware attacks, these systems evaluate activities such as network
connection requests, attempts to read or write to memory, or
attempts to access specific applications. Behavior known to be good
is allowed, behavior known to be bad is blocked, and suspicious
behavior is flagged for further evaluation.
The HIPS tool and features are accessed from the main console
(Tools > Security > Security Configurations). The HIPS
tool lets you create HIPS agent installation, update, and removal
tasks; configure HIPS settings that can be deployed to targeted
devices you want to protect; and customize HIPS display/interaction
settings that determine how HIPS appears and operates on managed
devices, and which interactive options are available to end users.
You can also view HIPS activity and status information for
protected devices.
Component of Endpoint Security
HIPS is one of the components of the comprehensive Endpoint
Security solution, along with the LANDesk Firewall and Device
Control tools.
Proactive security
HIPS proactively protects your managed devices from by:
Providing kernel-level protection against
applications that would attempt to modify binaries (or any files
you specify) on your machine or application memory of running
processes. It will also block changes to certain areas of the
registry and can detect rootkit processes.
Using memory protection against buffer-overflow and
heap exploits.
Executing protection schemes to keep an attacker from
building and executing code in a data segment.
Watching for unauthorized or unusual file
access.
Offering real-time protection for your computer
without relying on signature databases.
System-level security
HIPS offers the following system-level security:
Kernel-level, rule-based file-system protection
Registry protection
Startup control
Detection of stealth rootkits
Network filtering
Process and file/application certification
File protection rules that restrict actions that
executable programs can perform on specified files
HIPS console features
HIPS provides administrators with the ability to define and
manage separate profiles for different user groups with HIPS
settings. HIPS settings accommodate the needs of any and all user
groups by allowing administrators to create multiple, highly
flexible configurations for different user profiles.
HIPS settings can include custom password protection, WinTrust
handling, protection mode, custom whitelists, network and
application access control policies, file certifications, and file
protection rules.
HIPS client features
The HIPS client gives administrators a powerful new tool for
controlling what applications run on enterprise desktops and
servers, and how those applications are allowed to execute.
HIPS client software uses proven heuristic and
behavior-recognition techniques to recognize typical patterns and
actions of malicious code. For example, a file that attempts to
write to the system registry could be blocked and flagged as
potentially malicious. The HIPS client uses a variety of
proprietary techniques to reliably detect malware even before a
signature has been identified.
Supported device
platforms
HIPS supports many of the same desktop and server platforms
supported by the standard LANDesk-managed device platforms,
including the following operating systems:
Windows 2000 SP2
Windows 2003
Windows 2008
Windows XP SP1
Windows Vista (32-bit, and 64-bit)
NOTE:HIPS is not
supported on core servers or rollup cores
You should not install/deploy HIPS to a core server or a rollup
core. However, you can deploy HIPS on an additional console.
Supported
antivirus products
HIPS is compatible with the LANDesk Security Suite
Antivirus solution as well as several third-party antivirus
products. Compatibility means that HIPS will not interfere with
antivirus processes such as scans, real-time protection, etc.
Make sure the managed devices you want to configure with HIPS
have one of the following antivirus products installed:
LANDesk
Antivirus
Symantec Antivirus (versions 7, 8, 9, 10.1,
10.2)
McAfee VirusScan (versions 7.0, 8.0, 8.5i)
Trend Micro PC-cillin (versions 2005, 2006)
Trend Micro OfficeScan (versions 6.5, 7.3)
Trend Micro ServerProtect (version 5.58)
CA eTrust InoculateIT (version 6.0)
CA eTrust Antivirus (versions 7.0, 7.1, 8.0,
8.1)
ESET NOD32 (version 2.7)
Do not deploy HIPS to devices with any other antivirus
product installed.
HIPS licensing
In order to access the HIPS tool you must first activate your
core server with a HIPS license.
For information about HIPS licensing, contact your reseller, or
visit the LANDesk Web
site.
Role-based administration with HIPS
HIPS, like Patch and Compliance, uses role-based administration
to allow users access to features. Role-based administration is the
access and security framework that lets LANDesk Administrators
restrict user access to tools and devices. Each user is assigned
specific roles and scope that determine which features they can use
and which devices they can manage.
Administrators assign these roles to other users with the Users
tool in the console. HIPS is included in the Security
Configurations right, which appears under the Security rights group
in the Roles dialog box. In order to see and use HIPS features, a
user must be assigned the necessary Security Configurations access
rights.
IMPORTANT:LANDesk
Script Writers group permission required
In order to create scheduled tasks and policies in the Patch and
Compliance tool and the Security Configurations tool (for security
and compliance scan tasks, repair tasks, and change settings
tasks), a user must have the LANDesk Script Writers group
permission. In other words, they must belong to a group that has
the LANDesk Script Writers permission assigned. For more
information about role-based administration, see Role-based administration.
With the Security Configurations right, you can provide users
the ability to:
See and access the Host Intrusion Prevention System
(HIPS) features in the console's Tools menu and Toolbox
Deploy HIPS install or update tasks, and change
settings tasks
View HIPS activity for protected devices
Define HIPS data threshold settings for recording and
displaying HIPS activity
HIPS task workflow
The steps below provide a quick summary outline of the typical
processes or tasks involved in implementing HIPS protection on your
network. All of these procedures are described in detail in
subsequent sections.
Basic steps in implementing and using HIPS:
Configuring managed devices for HIPS protection
(deploying the agent to target devices).
Configuring HIPS options with HIPS settings, such as
signed code handling, protection mode, whitelists (applications
allowed to execute on devices), file certifications, file
protection rules, and end user interactive/options.
Discovering file and application behavior on devices
with the HIPS learn mode.
Enforcing HIPS protection on managed devices
with the HIPS automatic block mode.
Viewing HIPS activity for protected devices.
Configuring devices for HIPS
protection
Before managed devices can be protected from zero-day attacks,
they must have the Endpoint Security agent installed. The Endpoint
Security agent is a single agent service that manages all of the
Endpoint Security components, including HIPS.
You can configure devices for HIPS either during initial device
agent configuration or with a separate installation or update
task.
To install or update HIPS on managed devices via an agent
configuration
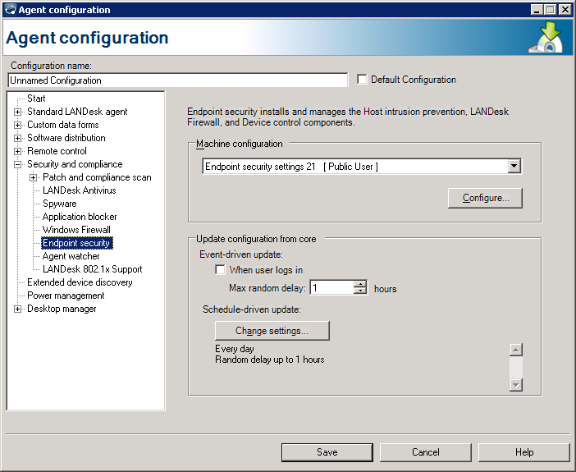
In the console, click Tools > Configuration
> Agent Configuration.
Click the New Windows toolbar button.
After specifying your desired settings for the agent
configuration, you must first click the Start page, and
select the Endpoint Security option under Security.
(This deploys the agent to target devices, but you still need to
select a HIPS settings.)
Now you can access the options on the Endpoint
Security page.
Select one of the settings from the available list to
apply it to the agent configuration you're creating. You can create
new settings or edit existing settings by clicking
Configure. The Endpoint Security settings contain HIPS
settings (among other security component settings). The HIPS
settings determine the following options: whether the HIPS client
is password protected, WinTrust signed code handling, action on
programs added to system startup, buffer overflow protection,
operating mode, whitelists, file certifications, and file
protection rules.
Finish specifying settings for the agent
configuration and then click Save.
If you want to install or update HIPS at a later time, you can
do so as a separate task from the Security Configurations
tool in the console.
To install or update HIPS as a separate task
In the console, click Tools > Security >
Security Configurations.
Click the Create a task toolbar button, and
then click Install/Update security components.
Enter a name for the task.
Specify whether the installation is a scheduled task
or a policy-based task, or both.
Select an Endpoint Security setting from the
available list to apply it to the agent configuration you're
creating. You can create new settings or edit existing settings by
clicking Configure. The Endpoint Security settings contain
HIPS settings (among other security component settings).
If you want to display the installation progress in
the security scanner dialog on targeted devices, select the Show
progress dialog on client option.
Select a Scan and repair setting from the list to
apply its reboot configuration (only) to the agent configuration
you're creating. You can create new settings or edit existing
settings by clicking Configure. Keep in mind that
only the reboot options specified on the Scan and repair
settings you select are used by this agent configuration's Endpoint
Security agent deployment to target devices. You can use an
existing Scan and repair setting that already includes the reboot
configuration you want, or you can create a brand new Scan and
repair setting specifically for your agent deployment.
Click OK.
Removing HIPS from
devices
If you want to remove HIPS from managed devices, you can also do
that as a separate task from the console.
To remove HIPS
In the console, click Tools > Security >
Security Configurations.
Click the Create a task toolbar button, and
then click Remove security components.
Enter a name for the task.
Specify whether the installation is a scheduled task
or a policy-based task, or both.
Select the Endpoint Security component to remove the
agent that includes HIPS.
If you want to display the installation progress in
the security scanner dialog on targeted devices, select the Show
progress dialog on client option.
Select a scan and repair setting from the available
list to apply its reboot configuration to the task you're creating.
You can create new settings or edit existing settings by clicking
Configure. The task will use the selected scan and repair
settings' reboot options only, which determine reboot
requirements and actions on target devices during agent
removal.
Click OK.
Customizing HIPS protection with
HIPS settings
HIPS settings give you complete control over how HIPS operates
on target devices, and which options are available to end
users.
This section describes how to create and manage HIPS
settings:
You can create and apply HIPS settings to a HIPS installation or
update task or to a change settings tasks. You can create as many
HIPS settings as you like. HIPS settings can be designed for a
specific purpose, time, or set of target devices.
To create HIPS settings
In the Security Configurations tool window,
right-click Host Intrusion Prevention, and click
New.
At the General settings page, enter a name for
the HIPS settings, and then specify the general requirements and
actions. For information about an option, see HIPS
settings help.
At the Mode configuration page, select whether
you want to enforce HIPS automatic blocking protection mode, or
learn mode. You can also create a whitelist (applications allowed
to execute on devices) based on the current certified files, and
specify whether you want the whitelist generation to run for a
specified period of time initially and then re-enforce automatic
blocking mode, or continue using learn mode. (NOTE: If you
select learn mode as the general protection mode and want to
generate a whitelist, the enforce automatic mode option is
disabled.)
At the File certifications page, add, modify,
or delete file certifications.
At the File protection rules page, add,
modify, prioritize, or delete file protection rules. HIPS includes
a predefined (default) set of protection rules.
At any of the settings pages, click Save at
any time to save your configured options for the HIPS settings, or
click Cancel to exit the dialog box without saving the
settings.
Once configured, you can deploy HIPS settings to target devices
with an installation or update task, or a change settings task.
Changing default
HIPS settings
The device default HIPS settings are deployed as part of the
initial agent configuration. At some point you may want to change
these default HIPS settings on certain devices. HIPS provides a way
to do this without having to redeploy an entirely new and complete
agent configuration.
To do this, use the Change settings task located in the
drop-down list of the Create a task toolbar button. The
dialog box that appears lets you enter a unique name for the task,
specify whether it is a scheduled task or policy, and either select
an existing HIPS settings as the default or use the Edit
button to create a new HIPS settings as the default for target
devices.
Viewing
device HIPS settings in the inventory
You can discover and/or verify HIPS settings in a device's
Inventory view.
To do this, right-click the selected device, click Inventory
> LANDesk Management
> Host Intrusion Prevention.
HIPS settings help
Use this dialog box to create and edit a HIPS setting. When
creating HIPS settings, you first define the general requirements
and actions, and then add specific file certifications. You can
create as many HIPS settings as you like and edit them at any
time.
If you want to modify the device default HIPS settings without
reinstalling the HIPS agent or redeploying a full agent
configuration, make your changes to any of the options on the HIPS
settings dialog box, assign the new settings to a change settings
task, and then deploy the change settings task to targeted
devices.
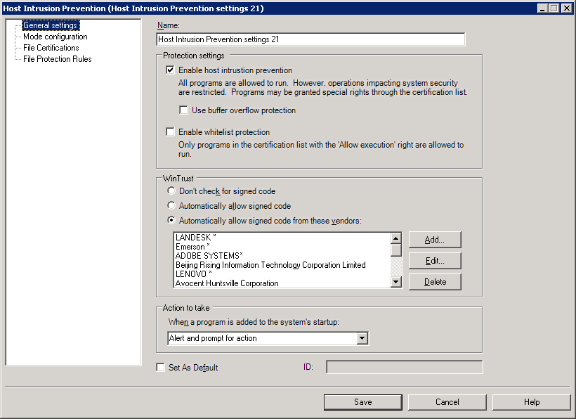
Use this page to configure the general protection settings and
actions for HIPS.
This page contains the following options:
Name: Identifies the HIPS settings with a
unique name. This name appears in the HIPS settings list on an
install or update security components task dialog box.
Protection settings: There are two types of
protection: HIPS and whitelist. You can select one or both. Both
protection types use the same operating mode, which is selected on
the Mode configuration page. (NOTE: There is one exception
to this general protection enforcement. If you specify the Learn
protection mode and have the Whitelist only learning option
selected, whitelist applications only are learned and HIPS
protection is set to the automatic blocking mode.)
Enable HIPS: Turns on HIPS protection. This
allows all programs to run (except when the program operation
threatens system security) as defined by predefined protection
rules. You grant special rights with custom file certifications for
program executables. HIPS protection observes application behavior
(whether the application is allowed to modify another executable,
modify the registry, and so on) and enforces security rules.
Use Buffer Overflow Protection: Protects
devices from system memory exploits that take advantage of a
program or process that is waiting on user input.
NOTE: Buffer Overflow Protection (BOP) can be enabled on a
32-bit Windows device regardless of whether the processor has NX/XD
(No eXecute / eXecute Disable) support. If the processor doesn't
have NX/XD support, it is emulated. However, if the processor has
NX/XD support but it's turned off in either the BIOS or boot
configuration, BOP can't be enabled. Note that the Endpoint
Security client displays whether BOP is enabled or disabled on the
end user device. BOP is not supported on 64-bit Windows devices
because the Kernel Patch Protection (KPP) feature prevents patching
the kernel.
IMPORTANT: We strongly recommend that you first test Buffer
Overflow Protection (BOP) on your specific hardware configurations
before doing a wide-scale deployment to the managed devices on your
network. Some configurations of older processors (prior to Pentium
4 with HT or HyperThreading) running certain Windows OS versions
may not fully support Buffer Overflow Protection.
Enable whitelist protection: Turns on
whitelist protection. This means only those applications whose file
certification has the allow execution option enabled are allowed to
run.
WinTrust: Determines how rights are provided
to digitally signed software. An executable file that is digitally
signed by its publisher is considered trusted, and will show this
digital signature in its file properties dialog box. HIPS allows
rights to digitally signed software based on the option you select
(Don't check for signed code; Automatically allow signed code; or
Automatically allow signed code from these vendors).
Action to take:
Determines the action taken when a program is added to the device's
Startup folder. This option provides a second line of defense for
authorizing processes in the system startup folder. HIPS monitors
the contents of startup and if it finds a new process, it performs
the action you select (Alert and prompt for action; Simply log in
report without alert; or Remove from startup without
alerting).
Set as default: Assigns this setting as the
default setting for tasks that use HIPS settings.
ID: Identifies this particular setting. This
information is stored in the database and can be used to keep track
of each setting.
Save: Saves your changes and closes the dialog
box.
Cancel: Closes the dialog box without saving
your changes.
About the HIPS: Mode
configuration page
Use this page to configure the operating mode of HIPS
protection.
This page contains the following options:
Protection mode: Specifies protection behavior
when security violations occur on managed devices. The protection
mode applies to the protection types selected on the General
settings page.
Automatic: All security violations (software
and system modifications) are automatically blocked. In other
words, all of the file certification rules you've created for
specific files are enforced.
Auto-learn period: Specifies a period of time
during which applications are allowed to run on the end user device
while security rules are enforced. During this period, application
behavior is observed (or learned) and that information is sent back
to the core database. (The maximum auto-learn time period is 5
days. If you want to run auto-learn for a longer period, at the end
of 5 days you can reset the value.)
NOTE: These two time period options are executed
successively. In other words, if both are selected, the auto-learn
period runs first and when it expires, the auto-log period
runs.
Auto-log period: Specifies a period of time
during which applications are allowed to run while security rules
are not enforced. Application behavior, including violations, are
recorded in an action history file.
Learn: All security violations are allowed,
but application behavior is observed (or learned) and that
information is sent back to the core database. Use this mode of
operation to discover application behavior on a specific device or
set of devices, and then use that information to customize your
HIPS policies before deploying them and enforcing HIPS protection
throughout the network.
Whitelist only learning: Only applications
with the whitelist designation (applications whose file
certification has the allow execution option enabled) are allowed
to run and are learned.
Log only: Security violations are logged, but
not blocked.
Block: Security violations are blocked, but
not logged.
Security model devices: Specifies the HIPS
protection mode for a subset of devices that are configured with
the same HIPS settings. You can use this feature to observe or
learn software and system modifications and which applications are
run on a limited group of devices. For example, you could use the
same HIPS settings with the protection mode set to Automatic
blocking mode, but identify a few target devices that you want to
learn from by adding those machines to the security model devices
list with their protection mode set to Learn.
About the HIPS:
File certifications page
Use this page to view and manage file certifications. File
certifications are a set of rights (privileges or authorizations)
that allow and deny certain actions that can be performed by
an application on managed devices.
This page contains the following options:
Certified files: Lists the files that have
certification rights configured for HIPS.
Add: Opens a file explorer dialog box where
you can browse and select a file you want to configure with file
certifications.
Configure: Lets you edit the selected file's
certifications.
Delete: Deletes the selected file and its
certifications.
About the HIPS:
Configure file certification dialog box
Use this dialog box to configure certifications for a specific
application file.
This dialog box contains the following options:
File name: Identifies the application file
that is being assigned certifications.
Full path: Specifies the location of the
file.
File size: Specifies the size (in KB) of the
file.
File date: Indicates the creation date and
time of the file.
Version: Indicates the version number of the
file, if available.
Certified: Indicates the date and time the
file's certifications were created or last modified.
MD5 hash: Shows the file's MD5 hash. A hash
file is used to ensure the integrity of the file.
Description: Provides a text box for you to
enter a description of the file.
Bypass all protection: Allows the application
file complete privileges. The file is completely unfiltered and
unmonitored.
Bypass buffer overflow protection: Allows you
to bypass buffer overflow protection. You will want to use this
option for files (processes) that are certified and that you
trust.
System security
Modify executable files: Allows the
application the right to modify other executable files.
Modify protected files: Allows the application
the right to modify protected files. You can generate a list of
protected files, such as the LANDesk Management Suite
device agents.
Modify protected registry keys: Allows the
application the right to modify protected registry keys. Protected
keys prevent malware infections.
Network security
Send e-mails: Allows the application to send
e-mail messages. (NOTE: HIPS recognizes standard e-mail
client applications and automatically certifies them so that they
can send e-mails.)
Files on disk
Add to system startup: Allows the application
the right to add files to the system startup.
Allow execution: Allows the application
(process) to run on the device. Certified files automatically have
allow execution enabled. Also, if a file's certification provides
partial rights, then the allow execution option is automatically
enabled.
Advanced security rules
Protect application in memory: Enforces
protection for the application as it is running in memory. The
application is protected from termination or modification.
Inherit to child processes: Assigns the same
file certifications (rights) to any subordinate processes executed
by this application. For example, you can use this with a setup or
installation executable to pass the same rights to subsequent
processes launched by the setup program.
Authorized installer: Indicates that the
application is allowed to perform software installation or
deployment. This is the case for the LANDesk Management Suite
software distribution tool, and can be applied to other software
distribution applications as well.
Lock file certification (authorizations will not
be updated via learn mode):
OK: Saves the file certifications and adds it
to the list of certified files in the main HIPS settings dialog
box.
Cancel: Closes the dialog box without saving
the file certifications.
About the HIPS:
File protection rules page
Use this page to view, manage, and prioritize file protection
rules. File protection rules are a set of restrictions that prevent
specified executable programs from performing certain actions
on specified files. With file protection rules, you can
allow or deny access, modification, creation, and execution by any
program on any file.
This dialog box contains the following options:
Protection rules: Lists all of the predefined
(default) file protection rules provided by LANDesk, as well as all
of the file protection rules that you've created.
Rule name: Identifies the file protection
rule.
Restrictions: Displays the specific actions by
programs on files that are restricted by the file protection
rule.
Apply rule to: Displays the executable
programs that are protected by the protection rule.
Move Up \ Down: Determines the priority of the
file protection rule. A file protection rule higher in the list
takes precedence over a rule that is lower in the list. For
example, you could create a rule that restricts a program from
accessing and modifying a certain file or file type, but then
create another rule that allows an exception to that restriction
for one or more named programs. As long as the second rule is
higher in the list of rules, it will take affect.
Reset: Restores the predefined (default) file
protection rules that are provided by LANDesk.
Add: Opens the Configure file protection rule
dialog box where you can add and remove programs and files and
specify the restrictions.
Configure: Opens the Configure file protection
rule dialog box where you can edit an existing file protection
rule.
Delete: Removes the file protection rule from
the database.
NOTE: File protection
rules are stored in the FILEWALL.XML file, located in:
ProgramFiles\Landesk\ManagementSuite\ldlogon\AgentBehaviors\Hips_Behavior.ZIP
About the
HIPS: Configure file protection rule dialog box
Use this page to configure file protection rules.
This dialog box contains the following options:
Rule name: Identifies the file protection rule
with a descriptive name.
Apply rule to
All programs: Specifies that all executable
programs are restricted from performing the actions selected below
on the files specified below.
Programs named: Specifies that only the
executable programs in the list have the restrictions selected
below applied to them.
Add: Lets you choose which programs are
restricted by the file protection rule. You can use filenames and
wildcards.
Edit: Lets you modify the program name.
Delete: Removes the program from the
list.
Restrictions
Deny access: Prevents the programs specified
above from accessing the protected files.
Deny modification: Prevents the programs
specified above from making any changes to the protected
files.
Deny creation: Prevents the programs specified
above from creating the files.
Deny execution: Prevents the programs
specified above from running the protected files.
Exceptions
Allow exceptions for certified programs:
Allows any of the executable programs that currently belong to your
list of certified files to bypass the restrictions associated with
this file protection rule.
Files
Any files: Specifies that all files are
protected from the programs specified above according to their
restrictions.
Files named: Specifies that only the files in
the list are protected.
Add: Lets you choose which file or files are
protected by the rule. You can use filenames or wildcards.
Edit: Lets you modify the file name.
Delete: Removes the file from the list.
Apply to sub-directories too: Enforces the
file protection rules to any subdirectories of a named
directory.
Understanding the HIPS
learn mode
HIPS can run in one of the following protection modes:
Automatic, Learn, Log only, or Block.
Using the HIPS learn mode
Below is a description of the HIPS learn mode process:
In learn mode, HIPS learns what kind of applications
are installed on the device, how they behave, and their rights
(privileges).
HIPS monitors activity on the device and records
information in an action history file.
Action history data is sent from the device to the
core server.
Administrators read the action history to see which
applications are doing what on the device. (The files/applications
and associated rights listed in the action history file (XML) are
displayed in the File certifications page of the HIPS settings
dialog box.)
Administrators can customize HIPS settings to allow
and deny privileges for relevant applications.
Learn mode can be applied to
managed devices generally allowing HIPS violations to occur
until a new HIPS setting is deployed, or learn mode can be applied
initially for a specified period of time in order to discover what
applications are run and their behavior and to create a whitelist
(applications allowed to execute on devices). If the general
protection mode is automatic blocking, you can still use learn mode
to discover application behavior and then re-enforce automatic
blocking mode once the learning period has expired.
Note that both the core server and the managed device must be
operating in learn mode in order for the action history
communication to take place.
Merging HIPS
certifications
You can merge HIPS certified files from one HIPS setting to one
or more other HIPS settings. This lets you update and share
certified file settings quickly and easily.
To merge HIPS certified files
In the Security Configurations tool window,
right-click Host Intrusion Prevention, and click Merge
certified files.
Select a source configuration from the list.
Select whether you want to merge differences in the
certified files or simply replace all certified files.
Select the target configurations.
Click OK.
About the Merge
certified files dialog box
Use this dialog box to configure and execute a merger of HIPS
certified files between one or more HIPS settings.
This dialog box contains the following options:
Source configuration: Specifies the HIPS
settings whose certified files you want to merge with the selected
target configurations.
Merge differences in certified files: Replaces
any common certified files in the target configurations with the
ones in the source configuration, and adds unique certified files
from the source configuration to the target configurations.
Replace certified files: Forces the certified
files in the source configuration to replace all of the files in
the target configurations.
Target configurations: Specifies the target
configurations you want to be merged with the source configuration.
Select targets from the list of available configurations.