Read this chapter for information about:
LANDesk provisioning lets you define all the attributes and features of new devices before they are introduced into your environment. Provisioning uses automation to apply this set of attributes and features to the devices. With provisioning you can reduce downtime and make sure new devices are reliable and predictable when they go into your production environment. You can access the provisioning history of each device to find out when and with what it was provisioned, and, if necessary, return it to a previous state. Provisioning runs on both Windows and Linux; there is no difference in the way you create templates for either operating system.
Provisioning consists of a series of actions to be executed on a target device. Actions are the fundamental unit of provisioning. A template is a collection of actions that are executed in a pre-defined order. LANDesk provides several pre-built provisioning templates to get you started. These are optimized to work with specific hardware configurations, such as several popular Dell and Hewlett-Packard systems. You can combine these provisioning templates with your own master templates, or run these templates with little modification to generically provision a specific Dell- or HP-brand device. You can split the provisioning tasks the way you split the work when setting up a system manually.
Provisioning works equally well on new devices or dynamic devices. You can provision new devices with the precise configuration you require, setting up the configuration before the new device has even arrived. You can use provisioning to reconfigure a device from one purpose to another, changing a device's base function to handle your organization's changing demands.
You can use alerting to let you know when provisioning events occur. For more information, see Using alerts.
The center of provisioning is the agent ldprovision, located in the /ldlogon/provisioning folder. This agent consists of small applications for each action. The agent resides on the target device. It is placed there through a PXE server or a physical boot media such as a USB drive or a CD.
The provisioning process is completed as the agent does the following:
The agent spans any reboots required, immediately moving to the next action after the reboot. Most provisioning work can be done before you receive a new device. You can create a template and create the task for the template to run on the new device. The task will not run until the provisioning agent runs on the new device.
To fully use provisioning, users require two rights: the Provisioning - Schedule right and the Provisioning - Configuration right. Together, these rights let a user create, edit, and schedule provisioning templates. These rights are automatically enabled for any users with Administrator rights, and can be enabled for any users. For more information, see Role-based administration.
Provisioning requires the ability to boot the device prior to putting an operating system on it. This can be accomplished through a PXE server or through a physical boot media (CD or USB drive). PXE is the most convenient way to boot many computers at a time into the same preboot environment. CD or USB drives are highly portable and guarantee that the computer running the preboot environment is the one the administrator intended to provision.
The preboot environment (PE) includes an operating system complete with video, networking, a small inventory scanner, and an agent capable of receiving files and executing commands. This agent executes an imaging tool or scripted install tool to install the OS on the device. The agent initiates the provisioning process. Provisioning supports the Windows and Linux preboot environments.
It is recommended that you install the new operating system using the same type of preboot environment that you are installing. For example, install Windows using the Windows PE and install Linux using the Linux PE. This is because Windows PE does not support EXT2, EXT3, or Reiser file systems, and Linux, though it supports NTFS, may cause problems with misconfiguration, particularly if PXE is isolated from the production network.
You don't need unique boot media for each client system; you can re-use the boot media for other devices.
Provisioning has broader use than OS deployment. While OS deployment can be part of the provisioning process, it is only one part of provisioning. Provisioning encompasses the start-to-finish process of preparing a device for secure usage in your environment. The table below shows how provisioning differs from OS deployment.
| OS deployment | Provisioning |
|---|---|
| Driven from the core | Driven from the target device |
| Work done after device arrives from factory | Most work can be done before device arrives |
| Encompasses only the OS deployment step of the provisioning process. | Comprises the end-to-end sequence of building a device |
| Requires one entire image, which can'tbe broken down | Comprised of smaller templates, which can be modified or swapped out at the template level |
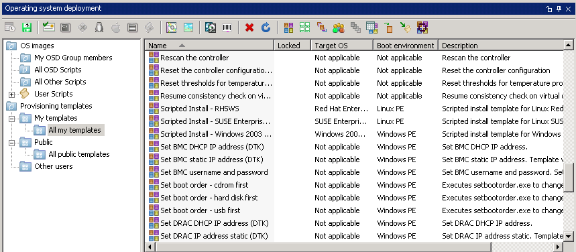
The provisioning tools are a part of the Operating system deployment tool (click Tools > Distribution > OS deployment). A tree structure displays provisioning templates, and a toolbar opens dialog boxes for different tasks.

In the tree structure, available templates are organized in the following folders:
Public templates are created by users with Administrator rights and are viewable by all users. Templates in the My templates folder are visible to others but can only be edited by the template's creator or users with Administrator rights. Each time you use a template not marked public, the instance of the template is locked in history. This instance can't be deleted, but it can be hidden.
The right pane displays the selected folder's templates, with five columns that show the template properties. Double-click a template to view its complete properties, including a list of other templates that include the selected template.
The toolbar includes buttons for creating, modifying, and managing provisioning templates.

If you double-click a template, the Template view opens. From this view, you can modify the action list (add or delete actions, modify the action order, and so forth). You can modify variables applying specifically to this template, view and modify the list of templates included by this template, or the list of templates that include the template. You can make a template public, view its history (when the template was executed), and view or modify the template's XML code.
The New template button is the starting point for creating a new template. To modify a template, right-click the template and select Edit. To remove a template, select it and click the Delete button. You can only delete templates that have never been used.
You can use provisioning groups to organize your templates in ways to suit your needs. For example, you could create groups based on specific vendors, and additional subgroups based on device models. You can create subgroups up to six layers deep.
Once a template has been used, it cannot be changed directly. It can be cloned, and then changed. For this reason we recommend that templates be smaller in nature so that if any changes are required, you can change that one component of the provisioning configuration.
The Clone option makes a copy of the selected template. You can modify the copy, making minor changes to the copy rather than taking the time create an entirely new template.
If you clone a public template, the copy is placed in the My templates folder and acquires the properties of a private template.
Use the Condense button to combine multiple templates into one template. If there are other templates included with the current template, their XML code will be saved within the XML code of the template to create a single XML file. Once you condense a template, it can't be expanded into separate templates again.
On the most basic level, provisioning a device is a simple process consisting of three steps. First, you create a provisioning template, then you configure the template with the features and components you want to install on the device, and then you schedule a task to run the template on the device. These steps are outlined briefly here; detailed instructions are found in the following sections.
To provision a device, you create a template. A template is an XML document with a series of building blocks to be applied to the device. They build upon each other, and can consist of actions, attributes, constraints, and so forth. A template can have one or many actions.
Templates may be chained together in a provisioning task in a particular sequence. You can change the task order in a template. The sequence can be changed where applicable (for example, you can't place a post–OS task before the installation of the OS). There are numerous pre-configured templates for various vendors (HP, Dell, and so forth).
Templates are saved as XML documents in the database.
The name and description are displayed in the list of templates.
Once the template is created, it must be configured by adding actions to it. Template actions are sorted into five sections. You can only select actions in each section that can apply to the section (for example, you can't select Software distribution as an action for the Pre-installation section). You can add any available action to any section, but be aware that some actions will break the template or may render your system unusable if completed in the wrong order.
A provisioning task contains templates and the device identifiers of the target devices. When a provisioning task begins, the job is associated with the device’s Computer record in the database so that the configuration history remains attached to the computer. Configuration tasks can't be reused with different target devices, but can be reused by specifying another device identifier.
The Scheduled tasks tool shows scheduled task status while the task is running and upon completion. The scheduler service has two ways of communicating with devices: Through the standard management agent (which must already be installed on devices), or through a domain-level system account. The account you choose must have the login as a service privilege and you must have specified credentials in the Configure Services utility. For more information on configuring the scheduler account, see Configuring the scheduler service.
When you click Schedule template, a task is created (it has no targeted devices, and it is unscheduled). If you don't add target devices or schedule the task, be aware that the task remains in the task list until you schedule it or delete it.
In the Scheduled tasks tool, tasks are grouped in the following folders:
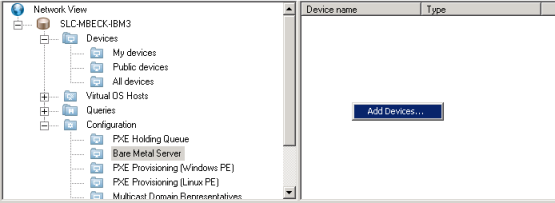
Provisioning lets you provision bare metal devices. You can begin this process before device is physically present. To do so, you enter a hardware identifier (such as the GUID or MAC address) for each new device in the Configuration > Bare Metal Server folder in the network view. The information required by the automated provisioning agent (ldprovision) is recorded in the database.
