Asset Lifecycle Manager includes barcode scanning support for
handheld devices running the Windows Mobile 5 operating system.
With the barcode scanning feature and a supported device, you
can:
Get information about assets by querying on asset tag
or serial number. The asset tab or serial number can be manually
entered or scanned in with the barcode scanner.
Use a supported barcode scanner to update the
location of assets that are in the database.
E-mail the list of assets that were moved to a new
location using the ALM barcode scanner application to the specified
user. The scan results include the number of existing assets that
were updated and the exception report that contains the asset tag
or serial numbers for devices that weren't in the database.
System requirements
Barcode scanning has the following system requirements:
Windows Mobile 5 operating system
Microsoft .NET 2.0 Compact framework
Ethernet network connection to the Asset Lifecycle
Manager server, either hardwired or wireless
For actual barcode scanning you must have hardware
scanner support, such as with a Symbol PocketPC
Installing the barcode software on handhelds
The barcode scanning software is contained in a CAB file on your
Asset Lifecycle Manager server in this folder:
The main CAB file, LANDesk Barcode Scanner.PPC500.CAB, installs
the scanner with English language support. If you want the scanner
software in another language, install the main CAB file and then
the CAB file for the language you want.
The language prefix descriptions are:
LANDesk Barcode Scanner De.PPC500.CAB: German
LANDesk Barcode Scanner Es.PPC500.CAB: Spanish
LANDesk Barcode Scanner Fr.PPC500.CAB: French
LANDesk Barcode Scanner Pt.PPC500.CAB:
Portuguese
LANDesk Barcode Scanner Ru.PPC500.CAB: Russian
To install the software, sync LANDesk Barcode Scanner.PPC500.CAB
and a language CAB (if necessary) to your handheld, and then run
LANDesk Barcode Scanner.PPC500.CAB and the language CAB.
Configuring the barcode software
You can launch the main barcode executable from the start menu
or from:
The scanner won't work without a network connection to the Asset
Lifecycle Management Server. Once the scanner launches for the
first time you must configure it.
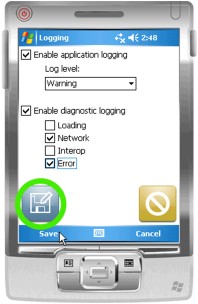
Below is the configuration screen with the Save button
circled.
To configure the scanner
Launch the scanner if it isn't already running.
Click the Configuration button.
Enter the ALM server name.
Enter the User name and Password. These
credentials must be an Active Directory user with at least read
rights in ALM and a scope that includes the necessary assets.
Click the Save button.
You can also configure scanner logging in this screen:
To configure scanner logging
Launch the scanner if it isn't already running.
Click the Configuration button.
Click the Logging button.
Check Enable application logging if you want
it and select the log level.
Check Enable diagnostic logging if you want it
and check what you want logged.
Click the Save button.
Do a soft reset to activate logging.
After you configure the barcode scanner for the first time, it
downloads the list of available locations from the Asset Lifecycle
Manager database. If the asset is currently in the handheld user's
scope, the handheld user can change the asset's location to any
available location.
Using the barcode scanner to change the location of assets by
scanning asset tags or serial numbers
Once you've configured the barcode software on the handheld, you
can start using it to update the location of assets by scanning
asset tags or serial numbers. The barcode scanner does this in
batches that are called inventory sets. An inventory set is one
session's worth of scanning. The scanner doesn't send each scan to
the server as it happens. Instead, the scanner collects scan data
until you're ready to submit it all at once. The user creates an
inventory set that contains the location that the user wants to
move the assets to, and then scans in all the devices that should
be updated with this location.
Once all the devices are scanned in, the user submits the
inventory set to the ALM server which updates the location for all
the assets in the ALM database. The purpose of this feature is to
keep the location information for assets up to date. The IT
administrator can periodically scan assets and update their
location to keep this location information up to date. Assets can
often be moved to new locations without the IT administrator
knowing. When the barcode email and exception reports are enabled,
the IT administrator can also receive email updates with a list of
assets that have changed location and the IT assets that were
scanned that do not exist in the ALM database.
Keep in mind that the barcode scanner only searches for existing
asset records based on two fields: the asset tag and the serial
number. These two fields are defaults on an asset form. The barcode
scanner matches the first occurrence of a matching asset. If there
are duplicates, only the first occurrence will get updated.
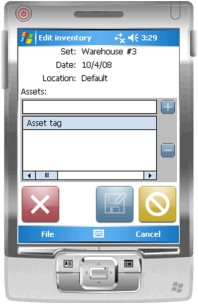
This is the asset entry screen:
To scan asset tags or serial numbers
Launch the scanner if it isn't already running.
Click the Manage inventory button.
Click the New inventory set button.
Enter a Name for the inventory set.
Select a Location. This is the list of
locations provided by the Asset Lifecycle Manager server.
Enter a Date.
Click the Save button.
Click the Edit inventory set button.
You're now ready to scan assets. You can either press
the physical scan button on the handheld or you can manually type
in the alphanumeric asset tag or serial number.
Once you've scanned the assets you want in the
inventory set, click the Save button.
Click the Send inventory set button to send
the set to the Asset Lifecycle Management server.
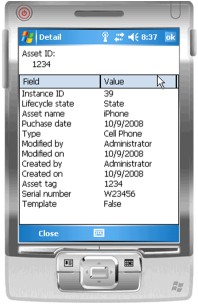
Using the barcode scanner to view asset records
You can use the barcode scanner to view the information for
asset records.
To search for individual asset records
Launch the scanner if it isn't already running.
Click the Find asset button.
Scan or enter the barcode you want to search
for.
If there's a match, fields from the asset that are
populated with data will be displayed (we do not display data from
the table control or multi-contact controls on the asset).
Click Close when you're done looking at the
record.
This is a sample asset record:
Sending an e-mail with barcode scan status and exception
reports
You can configure Asset Lifecycle Manager to send an e-mail for
each inventory set. The e-mail template you select determines the
e-mail content. We recommend you use the "Barcode exceptions"
e-mail template, which includes the following information:
Username configured on the device doing the
scanning
Location the assets were scanned into
Scan date
The number of assets that were and weren't found in
the database
The barcodes for assets that weren't found in the
database
A link to the Web console report for this inventory
set
To configure the inventory set status e-mail address
Click Tools > Settings.
Click the Barcode tab.
Check the Send e-mail box.
Choose an e-mail template. There is an e-mail
template created for barcode exceptions. Expand the system folder,
select Barcode exceptions. This template contains links to
the barcode exception reports.
Choose the Active Directory contacts that you want to
receive the e-mail.