Using the Report wizard, there are many customization options
you can choose from before executing the report. The Report wizard
walks you step-by-step through each of these settings and makes it
easy to generate the exact kind of report you want. Because you may
want to run the same report on a regular basis, the Report wizard
lets you assign a name to the report and then save the settings so
you can re-use it any time.
Generating a basic report
The following example demonstrates how to modify reports using
the Report wizard. It is based on an asset repository that includes
standard asset data for a company's desktop computers, including
manufacturer, model, serial number, processor, location, cost,
purchase date, etc. We will use this example first to generate a
basic report, and then walk through the different steps and
introduce some of the options for further customizing reports.
Finally, we will show how to use reports to quickly perform both
single-record updates and bulk updates to the repository.
NOTE: Since several
of the illustrations below are based on testing data and not on
actual data from your repository, the scenario described in these
examples is only hypothetical. You would need to have the same or
similar data in your asset repository in order to generate the
exact reports described below. In addition, most of the steps below
are not necessary for many types of reports. The purpose of the
examples below is to give you a basic understanding of how the
Reports wizard works and describe a few of the customization
capabilities you can use.
Before doing any special filtering or other customization, we'll
generate a full report for the company's desktop computers.
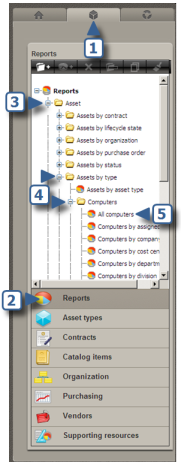
Select the Asset tab or the Process
tab.
Click Reports to open the Reports Explorer in
the navigation pane.
Click to expand the Asset folder in the
Reports Explorer.
Expand Assets by type, then expand
Computers.
Select the report template for All
computers.
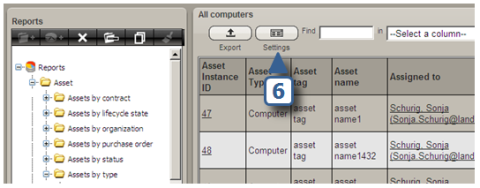
The Report wizard generates a report based on the current settings
for that report, which is for all desktop computers at any of the
company's offices, regardless of their current lifecycle state. The
report also shows the Asset ID, name, tag, manufacturer, owner, and
cost.
Click Settings to open the
Report wizard and make some changes to the settings.
The Report wizard opens. When using the Report wizard, if you are
editing or viewing the settings for an existing report, the wizard
goes directly to the Columns pane. When you are creating a
new report, the wizard begins at the General pane.
General pane
Click General to open the General report
settings pane.
The General report settings pane is used to assign a name to
the report and to select a report view. The Available report
views window is also displayed, but is dimmed because a view
has already been selected.
Type the name you want to assign to the report.
Columns pane
Click Columns to open the Columns pane.
The Columns pane lets you choose which columns (fields in the asset
records) you want to include in the report. The Available Columns
list includes columns you can add to the report. The right column
lists the columns that are currently included in the report
display. We don't need to include the Asset Type and Asset tag
fields, so we can remove them.
Select Asset Type and Asset tag in the
Display columns list.
Click [ < ] to remove them from the
Display columns list.
Filters pane
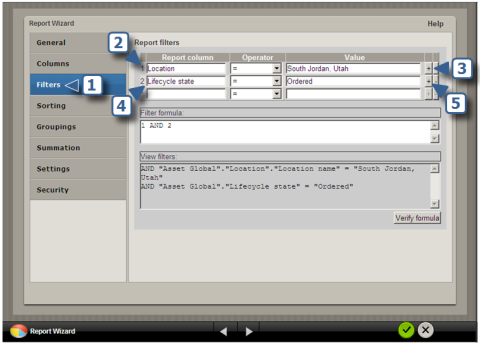
Click Filters to open the Filters
pane.
The Filters pane lets you focus the information you gather
by only including the data that is relevant to what you want to
show in the report. For this exercise we want to include only computers that are currently on order
for the South Jordan office.
In the Report
filters area, on row 1, select Location for the
Report column, [=] for the Operator, and
South Jordan for the Value.
Click the [+] button to add the formula to the
filter.
You can include additional or alternate filters by inserting
them as you create the formula. The example below would list all
laptops that are currently on order for the Los Angeles office, and
those that are either on order or available in Denver.
You can click the Verify formula button to check whether
your formula is valid.
On row 2 in the Report filters area, select
Lifecycle state for the Report column, [=] for
the Operator, and Ordered for the Value.
Click the [+] button to add the formula to the
filter.
NOTE: If users who
are unfamiliar with database syntax are given rights to create,
modify, or run reports, they may need to be reminded to expect or
use "1" for True and "0" for False when interpreting report values
generated from the database or when responding to user prompts that
appear during report generation. For example, a checkbox that has
been selected equals 1 (or "True") in the database; an empty
checkbox represents 0 (or "False") in the database record.
Sorting pane
Click Sorting to open the Sorting
pane.
We want to arrange the report so that the items are sorted by cost
and listed in descending order.
Select Cost in the Columns box.
Select Descending in the Sort order
box.
Groupings Pane
Click Groupings to open the Groupings
pane.
We want the data to be grouped by Manufacturer. Since the data
includes several different manufacturers, this will result in
separate reports for each manufacturer. Because the report data is
grouped, ALM will also include a bar chart and a pie chart when the
report is generated. To create a single report that does not group
by manufacturers, skip this section and move directly to the
Summation pane.
Specify Manufacturer name in the
Grouping text box.
Summation pane
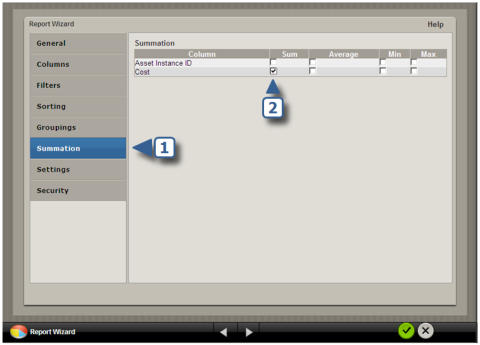
Click Summation to open the Summation
pane.
The Summation pane lets you choose options for the summary page of
the report. We will set the report to include a summation total for
the Cost column.
For the Cost column, click the checkbox for
Sum.
Settings pane
Click Settings to open the Settings
pane.
The Settings pane gives you several options that make it easy to
view and update the data in the repository directly from a report
you have generated.
Allow links adds a hypertext link on the main
report page for any columns you want to include. In the generated
report, you will be able to click on any underlined field for which you checked
the Allow links checkbox, and jump directly to that asset
record to view the data, or with rights, to edit it.
Allow bulk update
makes it easy to make changes to a given data field for multiple
asset records. For example, you can change all records you specify
from "Ordered" to "Received". In the "Allow bulk update" section,
checkboxes that are shaded gray (as "Asset Instance ID" above)
represent fields for which the bulk update feature is not
available; these fields cannot be bulk updated because of their
subordinate relationship to a parent field. Only controls at the
main (or "parent") level are available for bulk updating.
To include a button to quickly make a state change to
data on a generated report, you can click the arrow next to Show
change state buttons for column, specify the column in which
you want to make the change, and then specify the new state. You
can also define your own button label to more clearly identify the
change that will be made.
In the Allow
links area, select Asset Instance ID, Location
name, and Manufacturer name.
In the Allow bulk
update area, select Asset name, Lifecycle state,
and Location name.
Security pane
Click Security to
open the Security pane.
The Security pane lets you assign rights to read or modify the
report based on user IDs, group names, or roles you have previously
assigned. See Asset Lifecycle Manager
roles for more information.
Click
Add contact to choose additional users, groups, or
roles.
Select the
type of rights you want to allow to different types of users,
groups, or roles. Click [-] to remove a role
completely.
Make any necessary
changes to set the desired permissions for the report. When all
options are set the way you want them, the report is ready to be
executed.
Click the green
checkmark button to generate the report.
Understanding the Report Data
In the example described above, we generated reports that
included the following criteria:
The report data was defined based on the All
computers template.
We removed two columns, Asset type and
Asset tag, from the existing report settings.
We indicated that we only wanted to show computers
that are currently on order for the Los Angeles office.
We sorted the report data by Cost and in
Descending order (most expensive at the top).
We grouped the data by Manufacturer. This
resulted in separate reports for each manufacturer. The different
reports are listed on the summation page.
We specified that the summation page would list the
total cost of the computers in each report.
We specified three fields to include hyperlinks to go
directly to the asset record and three other fields that will let
us do an instant "bulk update" directly from the reports to the
asset repository.
We assigned role-based (read and modify) rights for
access to the reports.
Summation page - one report for each manufacturer
Click
Settings to return to the wizard if you want to make any
changes to the report.
Grouping
by Manufacturer name resulted in a separate report for each
manufacturer.
Click on
the name for the report you want to view.
Because
the report data is grouped, you can click the graph icons to
display a bar graph or a pie chart that summarizes the data in the
report.
You can
also print reports, graphs, and pie charts.
Settings
on the Summation pane requested that the total cost be
calculated for each group’s report.
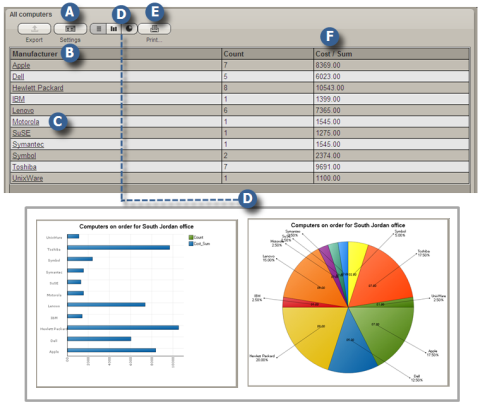
Generated report
Each individual manufacturer report includes the requested data,
which has been arranged, sorted, and displayed based on the
specified settings. To create a single report that does not group
by manufacturers, skip the settings on the Groupings
pane.
Summary
report for all computers for the South Jordan office, that are
currently on order, sorted in descending order by price.
We
specified that the report allow the bulk update option.
By
selecting the items that have been received, their records can all
be updated at once in the repository.
Underlined
data fields are hyperlinks that jump directly to the asset
record.