LANDesk Asset Lifecycle Manager includes a number of innovative features that are made possible by the structured asset repository. Once you understand these features and begin to put them to work, you'll find that they help you to plan and proactively manage your organization's assets in ways that have been either impractical or impossible using other software tools or methods.
In other sections of this guide, you are introduced to the Asset Content pack and how the structure of the asset repository lets you identify and keep track of assets, the relationships assets have with other assets, as well as with supporting resources, people, and the organization itself. But all of this data and information would be of little value if it wasn't easily accessible throughout the asset's lifecycle.
The following pages introduce you to some of the core features of LANDesk Asset Lifecycle Manager that open up new ways of understanding and using the extensive asset data available via your asset repository. These tools are accessed from the Features tabs in the Web console, which appear in the display pane when you are viewing an asset record.

|
The Features tabs are available on all Asset forms, and are used to access features that give you additional tools for managing your IT assets. The next few pages provide an overview of each of the tools on these Features tabs. |
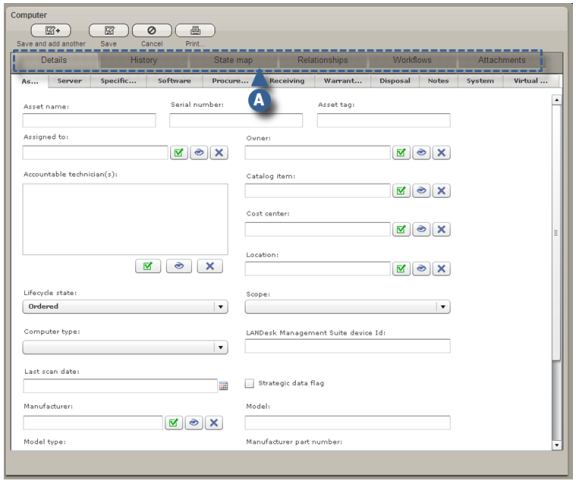
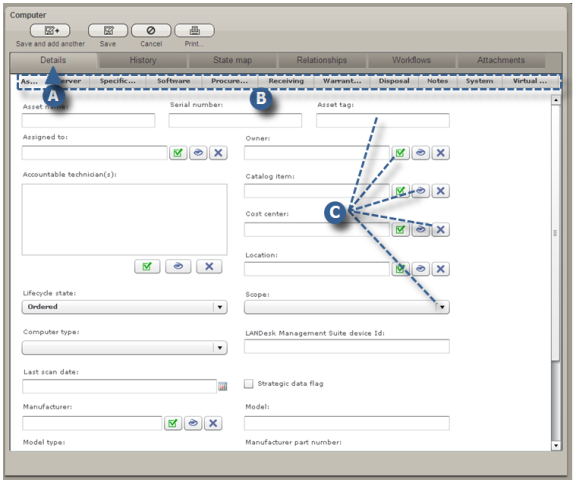
The asset record's Details tab is the active tab in the illustration below. This tab displays the details for the asset record, and is the default view for all assets and supporting resources.
|
|
The Details tab is the default view for asset forms, and includes fields for all details you want to track in the asset repository. |

|
Form tabs are used to help group and categorize data fields on ALM forms. |

|
There are a number of different types of fields and controls available on asset forms. Only a few of these are represented here. See Understanding ALM data forms in this guide. |
The History tab lists any changes made to the data for the selected asset, based on the current audit history settings configured in the Design console.
|
|
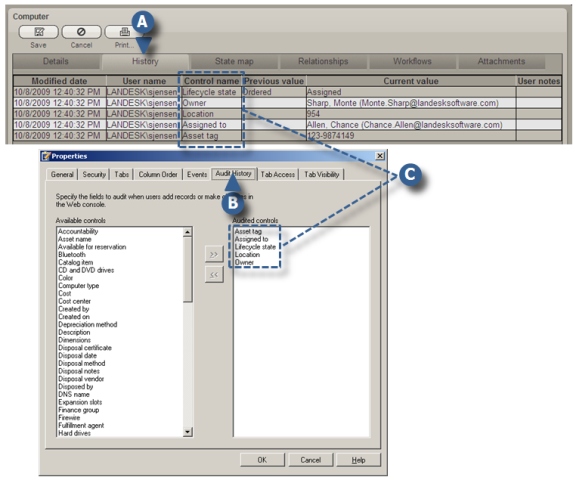
The History tab displays the audit history of changes made to an asset record, including the date and time when the changes were made, the user who made the changes, the name of the field, the previous and current values, and any comments from the person who made the changes. |
|
|
To change audit history settings, you need to be logged in to the Design console with the asset form open in the form designer. Then click Properties > Audit History and select the controls you want to audit. . |
|
|
In this example, five fields are set to be audited: Asset tag, Assigned to, Lifecycle state, Location, and Owner. |
State transition mapping is not unique to LANDesk Asset Lifecycle Manager, but the innovative ways in which it is implemented are. With ALM's state transition management feature, you can require that certain data be provided or that the necessary approvals be given for any given state change—and then, once those requirements are satisfied, the program automatically triggers actions and processes based on those changes. By doing so, the state transition engine blends process discipline with efficient and timely updates to the repository, which ensures both that accepted practices are followed and that asset and transition data are kept up to date.
|
|
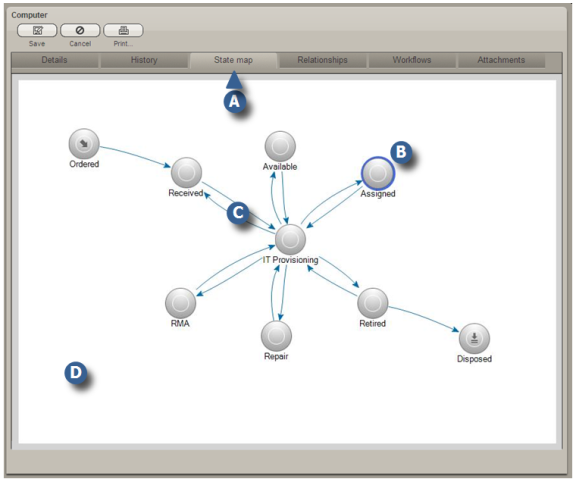
The State Map tab opens the viewer for the selected asset’s state transition map. This viewer shows the various states, along with the lifecycle transition path, that have been defined for the asset. |
|
|
The highlighted icon indicates that this asset is currently in the Assigned state. |
|
|
The arrows indicate the direction in which the asset can “travel” throughout its lifecycle between initial order and final disposal. |

|
In this example, the asset can move from Ordered to Received, and then to IT Provisioning. From there it could move to Available, Assigned, RMA, etc., but could not move from Assigned to Repair, Retired, or Available without passing through IT Provisioning. |
State Transition Maps are defined in the Design console, where you can also specify required fields and assign workflows to be automatically triggered by state changes.
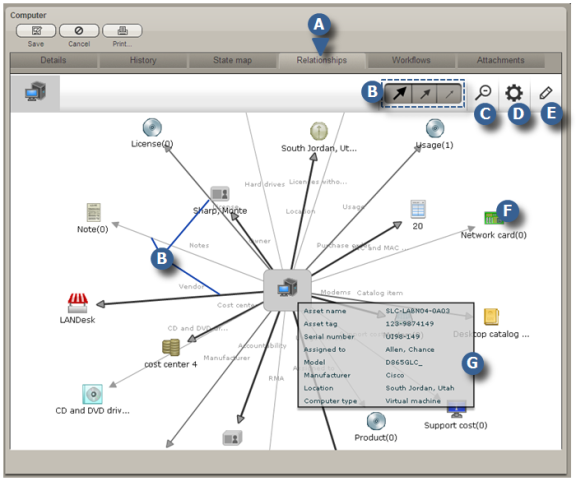
There are many relationships that can be identified between assets and supporting resources in a typical organization. Assets can have ties to other assets, to people, to cost centers, vendors, contracts, functional groups, geographic locations, and so on. To fully understand an asset and its value to the organization, and to be able to plan and manage IT resources effectively, it is helpful to be able to quickly see and understand what these relationships are. Asset Lifecycle Manager's Relationship viewer gives you a quick "at-a-glance" view of assets and their relationships to other assets and resources. It also lets you drill down and get more information on any object or entity in the relationship.
|
|
The Relationships tab opens the Relationships viewer. This feature finds all identified relationships for a given asset or resource and displays a graphical representation of how they are related. |
|
|
Thickness of arrows indicates High, Medium, or Low filter. |
|
|
Zoom/Magnify |
|
|
View the selected objects's attributes. |

|
Edit asset details. |

|
Drag any object to reposition the map. |

|
Hover over any object to display details in a popup window. |
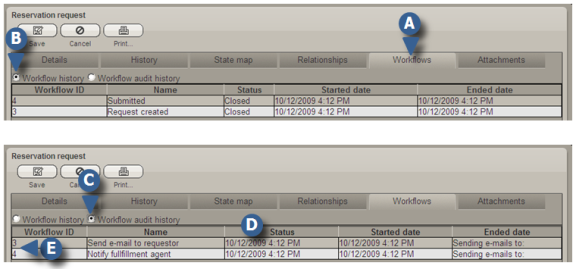
Using the Design console, you can configure a workflow to be triggered when a new asset instance is created, or when an existing asset instance is modified. In addition, in the state transition map for the asset, you can assign a particular workflow to be triggered if an asset reaches a certain state, such as when a laptop computer needs to be sent for repair. In this way, a complete workflow history can be kept throughout the lifecycle of an asset. The Workflows tab includes options for showing the audit history of workflows currently in progress, as well as for showing the audit history of individual actions included in those workflows.
|
|
The Workflows tab lets you view the status of any workflows connected to the selected instance, along with summary information. |
|
|
Click Workflow history to see the progress of workflows connected to the instance you are looking at. |
|
|
Click Workflow audit history to see the progress of individual actions within any workflows connected to the instance you are looking at. |
|
|
Actions status |
|
|
The Workflow ID is a unique number assigned by the system when the workflow was executed. You can drill down for more details by double-clicking this workflow ID. |
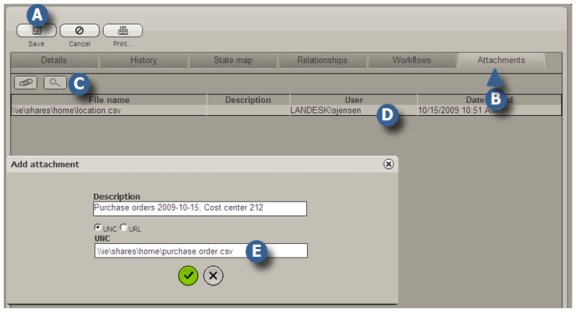
You likely have collections of electronic documents related to your assets, such as contracts, warranties, purchase orders, and so on. Often these documents are stored in multiple locations with different groups, departments, or cost centers, and may be difficult or impossible to find when you need them. The Attachments feature makes it easy for you to create a hyperlink to such documents so they can be accessed while viewing or editing the asset record.
|
|
If you have added new data or made changes, click Save before adding an attachment. |
|
|
The Attachments tab lets you attach relevant documents to an asset instance; for example, a contract, purchase order, lease agreement, warranty, or even a web page. |
|
|
After selecting a file in the Instance list, click here to open and view the file. |
|
|
The Instance list shows any documents that were previously attached to the asset record. |
|
|
Use a UNC path or URL to link to the file or web page. |