
Depending on rights assigned, users who log in to the Web console will see the contents of the Home tab, which includes the Requests panel, the Request status panel, and the Tasks panel. Clicking any of the panels displays its available options in the display pane to the right.
The Web console can be opened directly from the Tools menu in the Design console. However, since generally only a few individuals will have access to the Design console, most users would access the Web console via a web browser at http://localhost/ServiceManagement/Home.aspx.
What a user sees when they log in to the Web console is dependent on what roles they have been assigned. This is a key concept you need to understand, as it has significant impact on how the product works, what it looks like, what is available and accessible to different users, etc. For more information on this topic, see Asset Lifecycle Manager roles or see "Configuring Roles" in the Designer's Guide.
For example, if a user has been assigned the Requester role, up to five different request forms are displayed in the Request menu panel. If not, the request forms will be hidden. In this way, the Asset Manager can determine exactly who sees what, and which individual users or groups have access to which forms, reports, etc. A user may be assigned roles that also allow them to see the Asset tab, the Process tab, and/or the Synchronization tab. Depending on the role assigned, they may be able to see forms, edit the data in them, run reports, create or make changes to reports, and access the Synchronization features.
Users with access to the Home tab can submit Requests, open the Request status panel to check the status of requests they have made, or open the Tasks panel to see if they have any pending workflow-related assignments (approval requests, forms to fill in, or manual tasks). When viewing the Home tab, the display pane on the right reflects which button has been selected in the left pane.
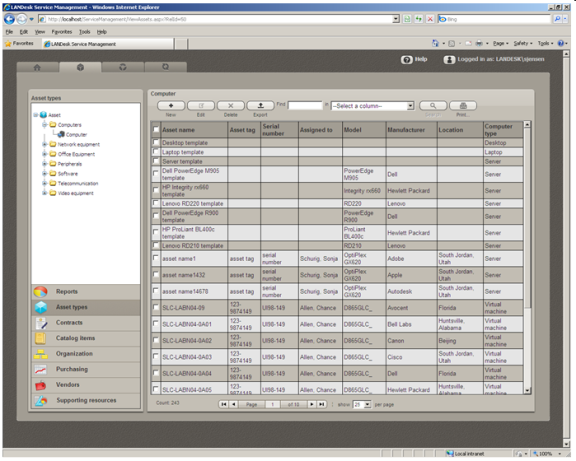
The Asset tab includes a navigation pane with a tree view on the left and a display pane on the right. The contents of the display pane depend on which item is selected in the navigation pane. In this example, Asset types has been selected and the display pane shows the Instance list for Computers. The Instance list shows several available templates, followed by a listing of all computer assets currently in the asset repository.
Like the Asset tab, the Process tab includes a navigation pane with a tree view on the left and a display pane on the right. In this example, the Forms panel has been opened and a new instance of a catalog item is being created.


|
Select the record |

|
View the selected record |

|
Clear the selected record |
The Synchronization tab is used to create, edit, delete, run, import, or export synchronization tasks. You can also use it to check the status of existing synchronization tasks, or to review pending imports and approve or ignore individual records flagged during a sync job. Completed synchronization tasks also include log files which you can use to troubleshoot synchronizations that may not have returned the results you were expecting.

When either the Asset tab or the Process tab is selected, the navigation pane displays a tree view and a set of buttons that open various panels. The tree view and the panels shown in these illustrations and elsewhere in this guide are populated with the forms, resources, and reports that are included in the Asset Content pack that is included with Asset Lifecycle Manager. See Asset Content pack for details.
|
|
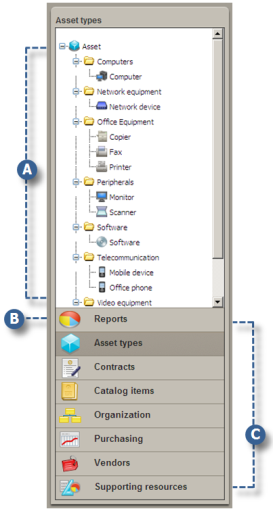
With Asset types selected, the tree view displays a list of available asset categories and types |
|
|
Reports wizard |
|
|
Click an item to display the available options in the tree view above |
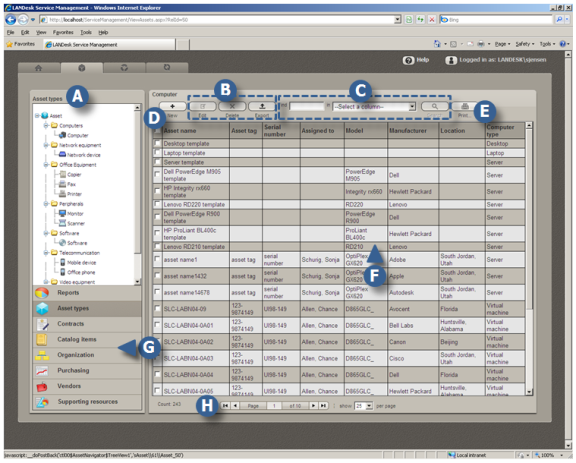
The display pane includes a number of options, depending on the type of item you select in the navigation pane. For example, when you select an asset type in the navigation pane at left, this displays a list of instances of that asset. You can then create new instances, edit existing instances, or delete, export, or search for instances. In the example below, several instances of desktop computers are listed.
|
|
Click an asset type to open the Instance list. |
|
|
You can also Edit, Delete, or Export an existing instance. |
|
|
To search, type a keyword, select the column to search in, and click Search. |

|
Create a new instance. |

|
Print one or more pages of asset instances. |

|
The Instance list displays a summary of all instances for the asset or resource you selected. |

|
Click a button to display filtered lists for specific resources. |

|
Page navigation options enable you to move quickly between pages. |