Directory Services

Configuring DSML Services for Windows

To Configure DSML Services for Windows
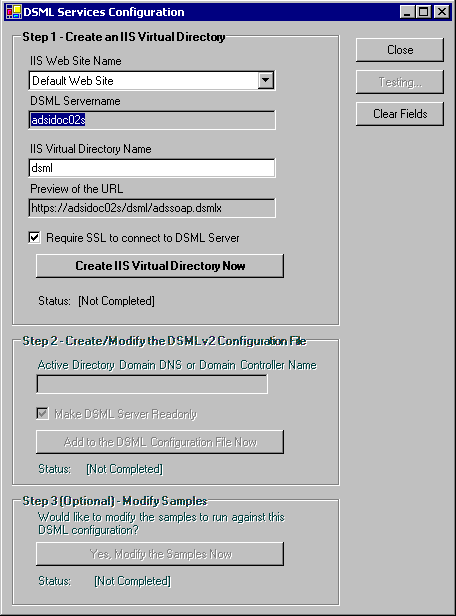
  1. Click the Start button, and then point to All Programs. Point to DSML Services for Windows, and then click Configuring DSML Services. This will start the DSML Services Configuration application.

    DSML Services Configuration Dialog Box

  2. The IIS Web Site Name will default to Default Web Site. The IIS Virtual Directory Name will default to dsml. The Require SSL to connect to DSML Server check box will be selected. Click Create IIS Virtual Directory Now.
  3. The Active Directory Domain DNS or Domain Controller Name defaults to the name of the Active Directory domain, which in this example is fabrikam.com. Click Add to the DSML Configuration File Now.

    This can be changed to the DNS name of an Active Directory server if you want all DSML requests to be handled by a specific computer. For example, if the Active Directory server name is testnet01 and the domain name is fabrikam.com, then typing testnet01.fabrikam.com in the text box will direct all DSML requests to this Active Directory server.

  4. DSML Services for Windows includes several sample ASP pages that demonstrate various DSML V2 commands. Click Yes, Modify the Samples Now to modify the sample pages to match the current configuration.
  5. A Launch the samples Now? dialog box will appear. Click Yes to open the samples Web page. Click No if you do not want to run the samples Web page at the current time.
  6. Click Testing to test the DSML Services for Windows configuration. This opens an HTTP connection to the IIS server, sends a SOAP message with an empty DMSL payload, and checks the response to confirm that the connection is working properly. If the SOAP/DSML connection is not working properly, an error message will display.
  7. Click Close to exit the configuration application.